This tutorial shows you how to create a JavaScript Remote Form (web form) so you can view a picture database in a web browser on your desktop, or on a mobile device, such as a phone or tablet. The sample database provided contains sample client designs for a fictional design company including TV program identities, music album covers, and book jackets. You could, however, use the application to store any type of picture data, such as a library of your own favorite books or photos. To use the application for your own data, you need to work through the tutorial to create the application (library file) and then create your own database file.
To complete the Tutorial you must use Omnis Studio 12 which you can download from the Omnis Studio website: see below.
The tutorial shows you how to create the Omnis class structure required to match the data structure in an existing database (a SQLite database file available in the zip download), and how to create a JavaScript Remote Form using a wizard, to browse the data in a web browser, either on a desktop computer or a mobile device. That part of the tutorial will take you less than an hour to complete.
Other optional parts of the tutorial show you how to create a database session and remote form from scratch and will take a little longer, but you can pause at any stage and return to those parts at a later time, as long as you remember to open the database session using the SQL Browser each time you start Omnis Studio.
If you haven’t already done so, you need to download the development version of Omnis Studio 12. For this tutorial, you can use the Full or Trial (free for 90 days) version of the Studio Professional Edition, or the free Community Edition, which can be activated when you first start Omnis Studio.
The following software download can be run as the Professional Edition, Trial Edition, or as the Community Edition. Depending on your preferred operating system you can choose between macOS and Windows. Or you can try both, as a Studio license is valid for both platforms.
The following instructions are for using the Trial or Community edition license, which may be suitable if you are evaluating Omnis Studio, but the information also applies if you have purchased a full Studio Pro Edition license.
On Windows, run the installer, installing Omnis Studio 12 into a new folder.
On macOS, drag the downloaded file into your Applications folder.
Start Omnis Studio and in the Registration dialog click on the Create / Sign-in button. This will open a web browser tab containing the Omnis Licensing dashboard.
In your web browser you need to create your Omnis ID account. For this you can use your own email and password, or you can check the email link option to log in without a password. Alternatively, you can use a Single-Sign On account from Google, Microsoft, etc. At this point, your web browser will close automatically.
Finally, you need to switch back to the Registration dialog in Omnis Studio. Select the Studio Trial or Community Edition license (or Full license if you have purchased one), choose your country (for Community Edition only), then you must read and accept the EULA, and click on the Start or Activate button.
See the Omnis Studio Licensing section for full details and help about licensing and activating your software, and for details about licensing your applications for deployment.
To work through the tutorial, you will also need to download and extract the project files from the following archive:
The archive contains a SQLite database file called Pics.db (the Pics.db-journal file is also required), and a PNG image file.
Place the files from the zip in the \welcome\tutorial folder in the writable part of the Omnis tree you installed. Alternatively, you can place the tutorial files on your Desktop or Documents folder.
On Windows, you will find the ‘tutorial’ folder in the writable part of your Omnis installation, found in the ‘AppData\Local’ folder, for example:
C:\Users\<username>\AppData\Local\Omnis Software\ Omnis Studio <version>\welcome\tutorial
To find the ‘AppData\Local’ folder, you may need to enable hidden folders in the Windows File Manager and then navigate to the Omnis folder via Users\<username>\AppData\Local.
On macOS, you will find the Omnis files, including the ‘tutorial’ folder, in the Application Support folder, for example:
/Users/<username>/Library/Application Support/Omnis/Omnis Studio <version>/welcome/tutorial
To find the Application Support folder, click on the Go menu in the macOS Finder, then hold down the Option key and select the Library option. There you will find the 'Application Support' folder and within that the 'Omnis' folder.
If you are using the Professional Edition (or the free trial), you can open and examine the libraries in the final folder in the ‘\welcome\tutorial\’ folder in the Omnis folder; note you cannot open these libraries in the Community Edition.
The PICS.LBS library in the final folder contains the same classes as covered in this tutorial. The PICS2.LBS library has the same classes with some extra classes, including a Query class, a Report class, and a Menu class that enhance the Desktop aspects of the application. You can open these libraries and examine the code in both, or you can copy code from these into your tutorial library to save time when completing the different exercises.
In this tutorial, all mouse and key combinations are given in shorthand for all supported platforms, with the Windows shortcut first. So "Press Ctrl/Cmnd-T" means you press Ctrl-T under Windows, or press Cmnd-T on macOS. Similarly, "Press F2/Cmnd-2" means you press the F2 key under Windows, or press Cmnd-2 on macOS, or if your keyboard has function keys you can use Fn+F2 on macOS.
Many of the design tools and class editors in Omnis have Context Menus that provide useful options that speed up development and navigation. To show a context menu, when using a two-button mouse or trackpad, click the Right button on the window or editor and select an option, or when using a single button pointer, hold down the Ctrl button and click the pointer; both these methods will be described in the tutorial as a “Right-click”.
To create an Omnis Studio application, you need to use the Development version. Once you have created your web or mobile app, you would run it in conjunction with the App Server version of Omnis Studio for which you need separate end-user client licenses (a free Web license is provided with the Community Edition). The Development version has all the design editors and debugging facilities that you need to help you build an application, but also allows you to test your application in a browser in “runtime mode” as you build it, without having to compile your app. During this tutorial, you will be using the Development version.
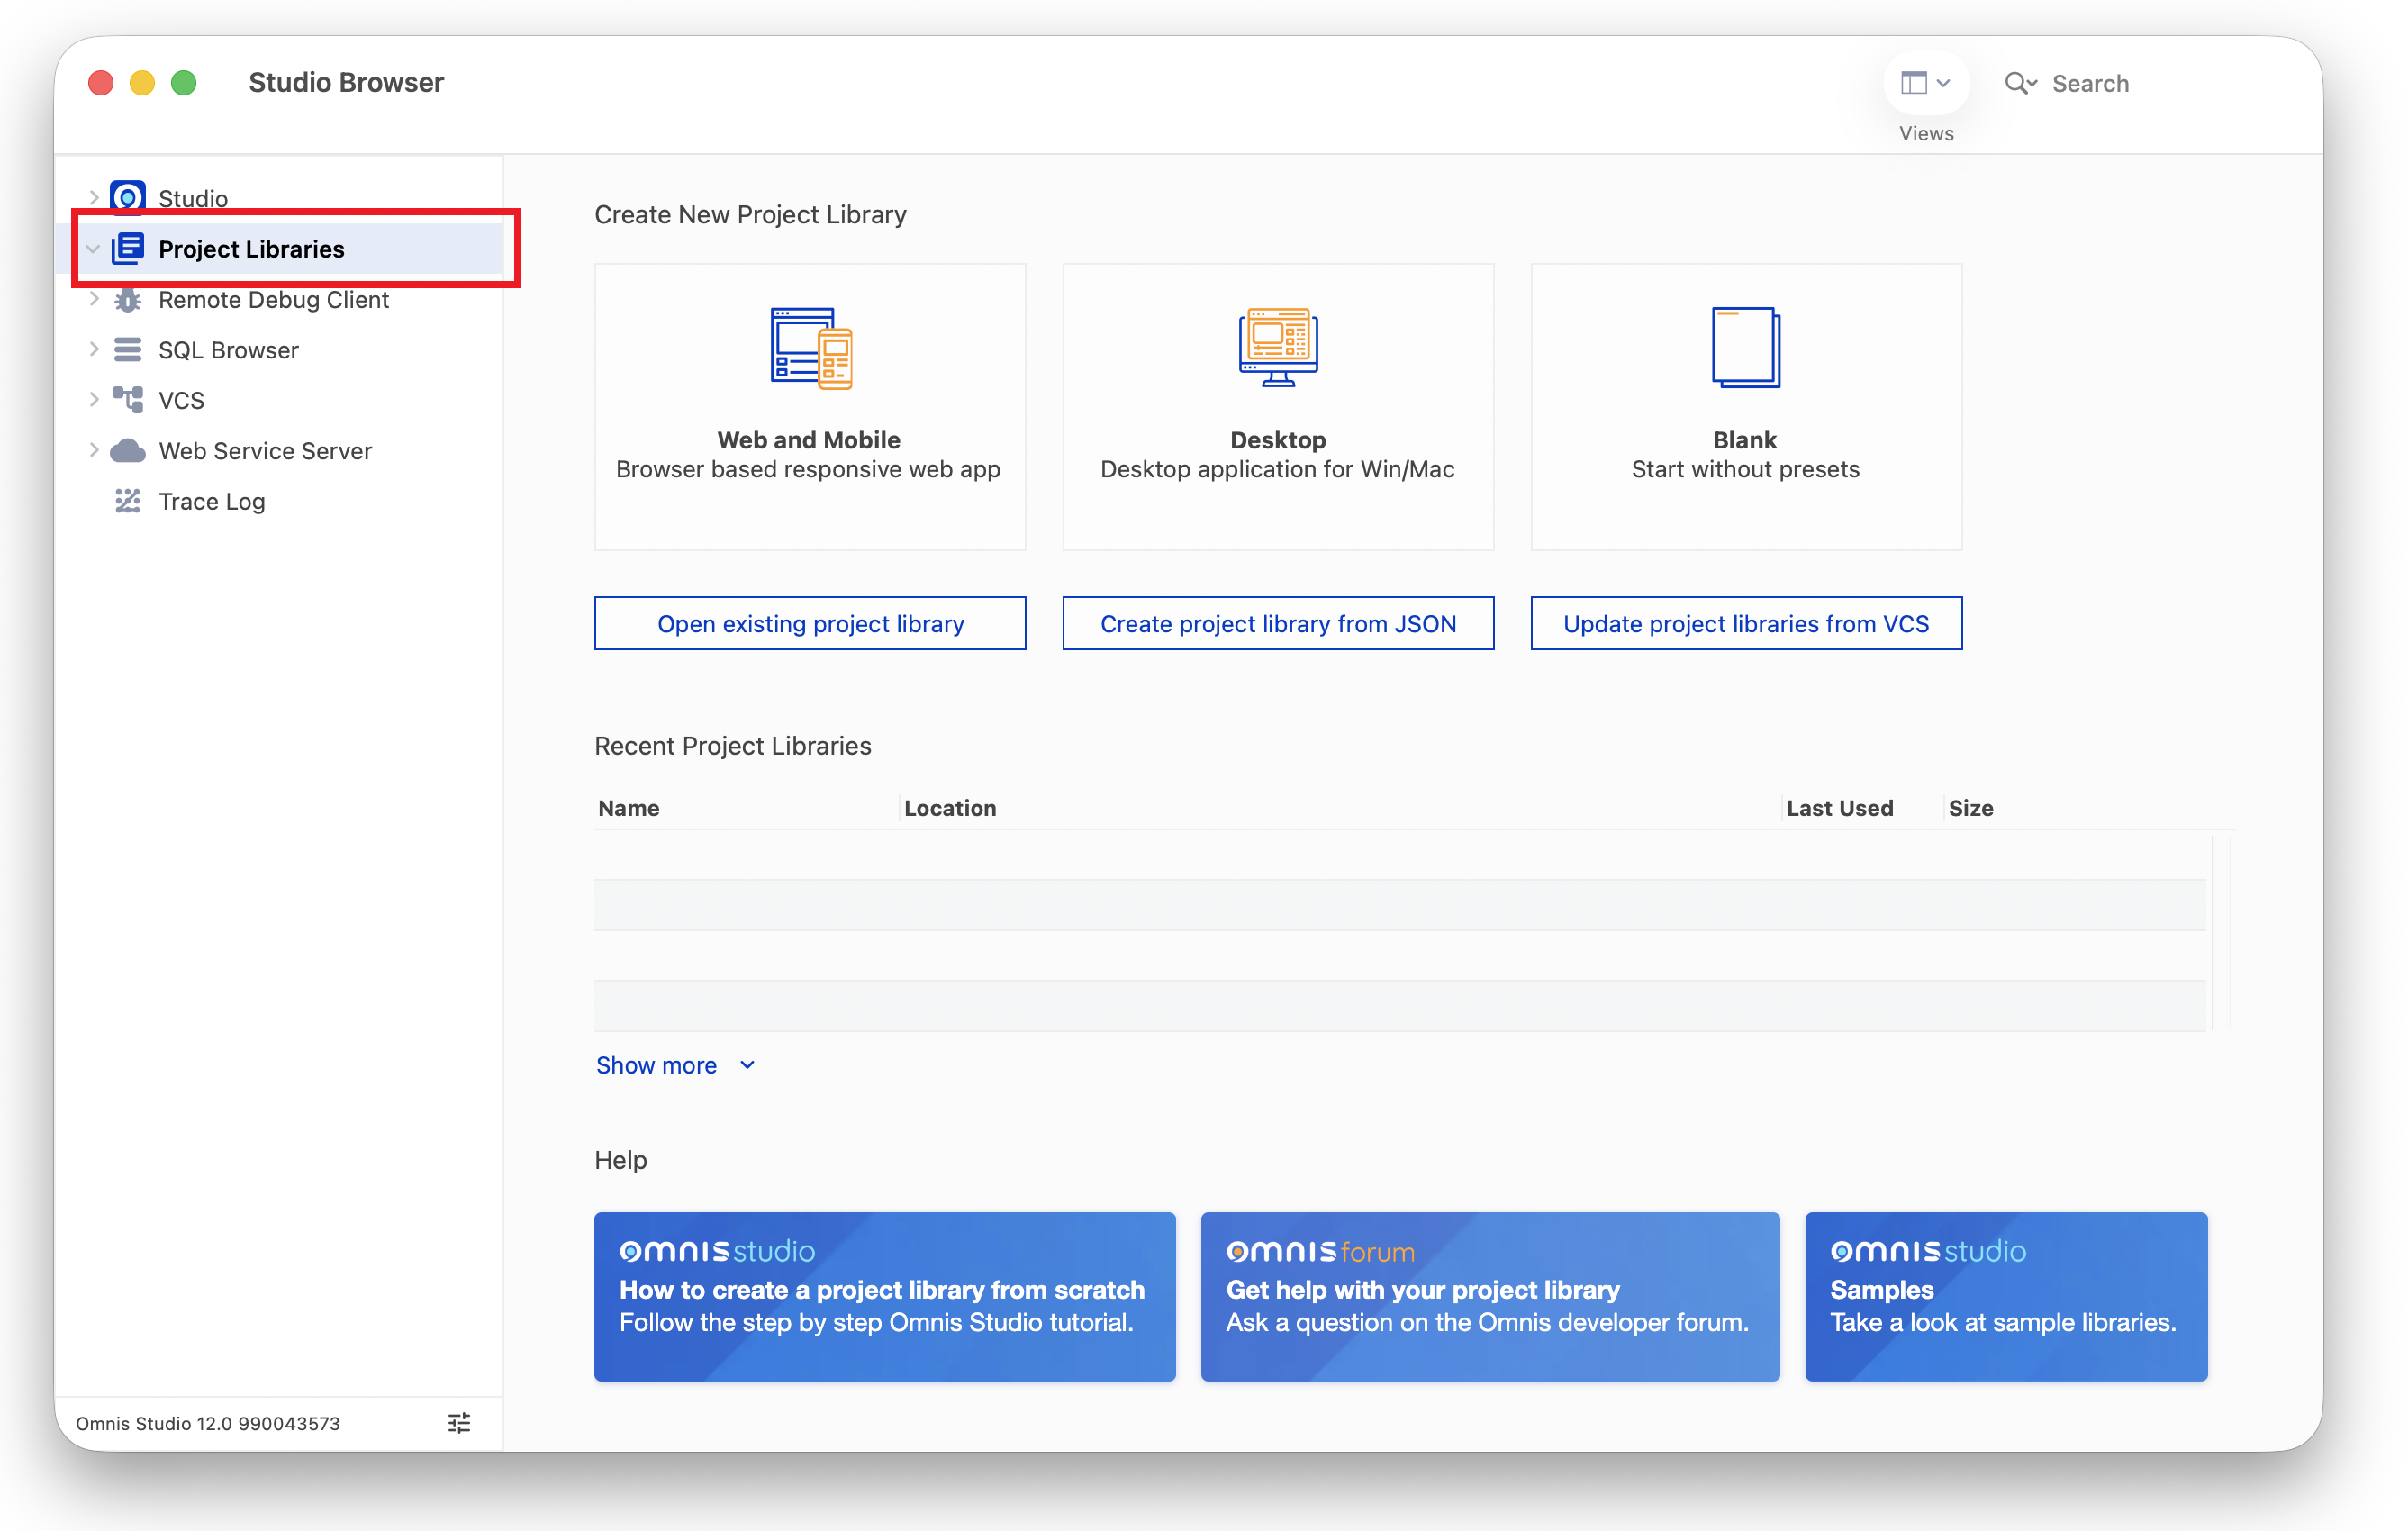
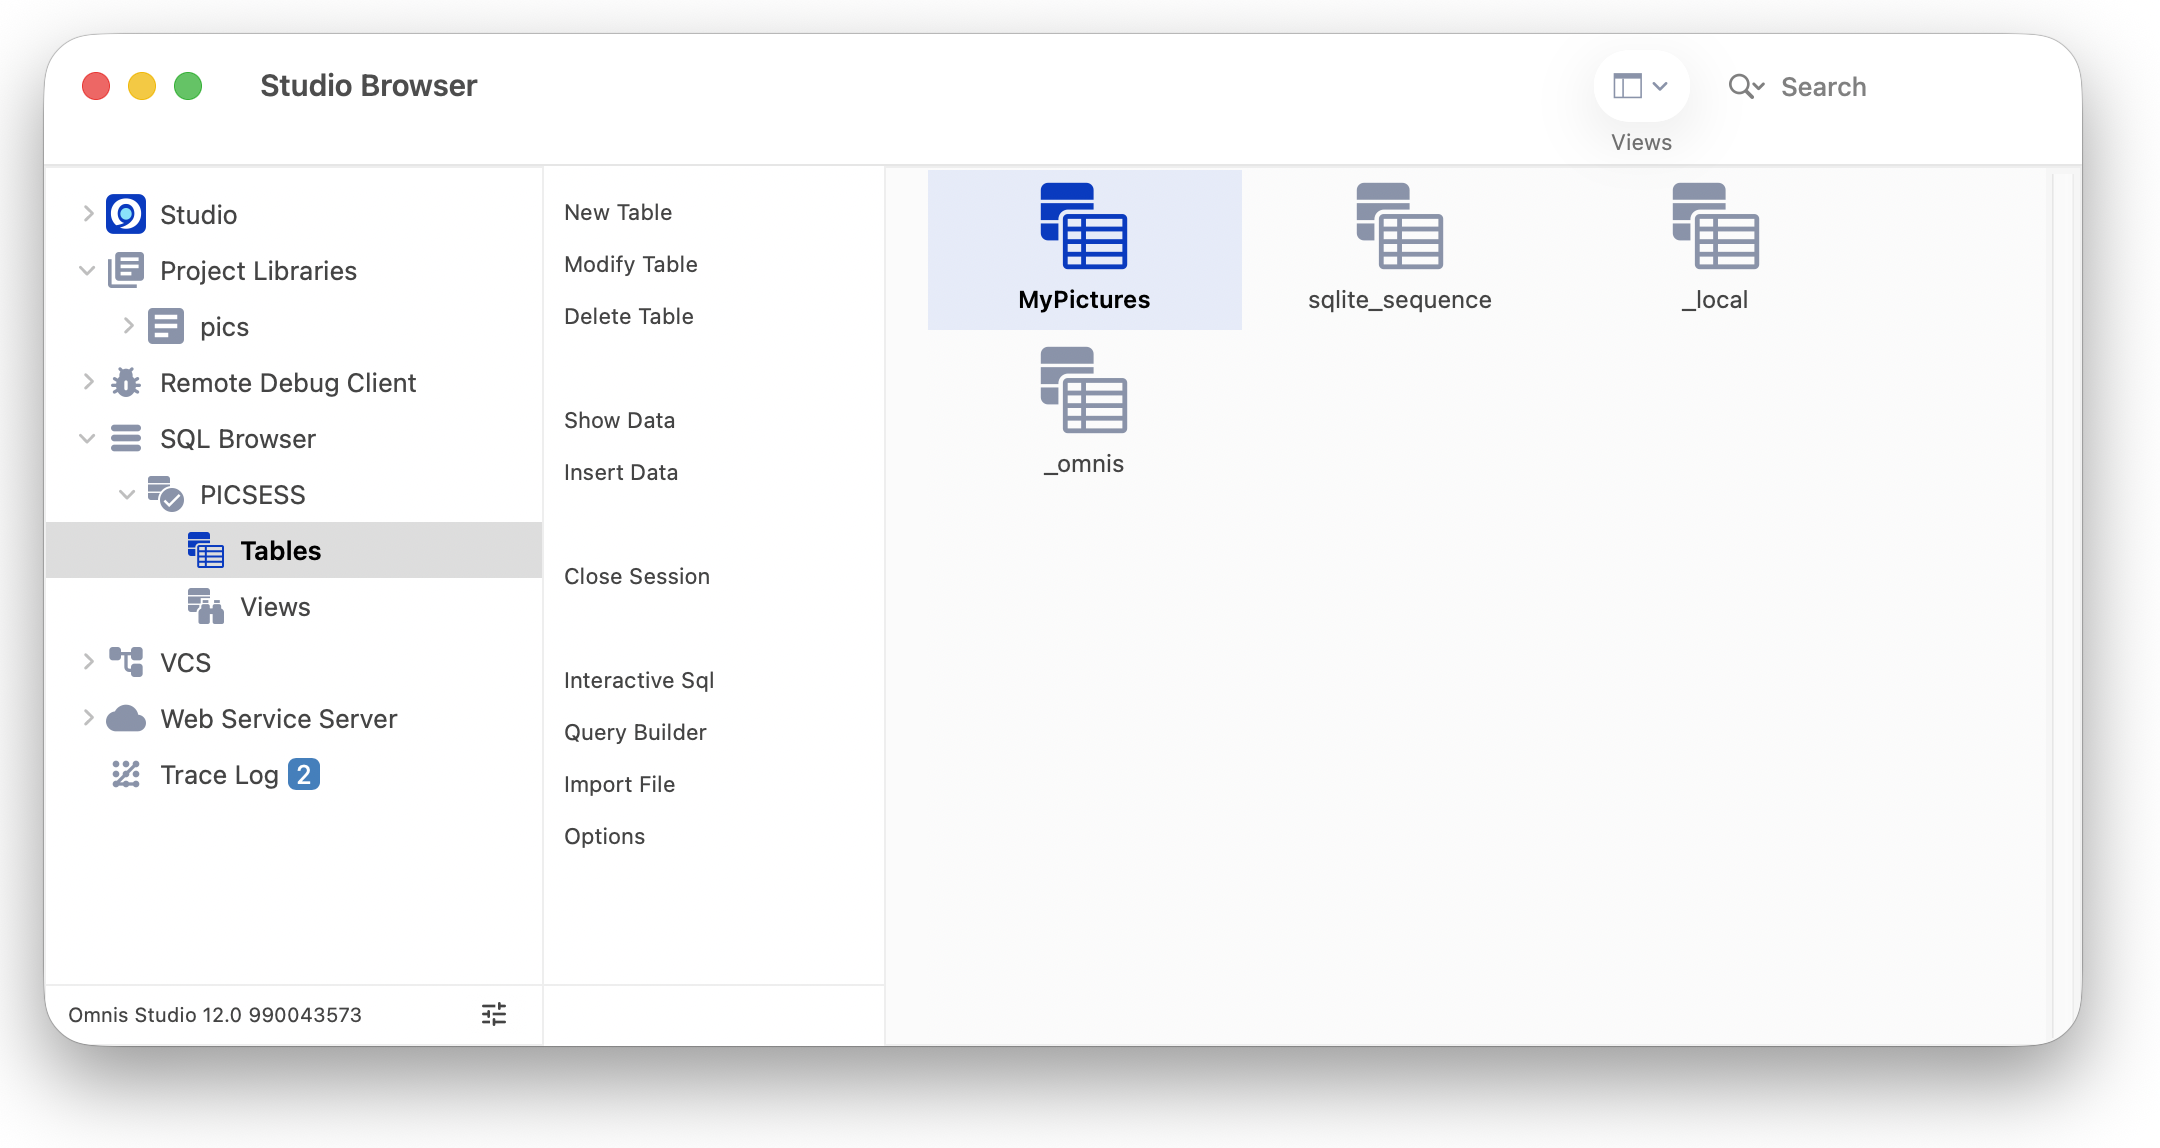
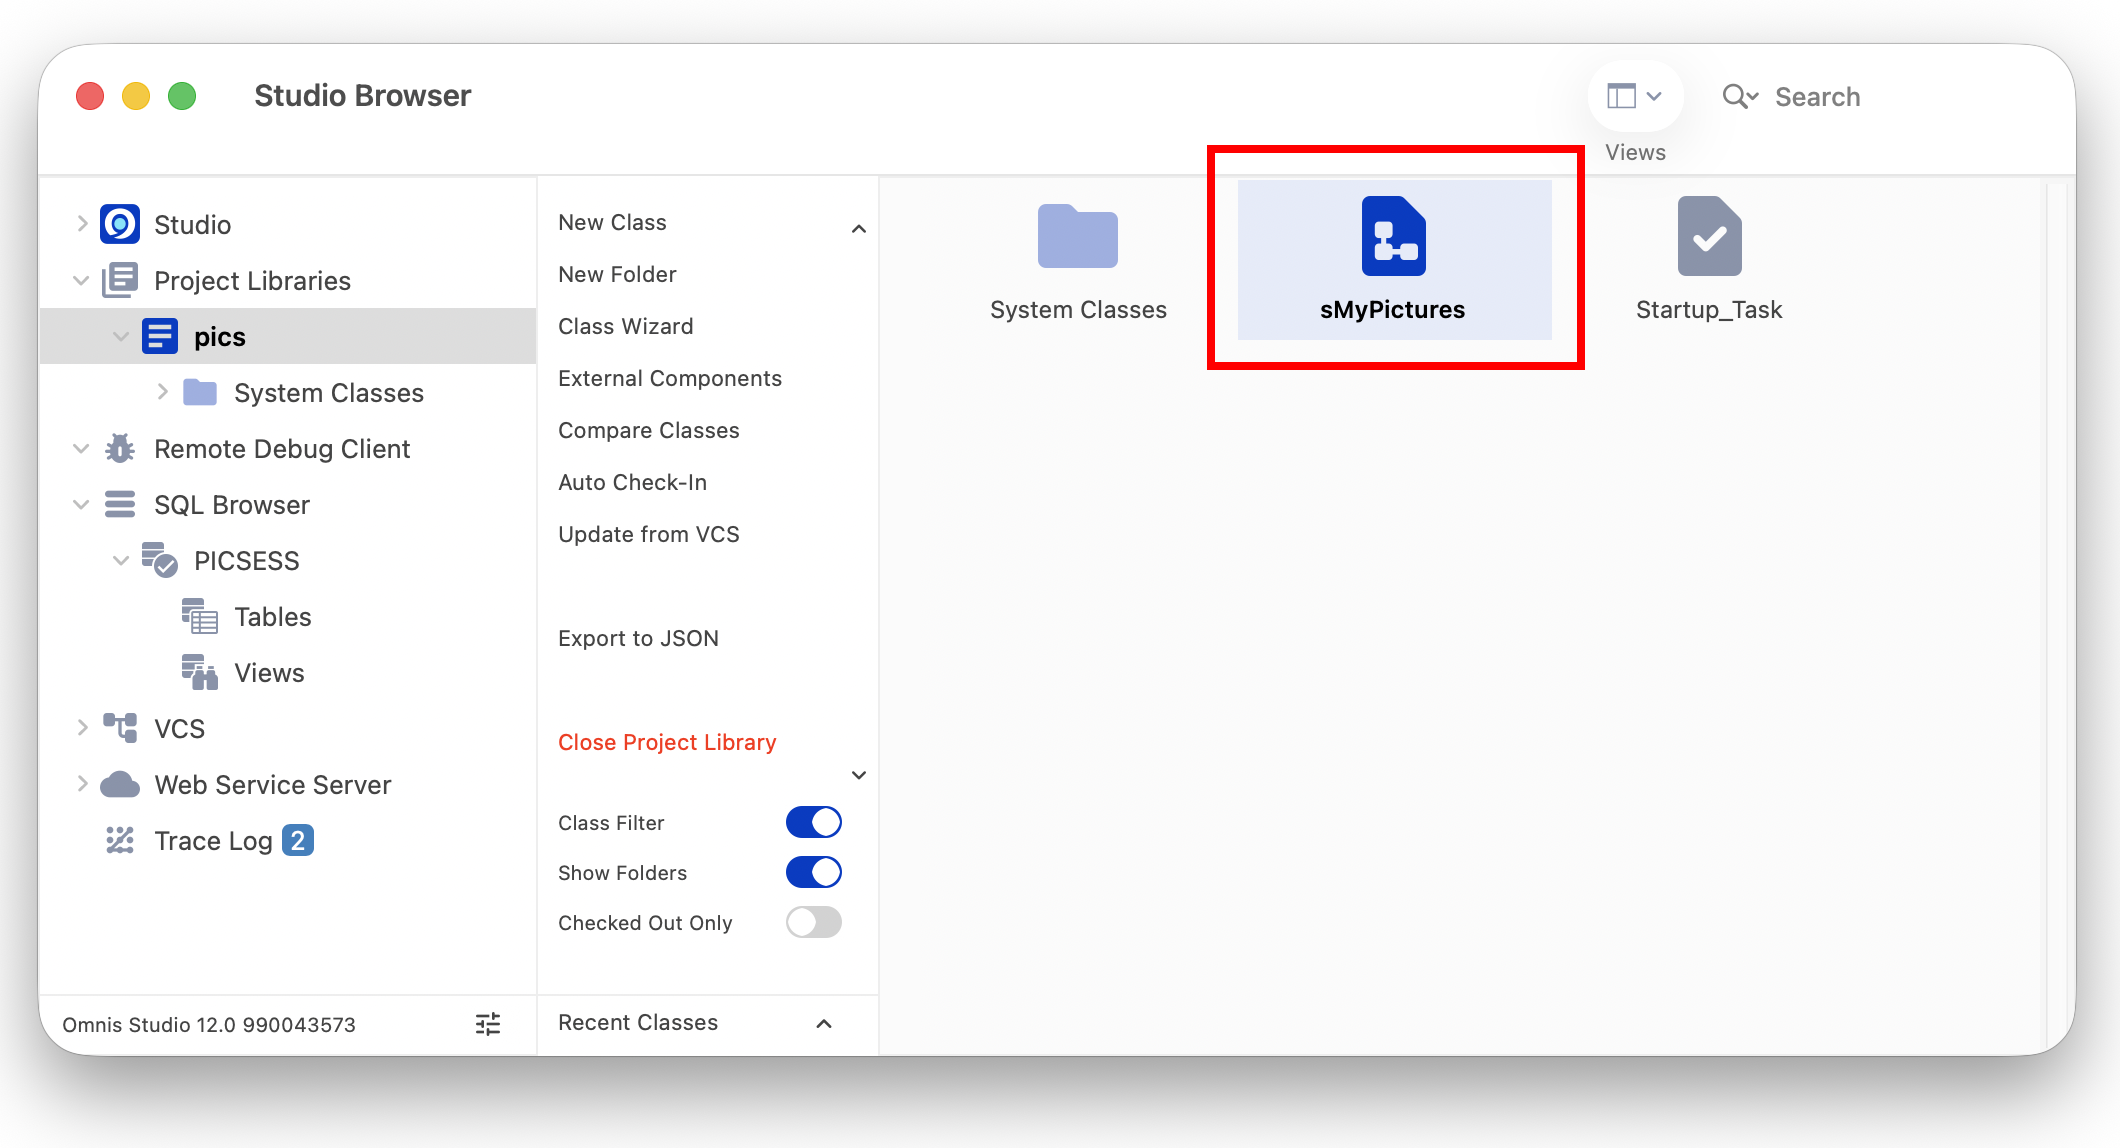
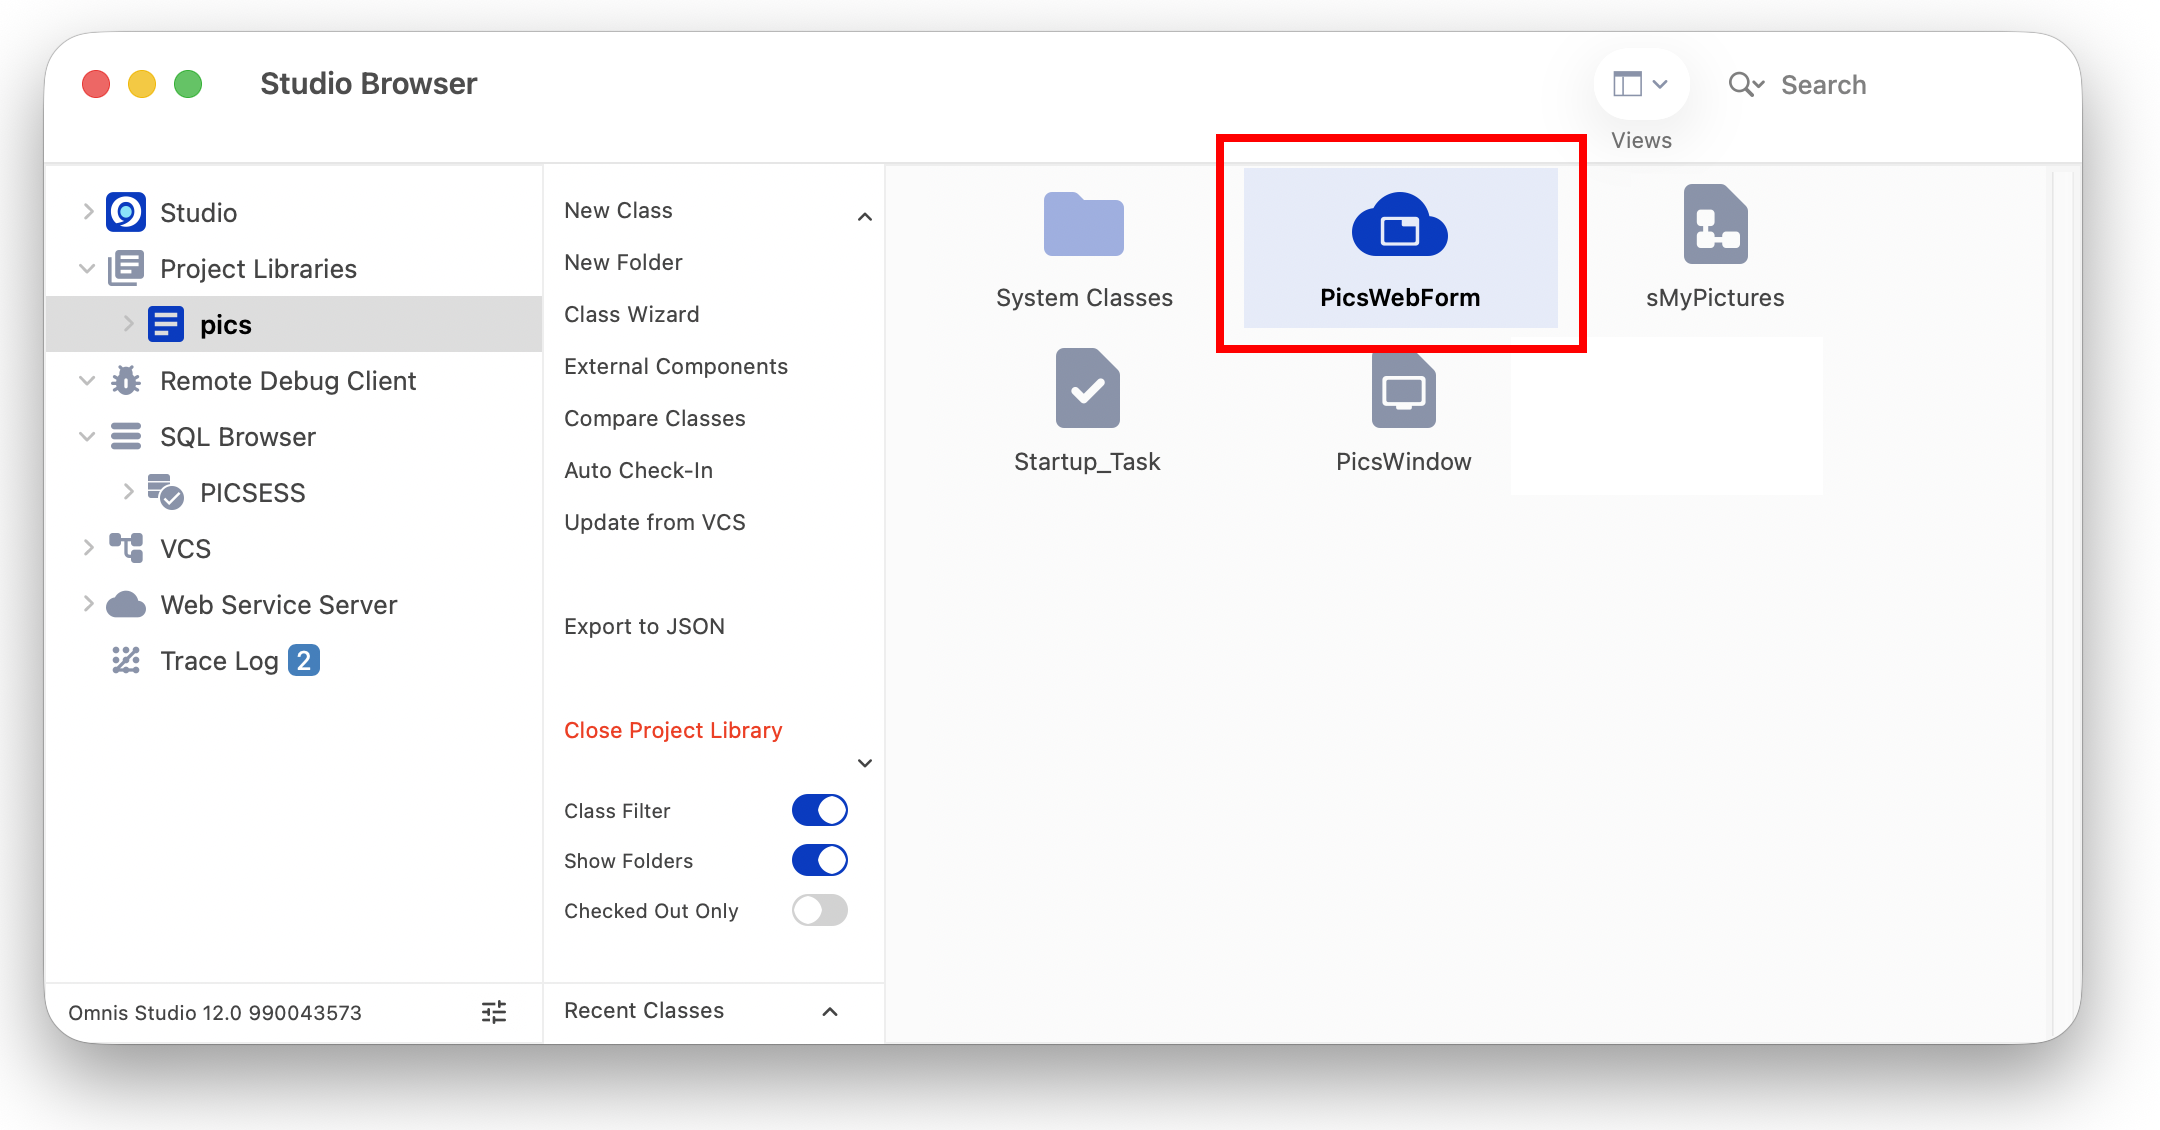
When you start Omnis Studio you will see the Studio Browser, which is the main window from which you can access all the other tools and class editors in Omnis Studio. Initially you will see the Project Libraries option (highlighted below), where you will create a new Omnis library file.
The above screen is the Studio Browser on macOS, but it will look identical on Windows, except for obvious differences in border or window style: since Omnis Studio is cross-platform, you should note that every part of the IDE performs in exactly the same way, with only minor differences in key strokes or menu/toolbar options.
If you cannot see the Studio Browser press the F2 key on Windows, or Cmnd-2 on macOS. Under Windows, you can click on the Browser button (compass icon) on the main Omnis Studio toolbar, or you can select the Browser option from the View menu on the Omnis menubar. To show the main Omnis menubar on Windows you need to press the Alt key. On macOS, you can select the Browser option from the View menu on the Omnis menubar, or to show the Omnis toolbar, select the Toolbars option from View menu, show the View toolbar, click OK, and then you can click on the Browser button.
The starting point for your Omnis application or project is an Omnis library. A library stores all the classes in your application, including the web forms, data classes, and so on. If you want to edit an existing library, you can open it using the Open existing project library option in the Studio Browser.
You can import an Omnis library from a set of JSON files using the Create project library from JSON option, e.g. you can get sample Omnis libraries in JSON format from our GitHub repository at: https://github.com/OmnisStudio. However, for this tutorial, you will create a new blank library using the Create New Project Library section in the Studio Browser.
To create a new library:
Press F2/Cmnd-2 or click on the Studio Browser to bring it to the top, then click on the Project Libraries branch in the Folders tree list; this should be selected by default when you first start Omnis
Under the Create New Project Library section, click on the Blank option, as shown below (note the Desktop option is hidden in the Community edition)
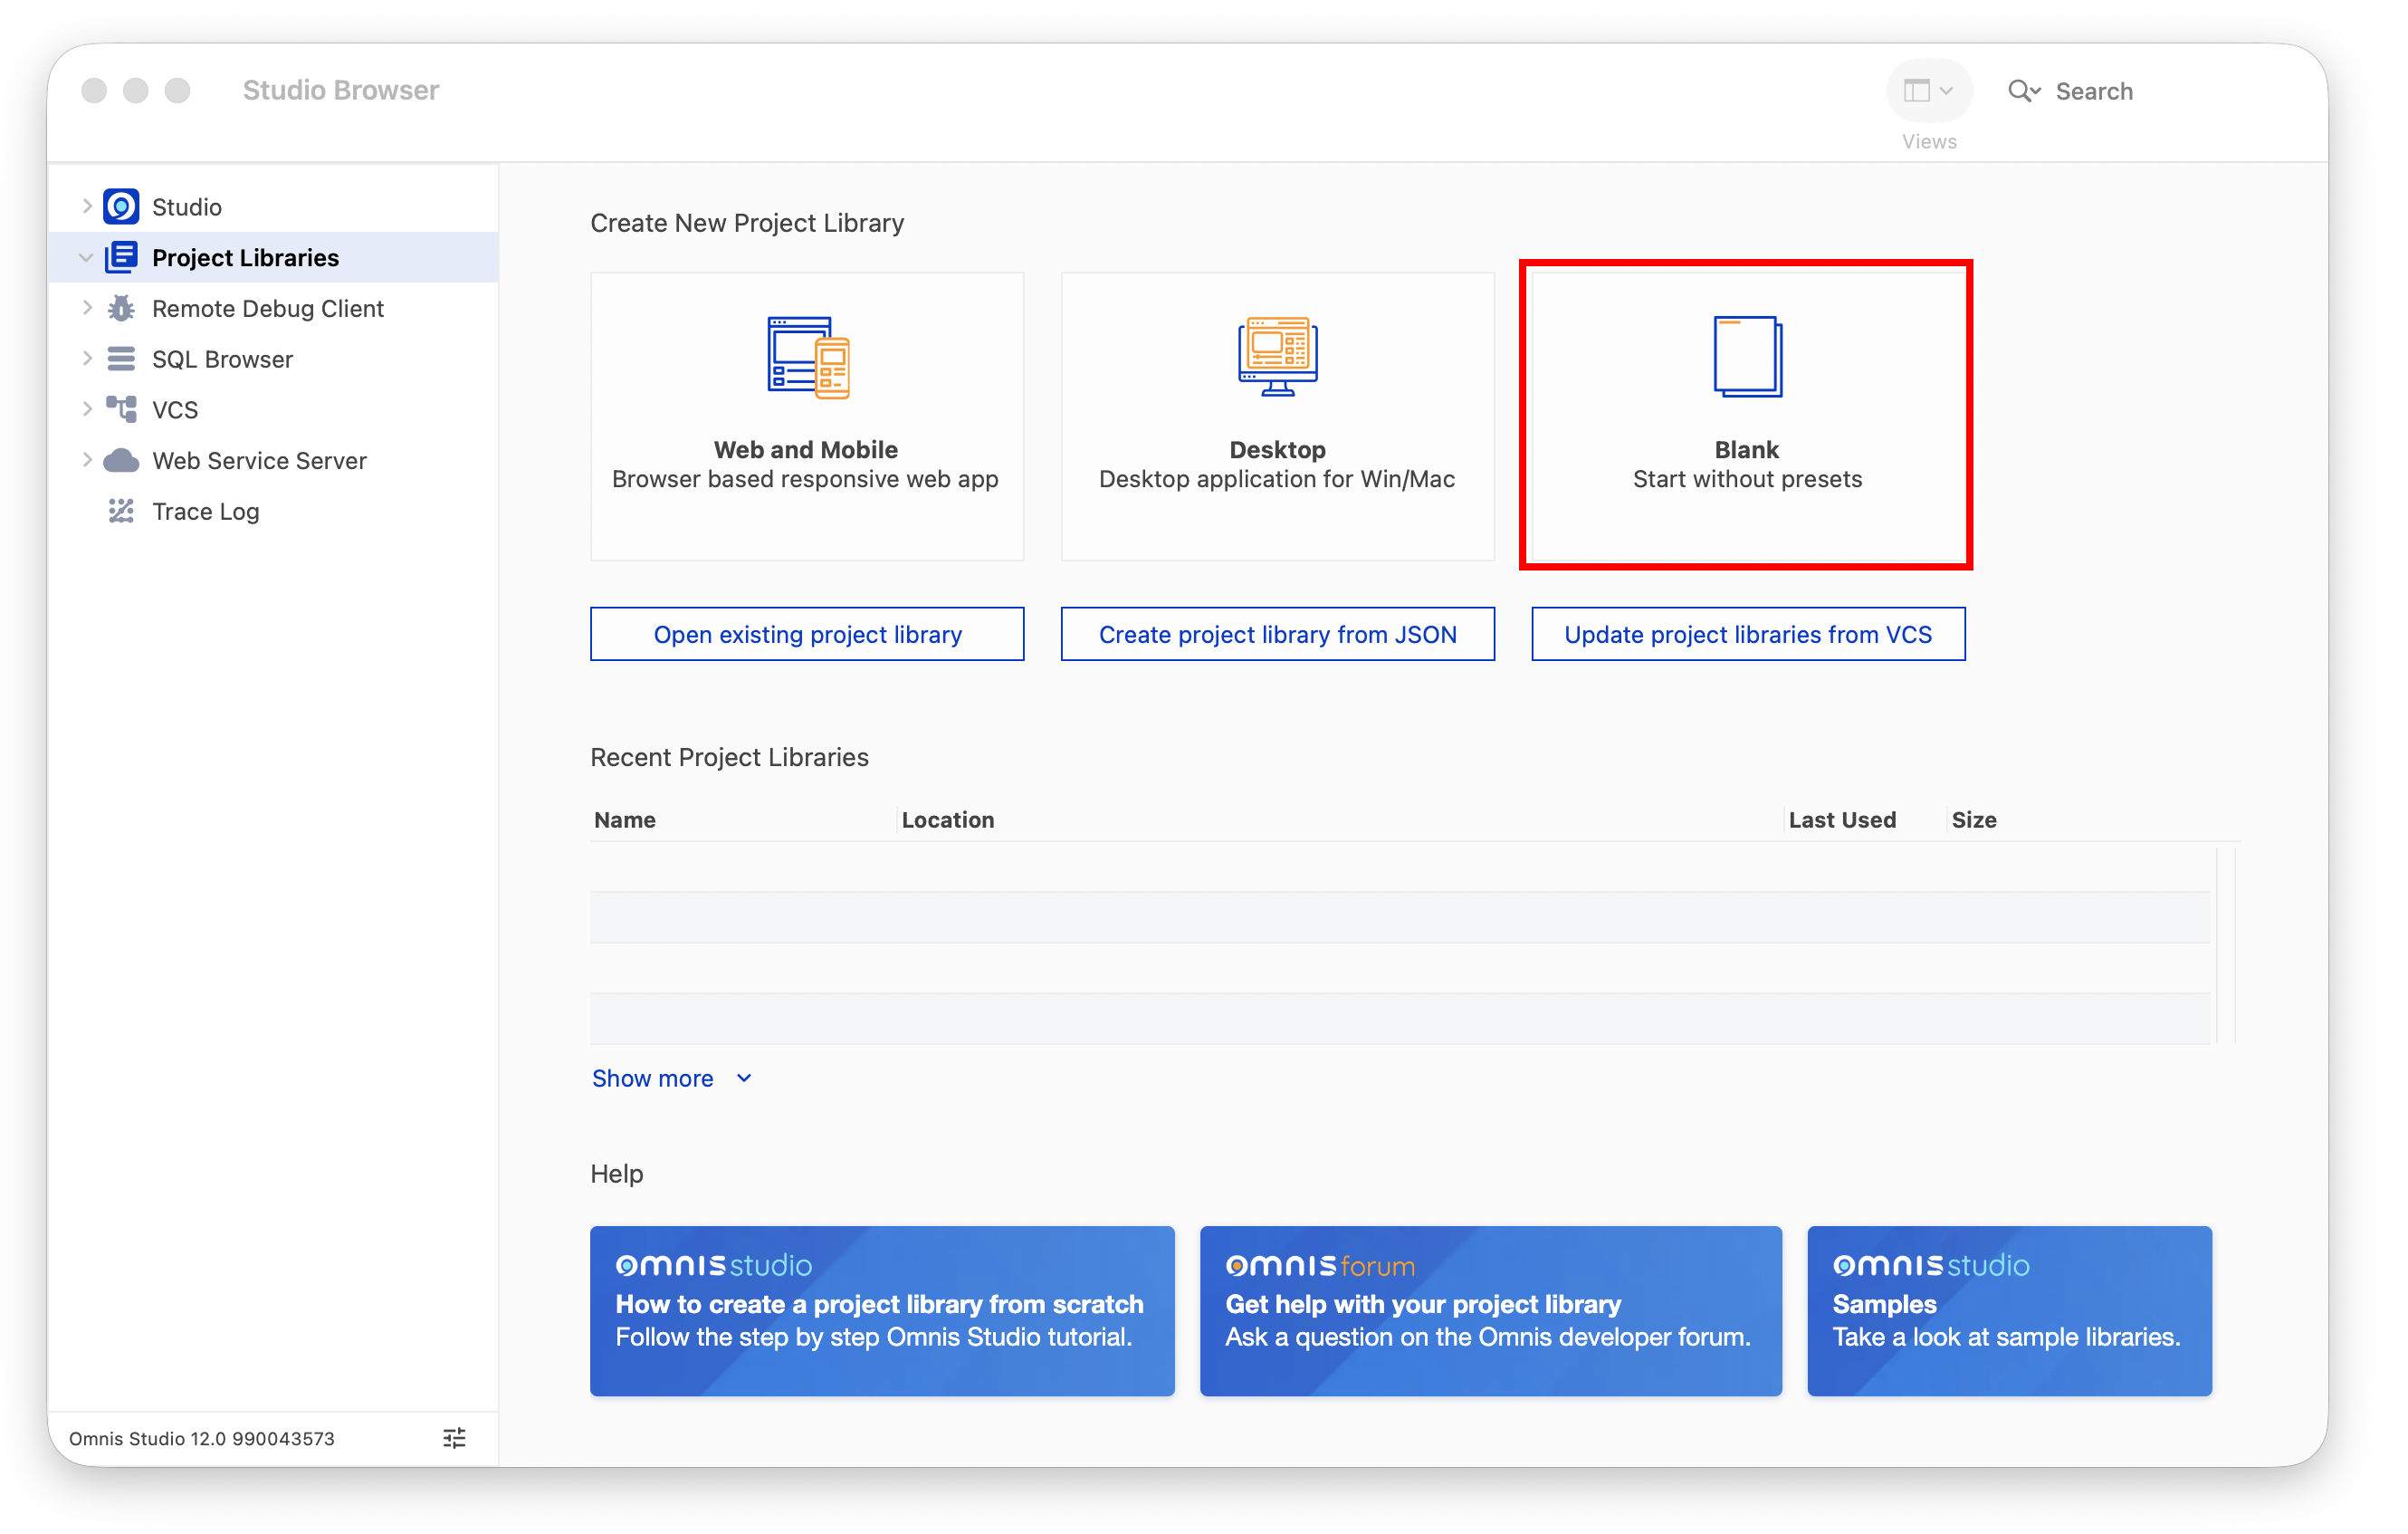
The Web and Mobile option creates a new library containing a new Remote form and a Remote task, but in this tutorial we are going to create a library and a Remote form using the Form wizard to automate some parts of the process. If you are evaluating Omnis Studio, and haven’t got time to work through the tutorial, you may like to try the Web and Mobile option and examine the Remote form and other classes it creates for you automatically.
On Windows, you may want to place the tutorial files in your ‘AppData\Local’ folder to allow read/write access to them (note that you may need to enable hidden folders in the Windows File Manager to access the AppData folder). On macOS you can save your library in the Documents folder or on the Desktop.
When you create or open a library it appears in the Studio Browser. To view the contents of a library you expand the ‘Project Libraries’ branch of the Folders tree list (on the left) and click on the library name, in this case the pics library; an alternative way to expand (or contract) a branch in the Folders tree list is to double-click on the name.
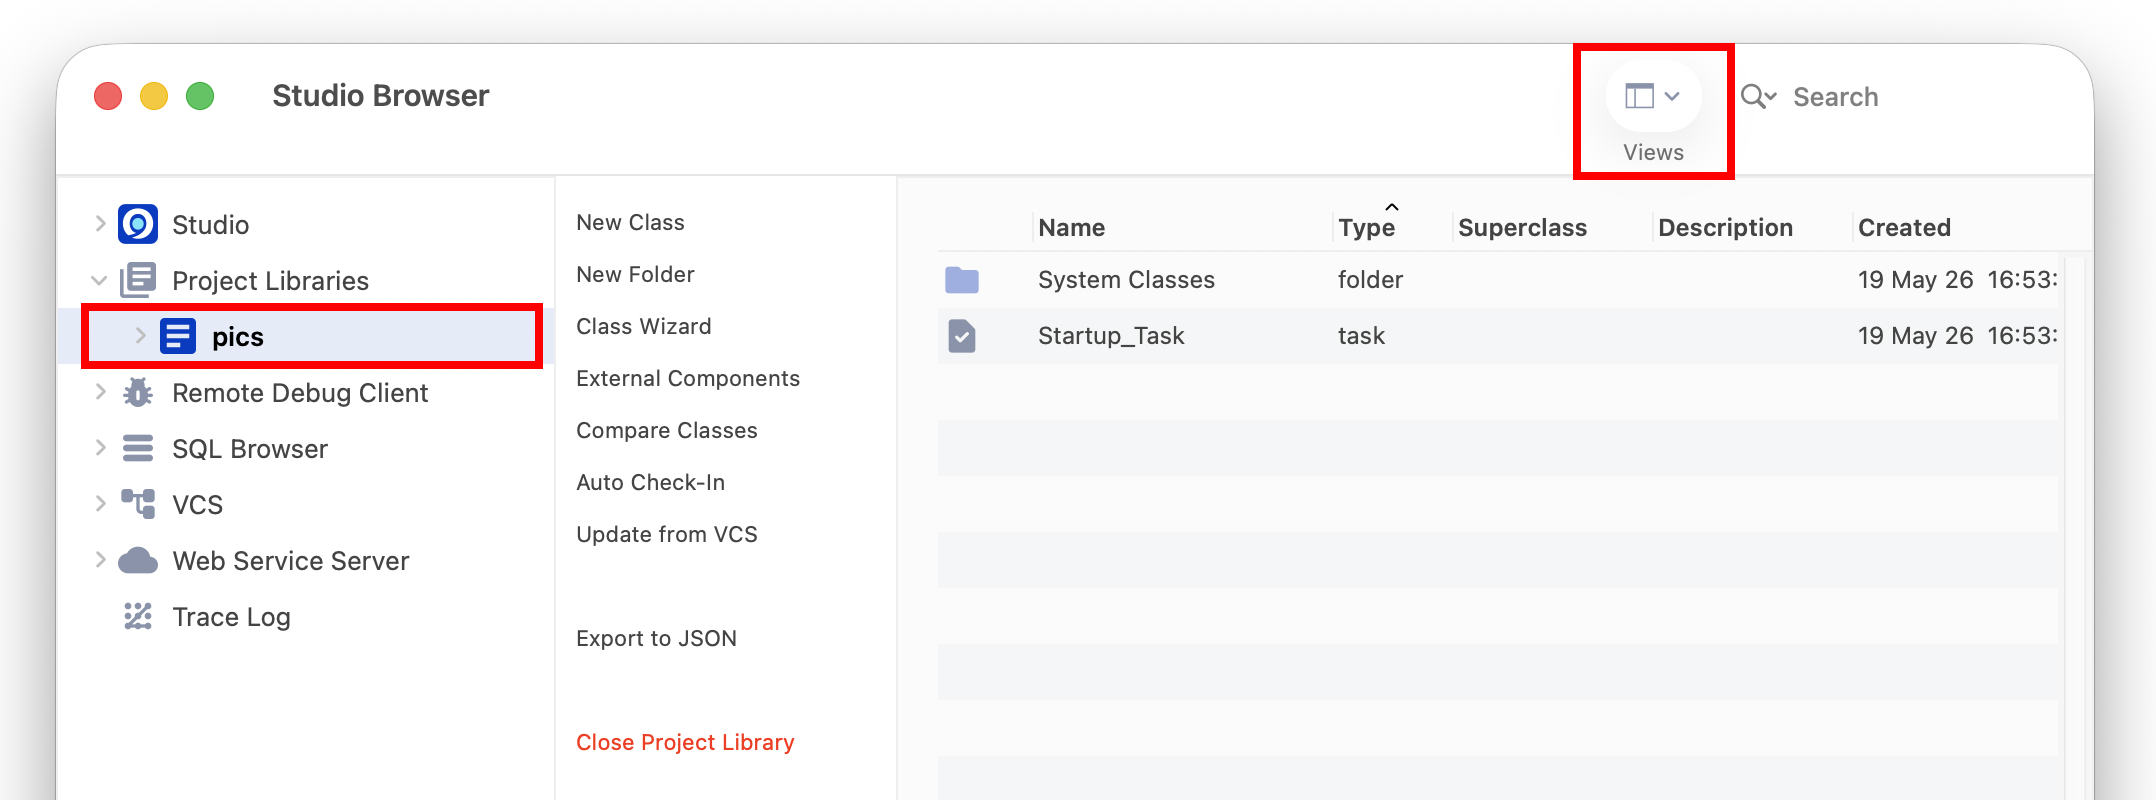
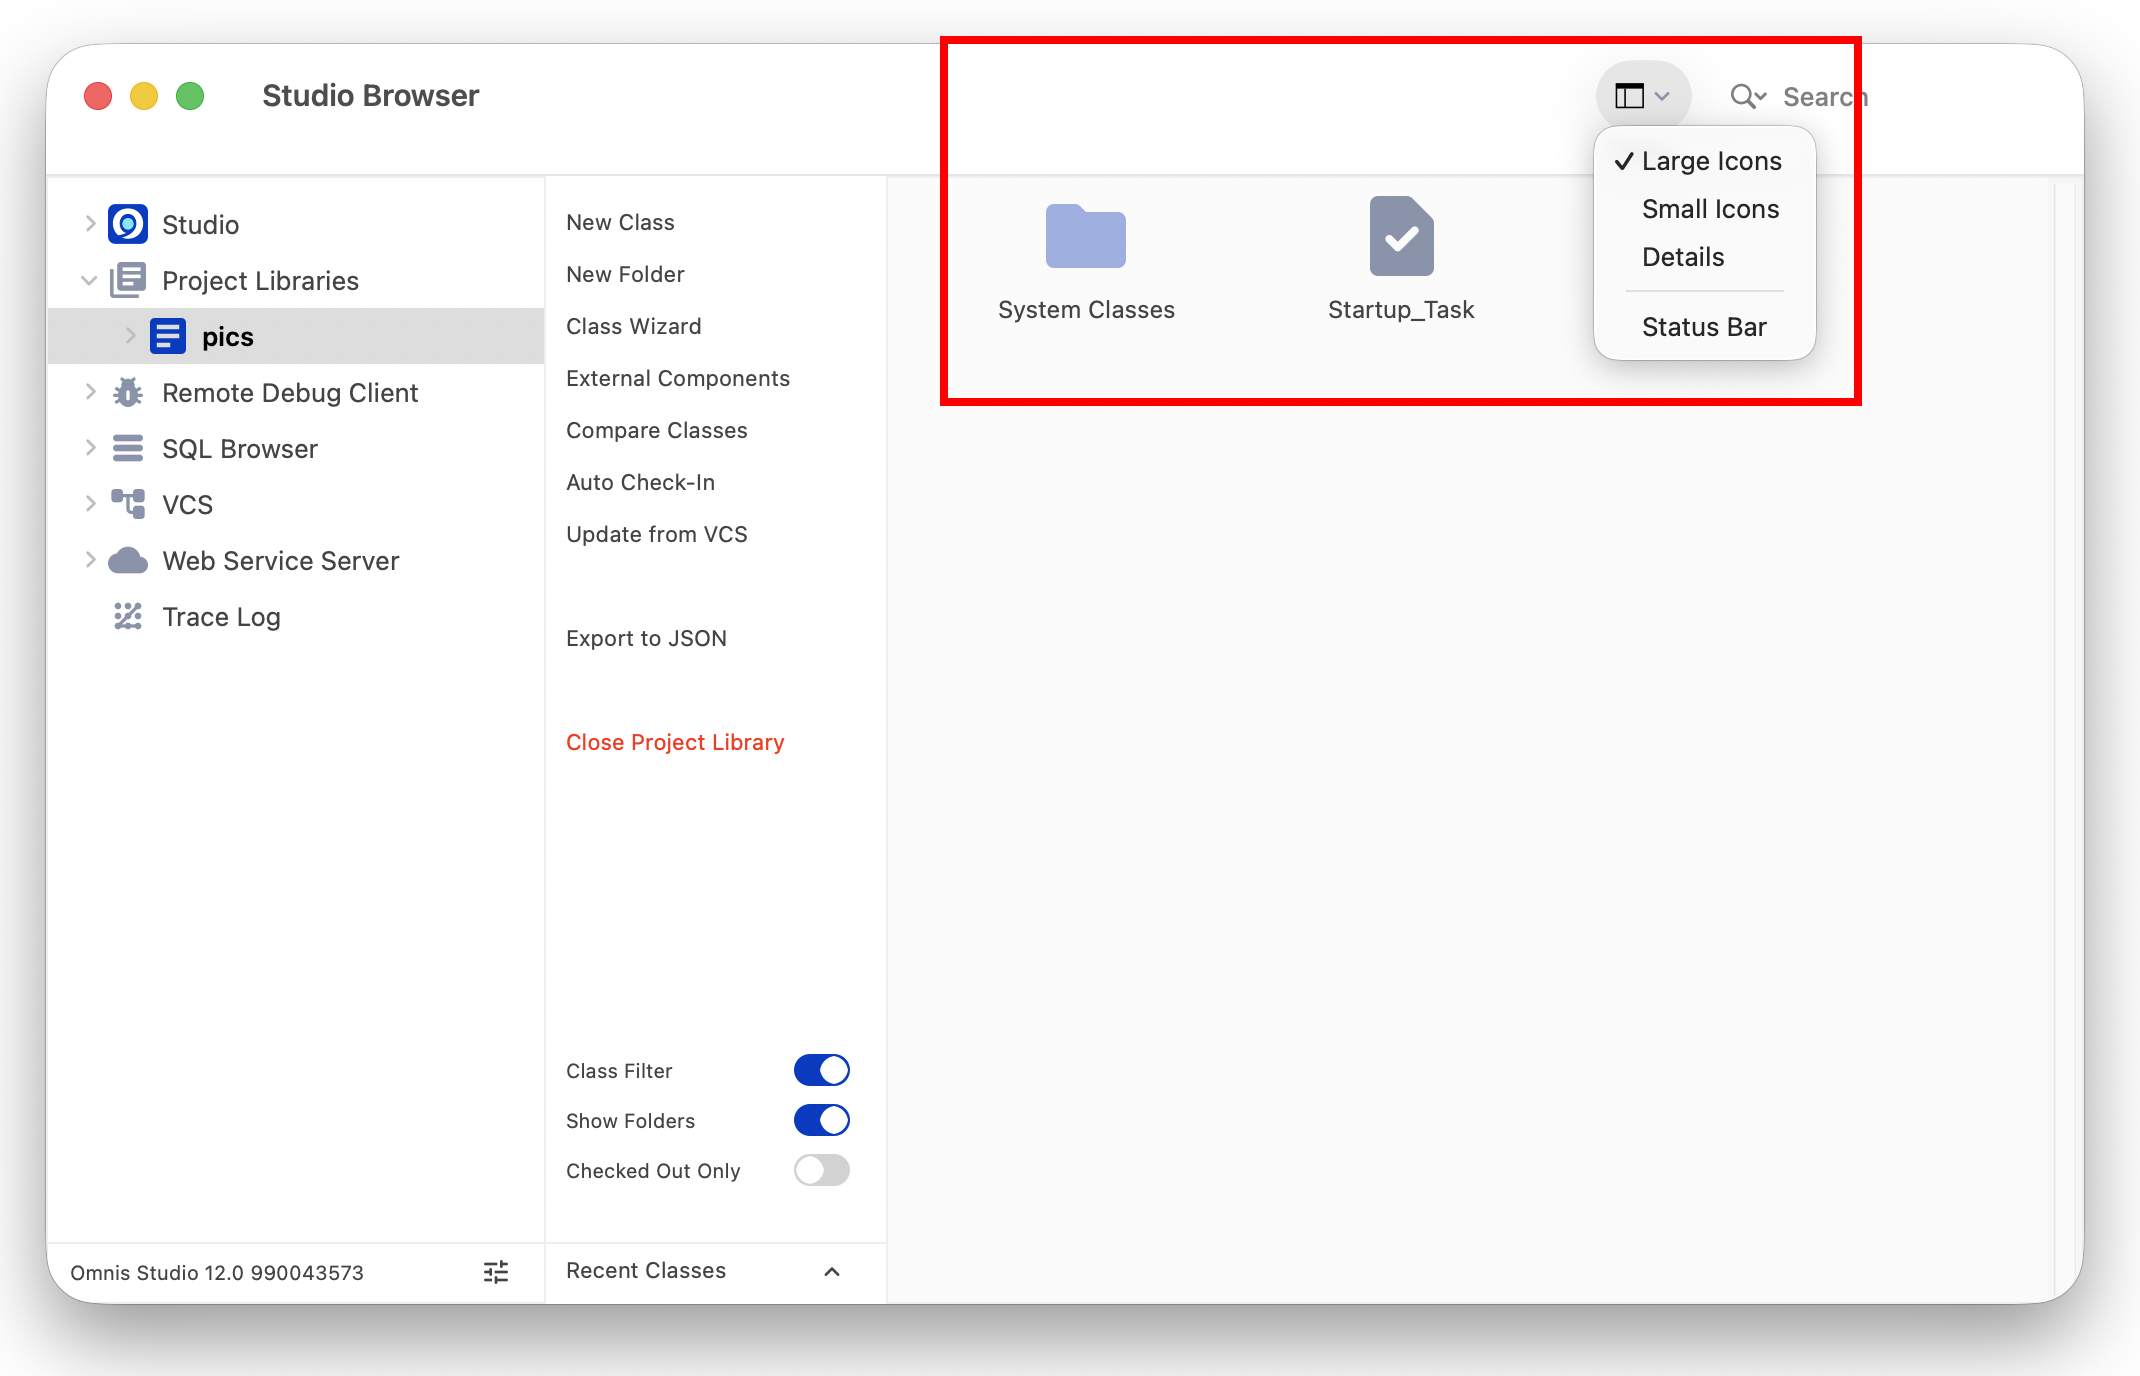
The classes that belong to the selected library are listed to the right of the Folders tree list in the Browser list. Using the View menu on the Browser window toolbar, you can change the display to Large Icons, Small Icons or Details (the default view). The following screenshot shows the Studio Browser in Large Icons view, which might be easier while you work through the Tutorial.
Note that your library initially contains a Startup_Task which is used to initialize the library when it starts up (i.e. when it is opened), as well as a folder containing some System Classes that are required to setup or configure a library. If you are using the Community Edition, your library will also include a Remote_Task class which will be listed in the Studio Browser.
This section describes how you can logon to a database and create a Web Form (called a ‘Remote form’) using a Form Wizard; if you are evaluating Omnis Studio, using a wizard will speed up the development process allowing you to evaluate Omnis in a much shorter time. If however you want to create a database session and a Remote Form from scratch, you can start with the ‘Creating a Database Session’ section and continue from there.
Having created a blank library, you can create a Web Form, called a Remote Form in Omnis, to browse your data in a web browser on your desktop computer or on a mobile device. To do this quickly, and without writing any code, you can use the SQL Form Wizard – the form wizard can also create a database connection (session) for you, saving you even more time and ensuring that you can logon easily next time you open your library.
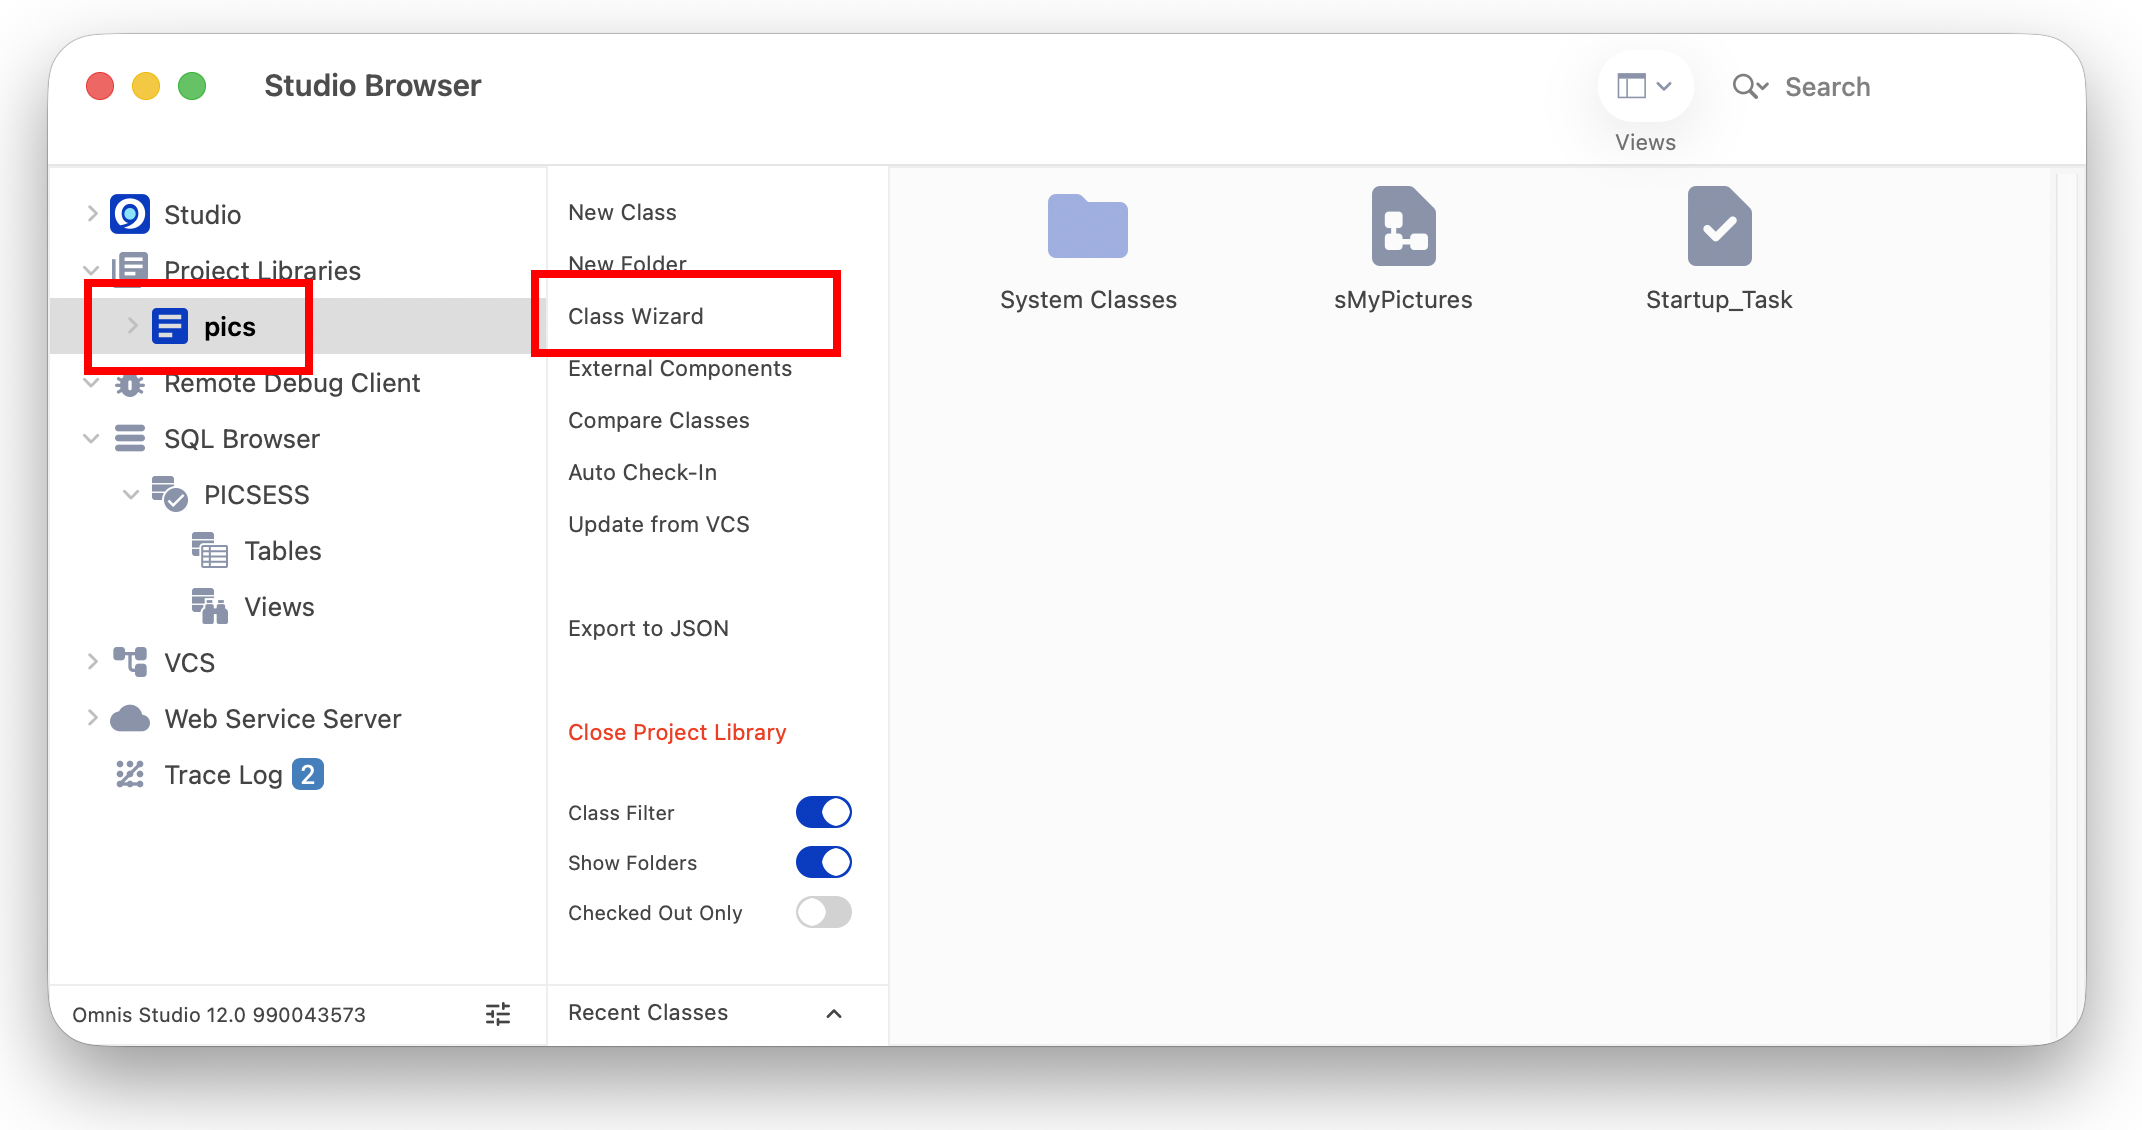
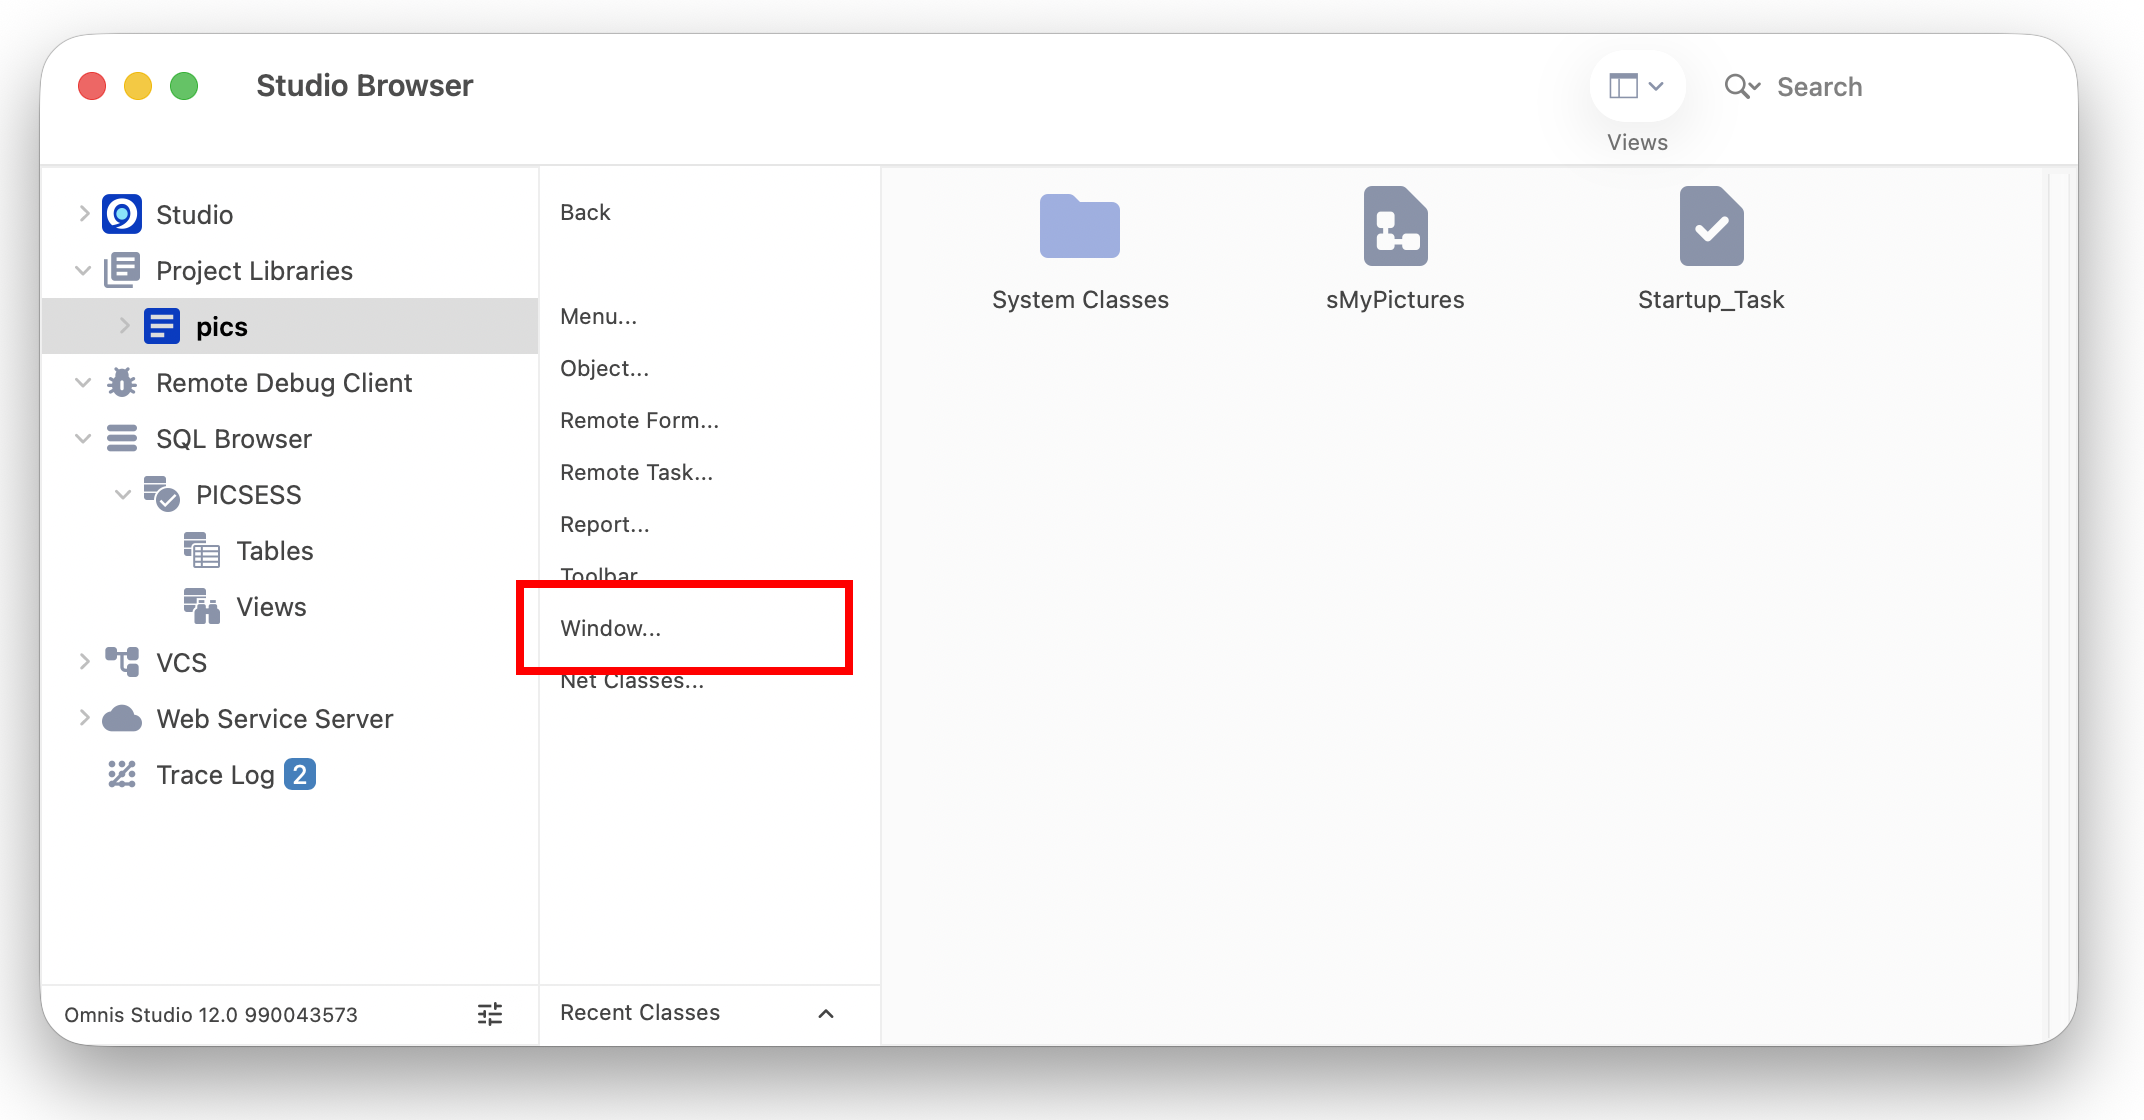
Click the Pics library in the Folders tree list in the Studio Browser and select the Class Wizard option.
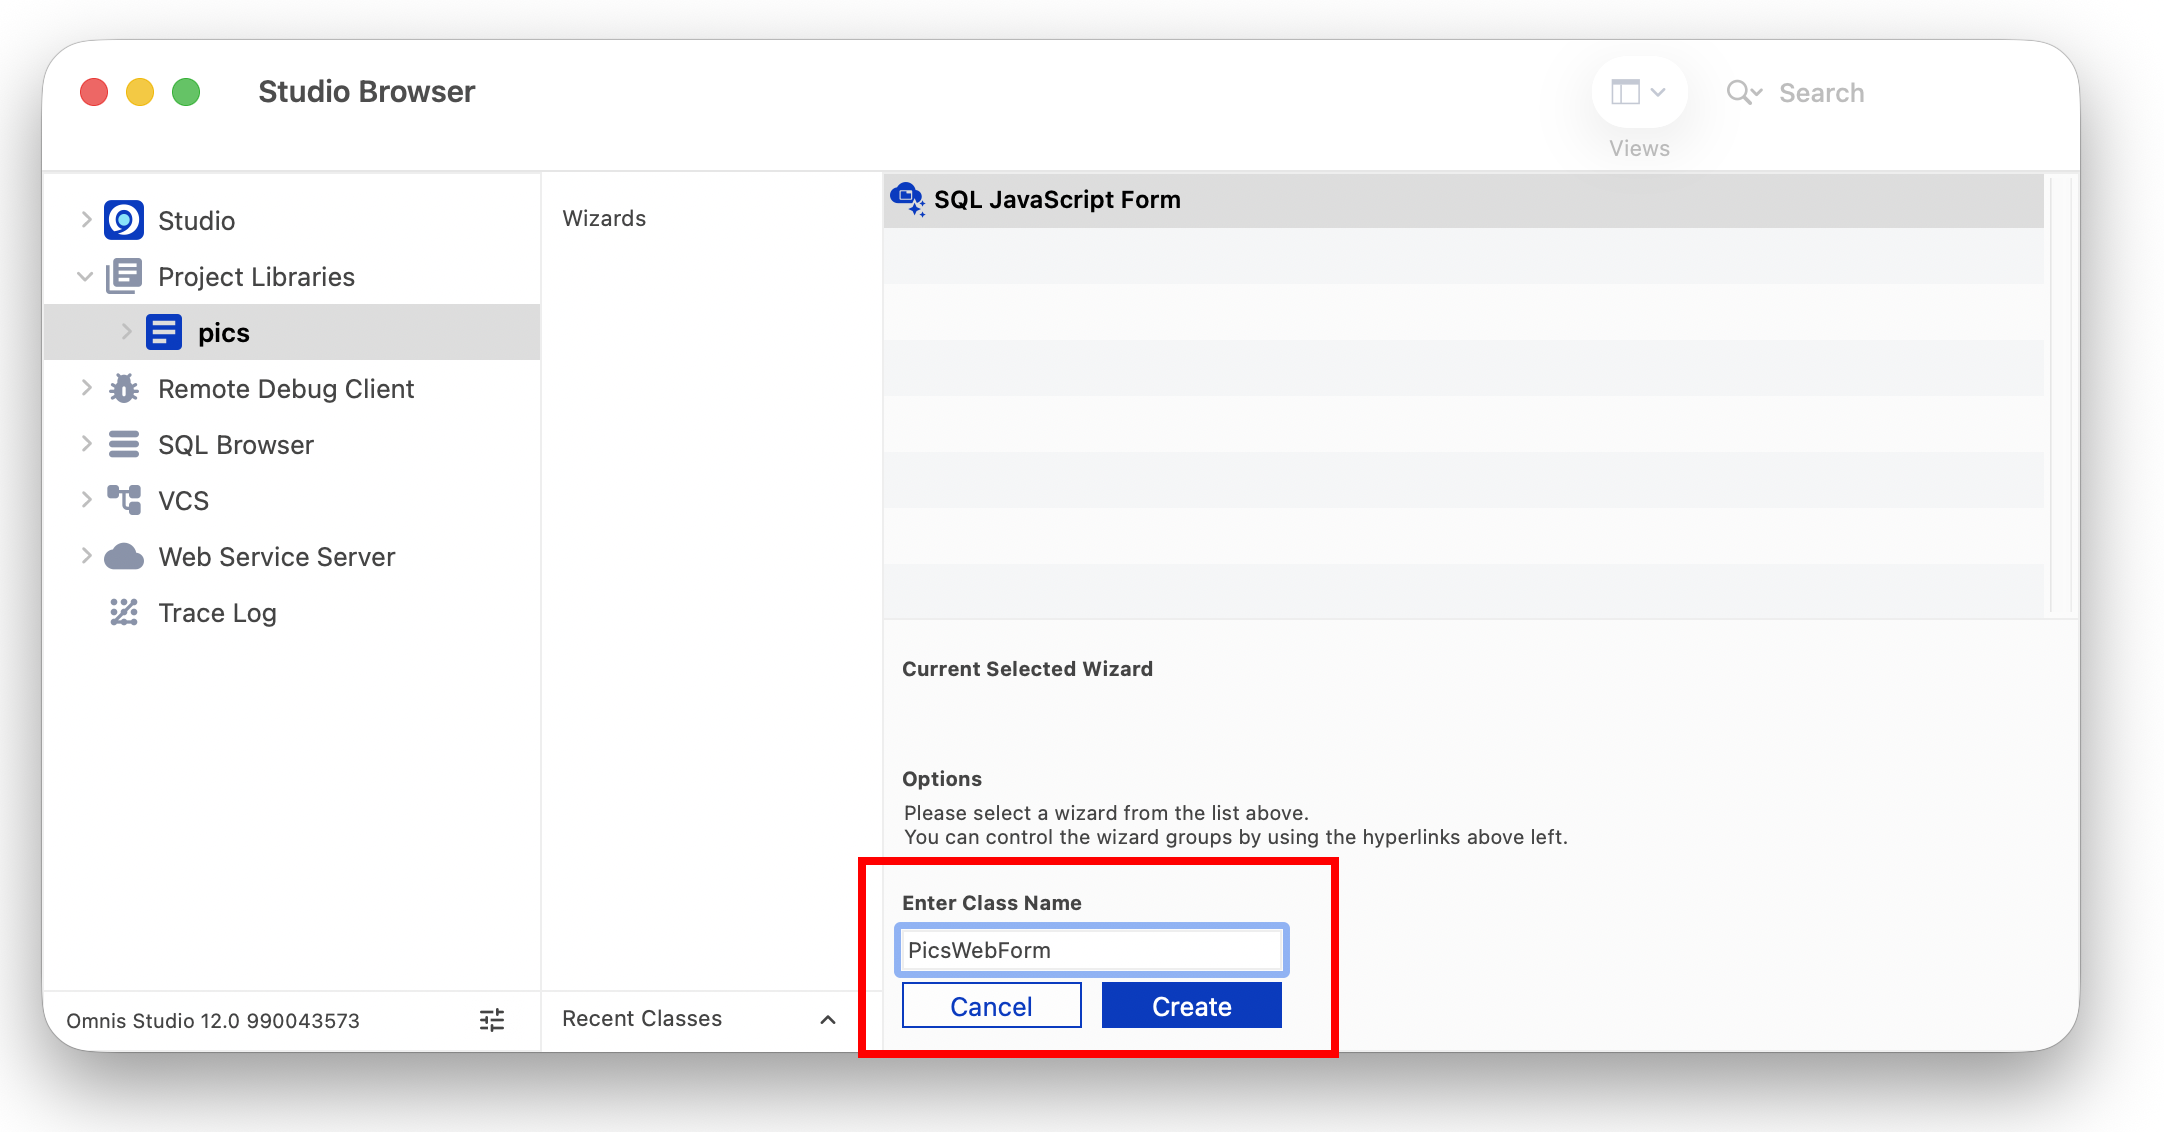
Now click on the Remote Form... option in the Studio Browser list to display the available remote form class wizards (some of these options will not appear in the Community edition).
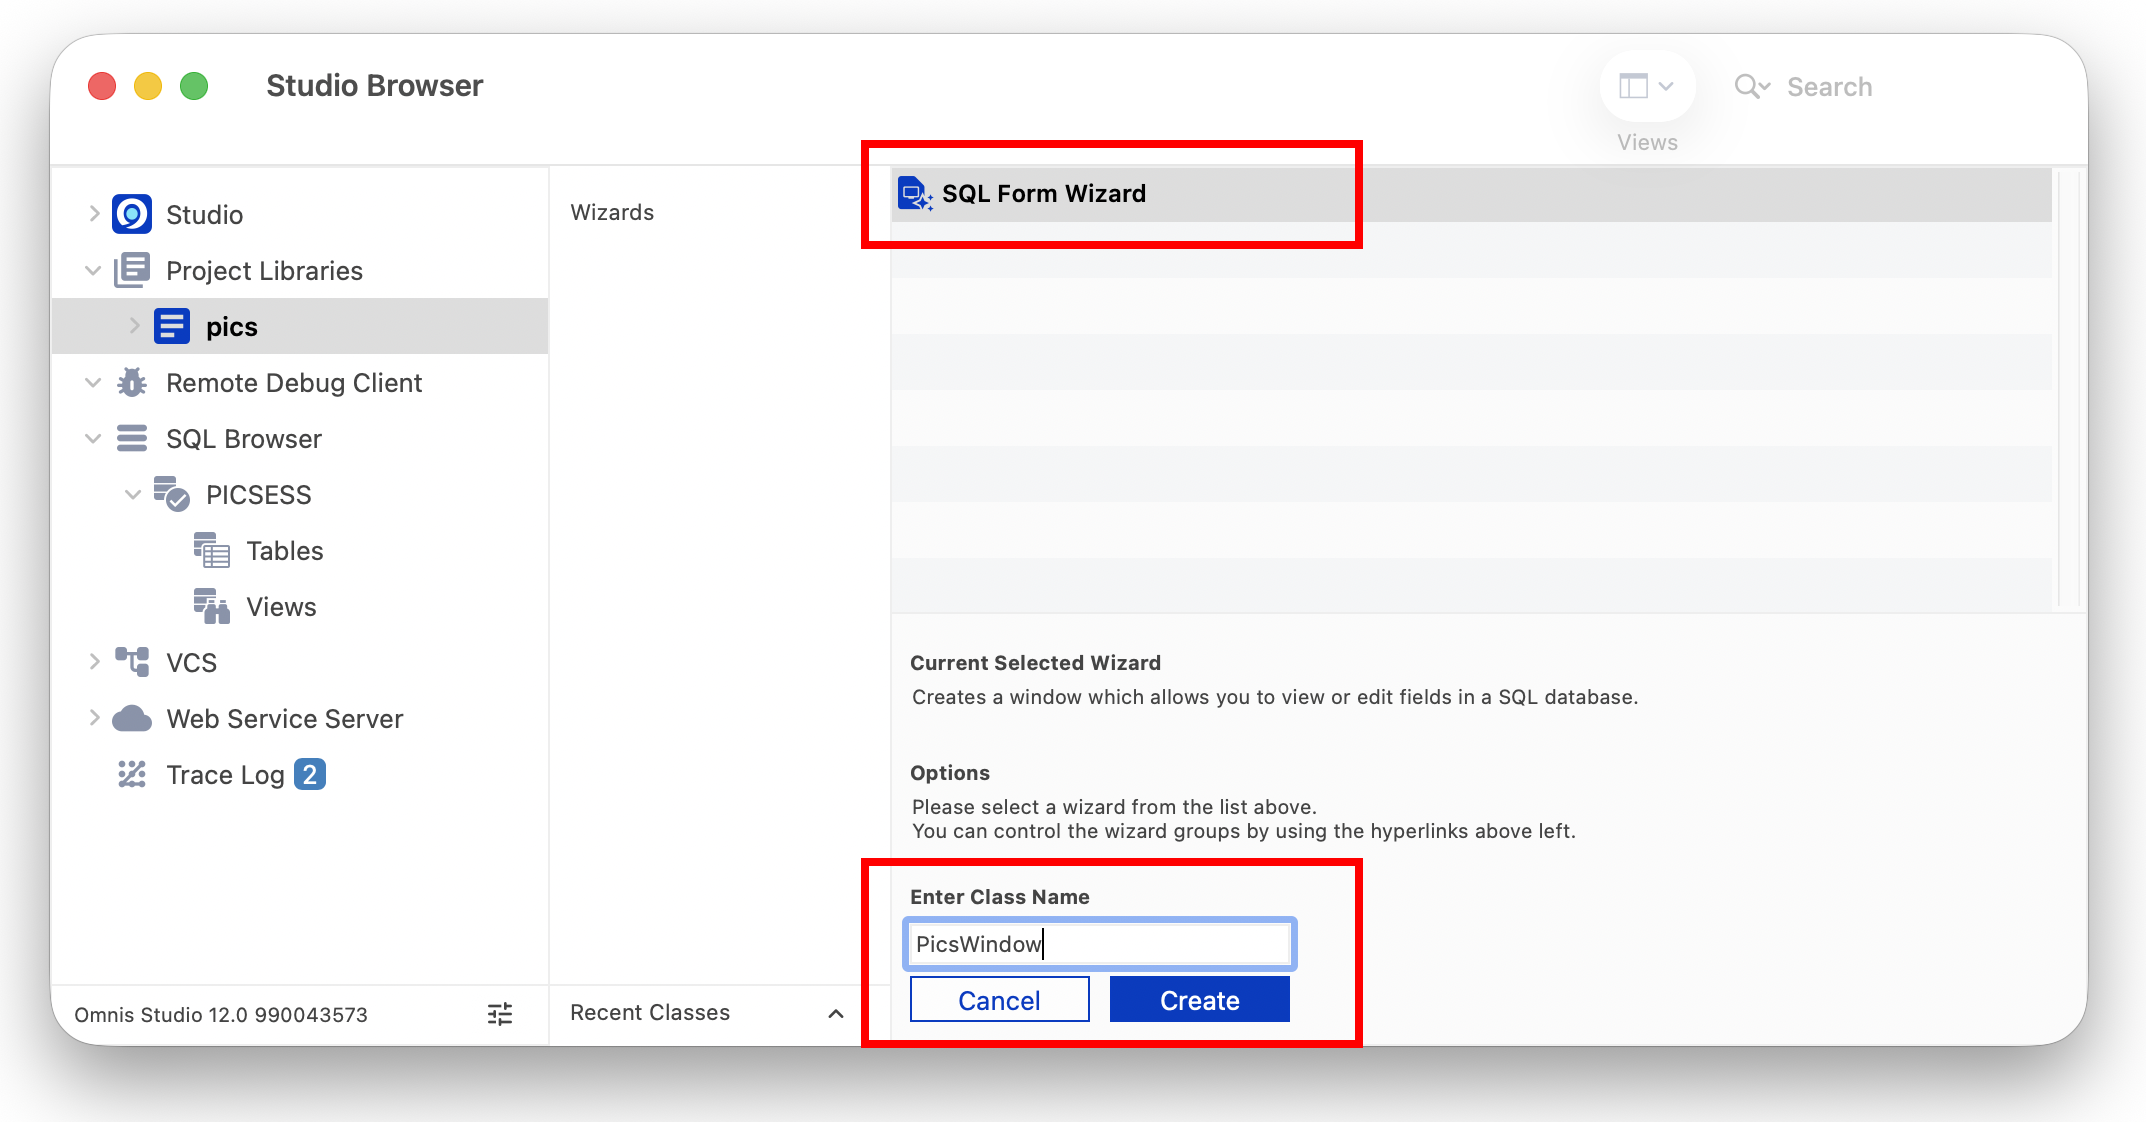
Select the SQL JavaScript Form option in the list, enter the class name PicsWebForm at the bottom and press the Create button.
Next you need to create a new Remote task, or if you are using the Community edition select an existing remote task which in this case was created for you.
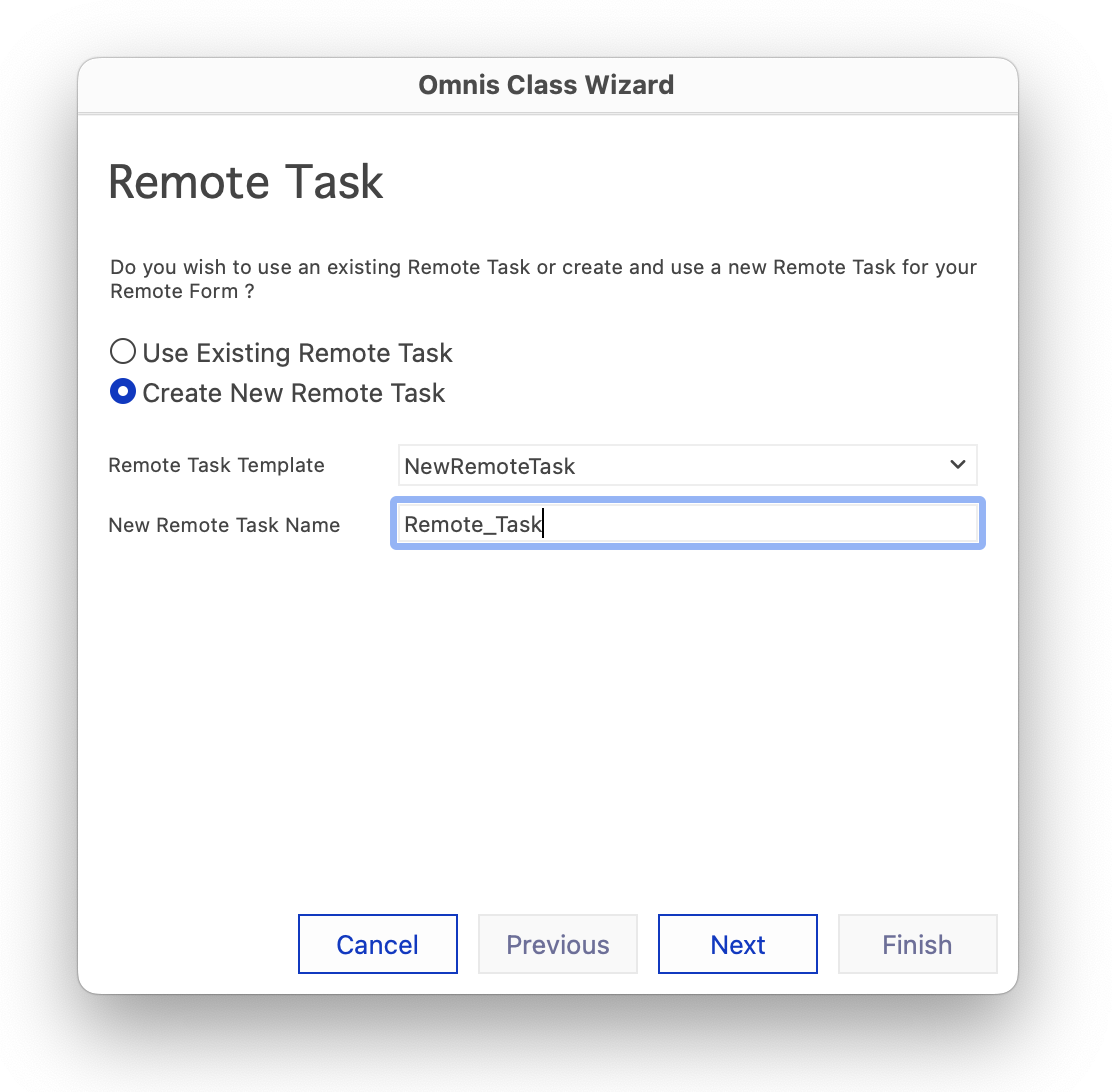
If you are using the Professional edition (or Trial version):
Select the Create New Remote Task option and the NewRemoteTask template option (the default).
Enter the name Remote_Task in the New Remote Task Name box and click on Next.
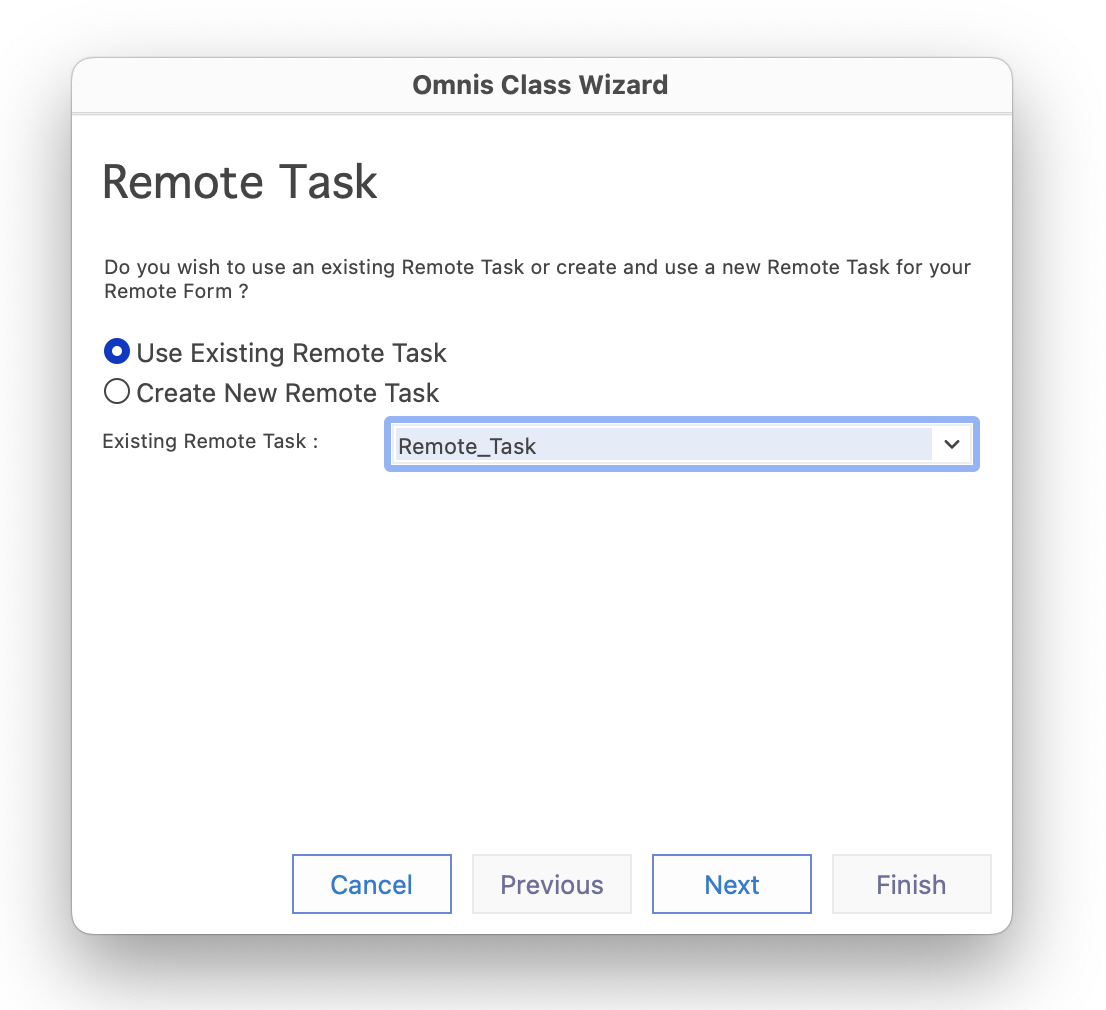
Or if you are using the Community edtion:
Select the Use Existing Remote Task option.
Select the Remote_Task and click on Next.
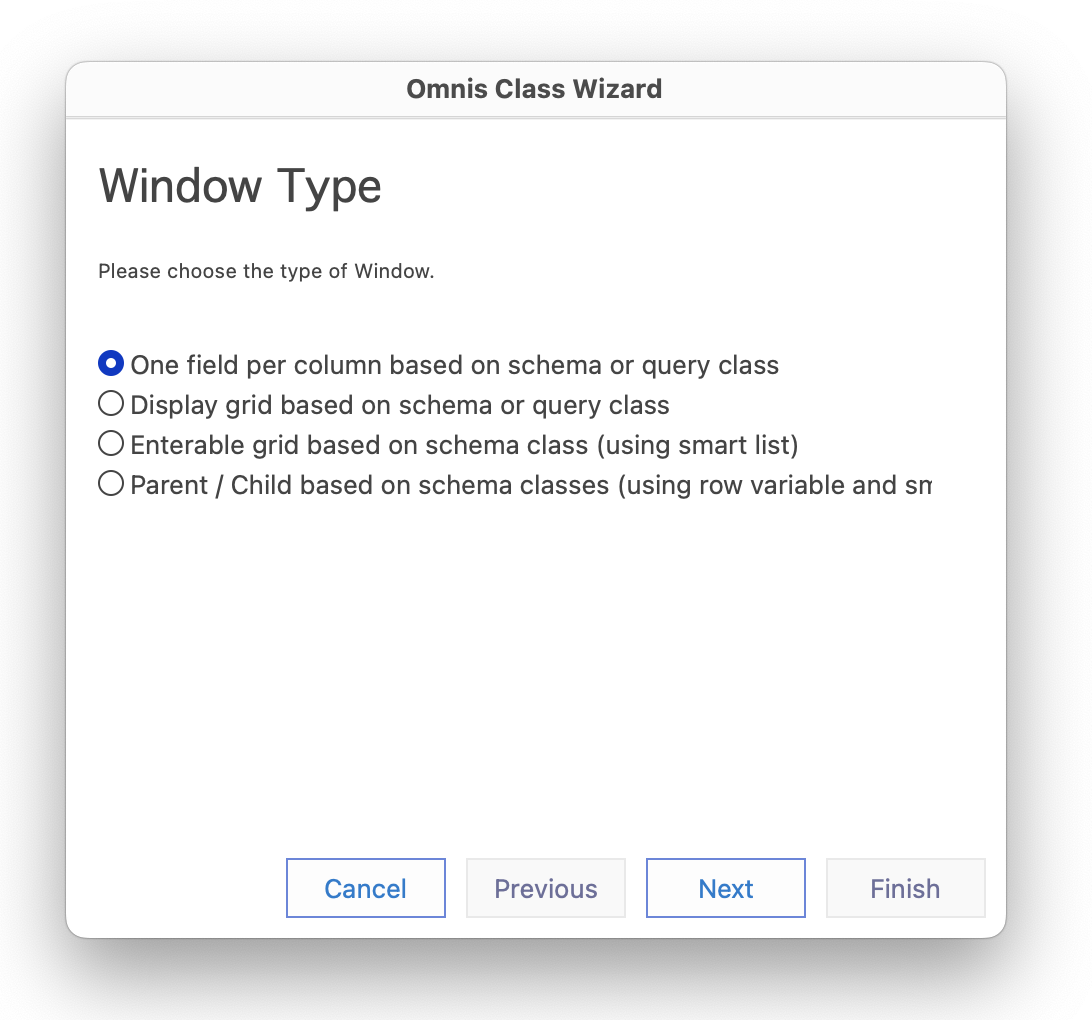
Next in the Class wizard screen, you need to choose the style or layout of the remote form; the radio buttons allow you to select the style of remote form to create.
The "One field per column based on schema or query class" option should be selected by default, which creates a simple entry form to allow you to browse the data in a single database table, like the one used in this tutorial.
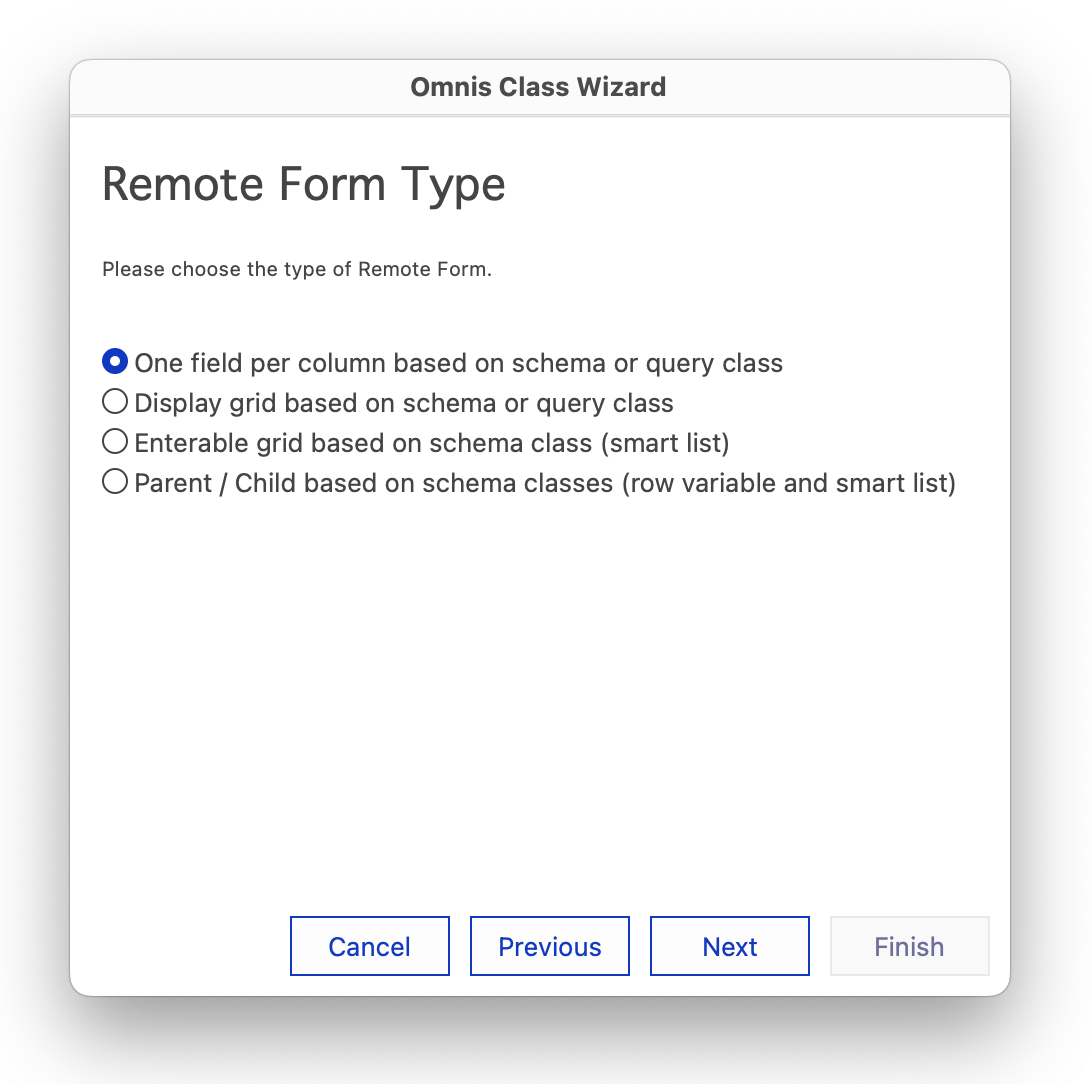
If you have more time, and want to explore Omnis Studio a little more, you can come back to this stage of the tutorial and try the other form layouts, such as the Display or Enterable grid-based form; note the Parent / Child option requires two tables (schema classes) linked in a parent/child relationship.
Note that at any time in the wizard process you can press the Previous button to go back and review or change a selection.
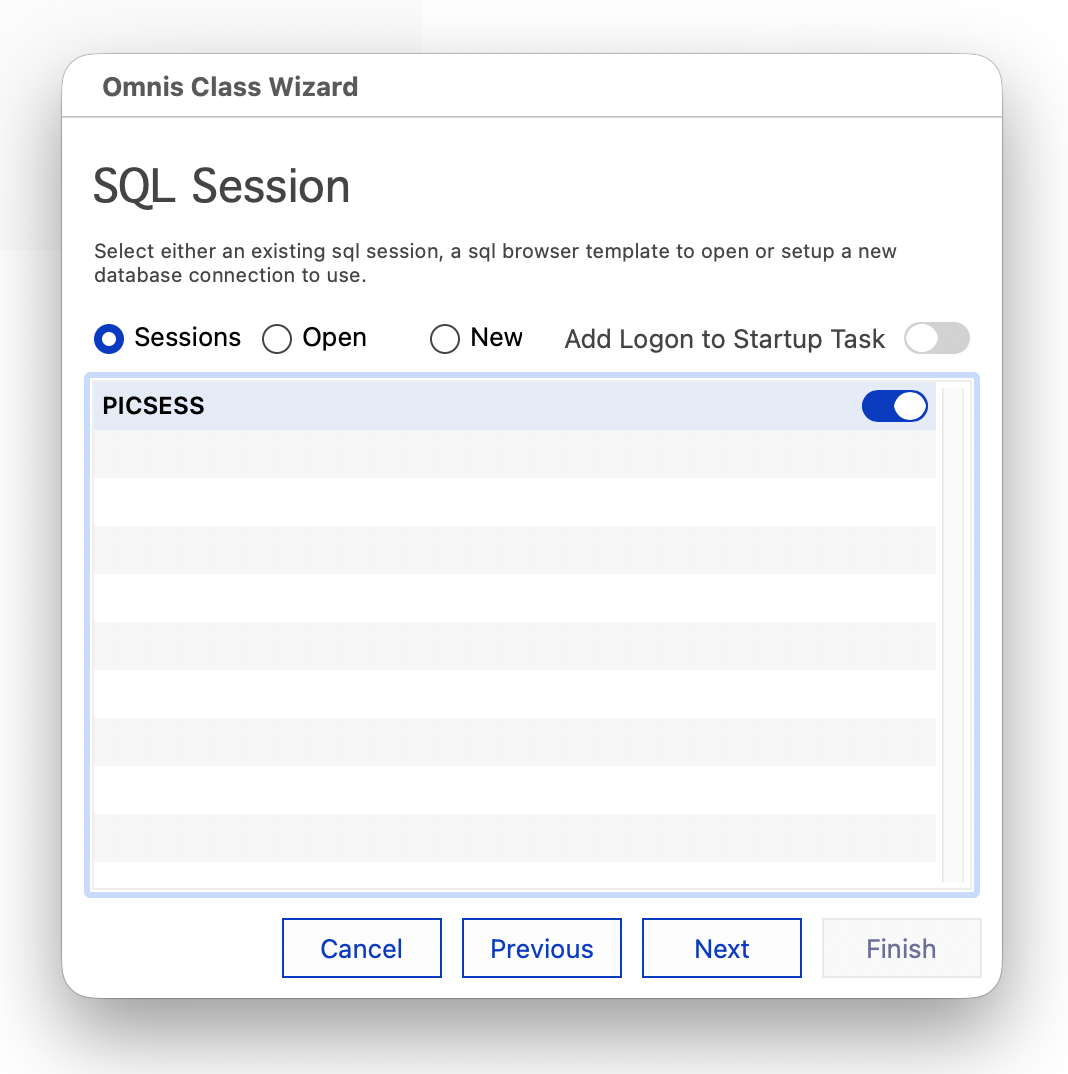
Next the form wizard allows you to create or open a session to a SQL database, to access the data you are going to use. In this case, you are going to connect to the SQLite database provided in the download (pics.db). However, you could use a database from another vendor, such as Oracle, Sybase, DB2, or MySQL, or some other data source connected via ODBC (your edition may restrict which databases you can use).
To use the Pics.db SQLite database provided, ensure that the New option is selected (the default) to create a new session template.
Type PICSESS in the Session Name box, select SQLite from the list of Databases
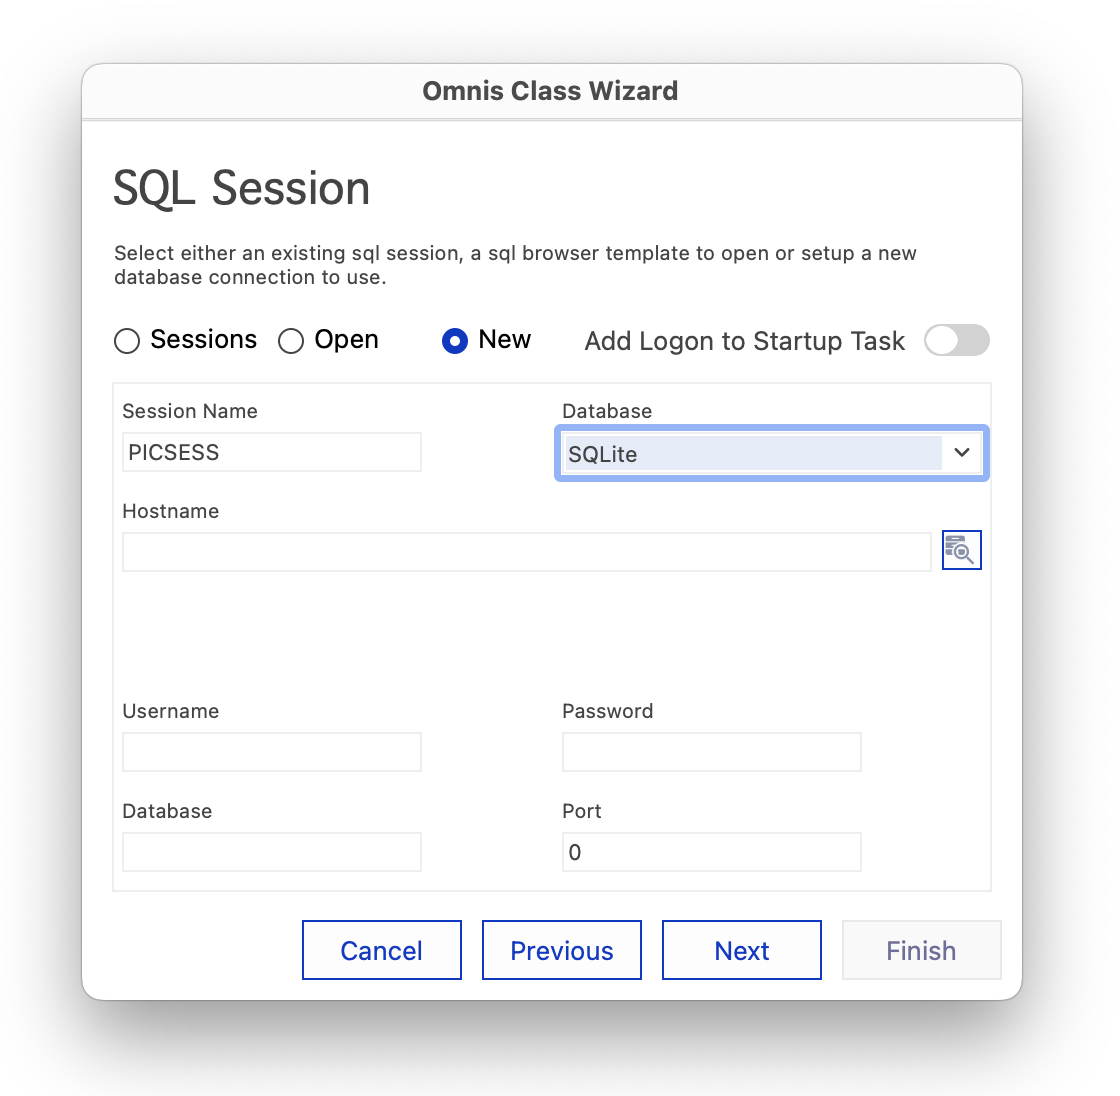
Note the list of DBMS Vendors in the Database list may be limited if your edition of Omnis Studio does not support a particular database, or you do not have the necessary clientware installed, but the list should include PostgreSQL and SQLite in all editions of Omnis Studio including the Community edition.
If you wish to create your own SQL session, jump to Creating a Database Session, then come back to this section to create your remote form using the wizard.
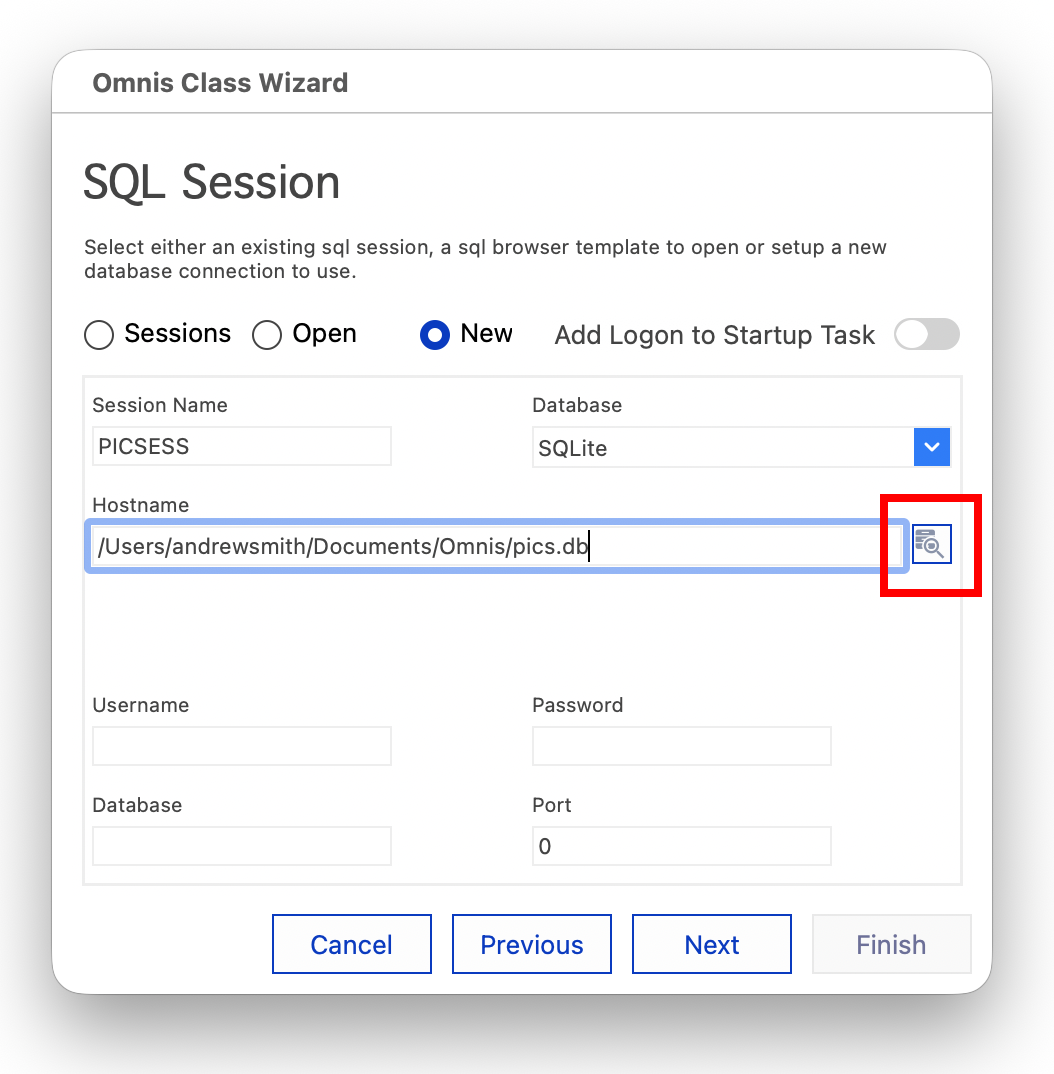
Now you need to load the SQLite database available in the zip download. To do this, the Host Name box needs to contain the path to the SQLite database file.
Under Windows, it will be located in 'AppData\Local' folder such as:
On macOS, look for the ‘tutorial’ folder in the Application Support folder, such as:
or if you have placed the file(s) in your Documents folder:
/Users/<username>/Documents/Omnis/
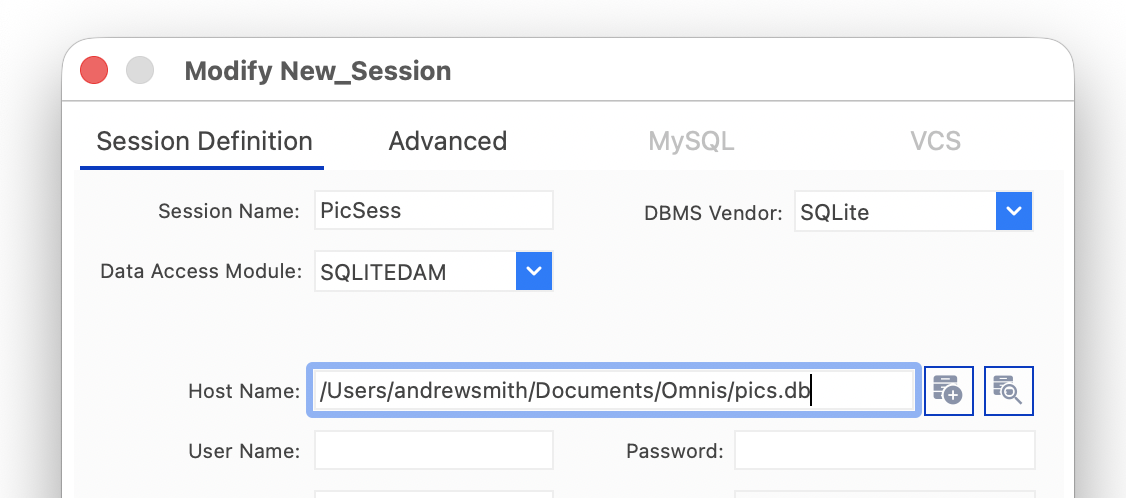
When you have located the pics.db database file on your system, click OK (or Open) and the path to this file will appear in the Host Name box (shown above).
The Add Logon to Startup Task option allows you to add logon code to the form or the library. For the purposes of this tutorial you can leave the option disabled to add the logon code to the form, which means the database session will be opened when you open the form. When the option is enabled, the logon code will be added to the Startup_Task which means the database session will be opened when you open your library.
Next you can choose the table in your database to be used in the form, in this case the MyPictures table in the pics.db file.
Click on the drop arrow next to the MyPictures item in the list.
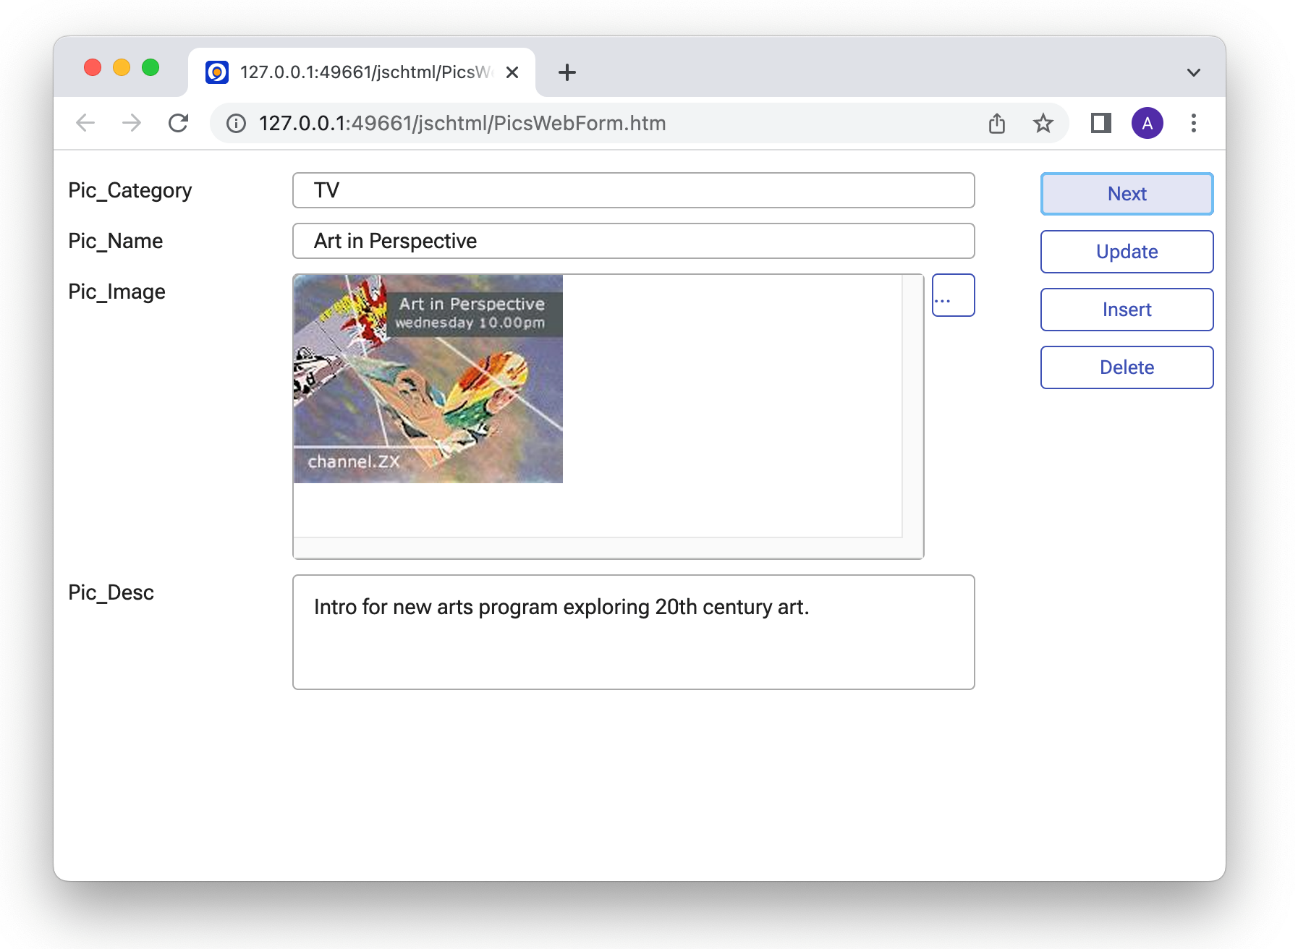
Check the Pic_Category, Pic_Name, Pic_Image, and Pic_Desc options; these correspond to the columns in the MyPictures database table. (The Pic_ID and Pic_URL columns do not need to be displayed on the remote form.)
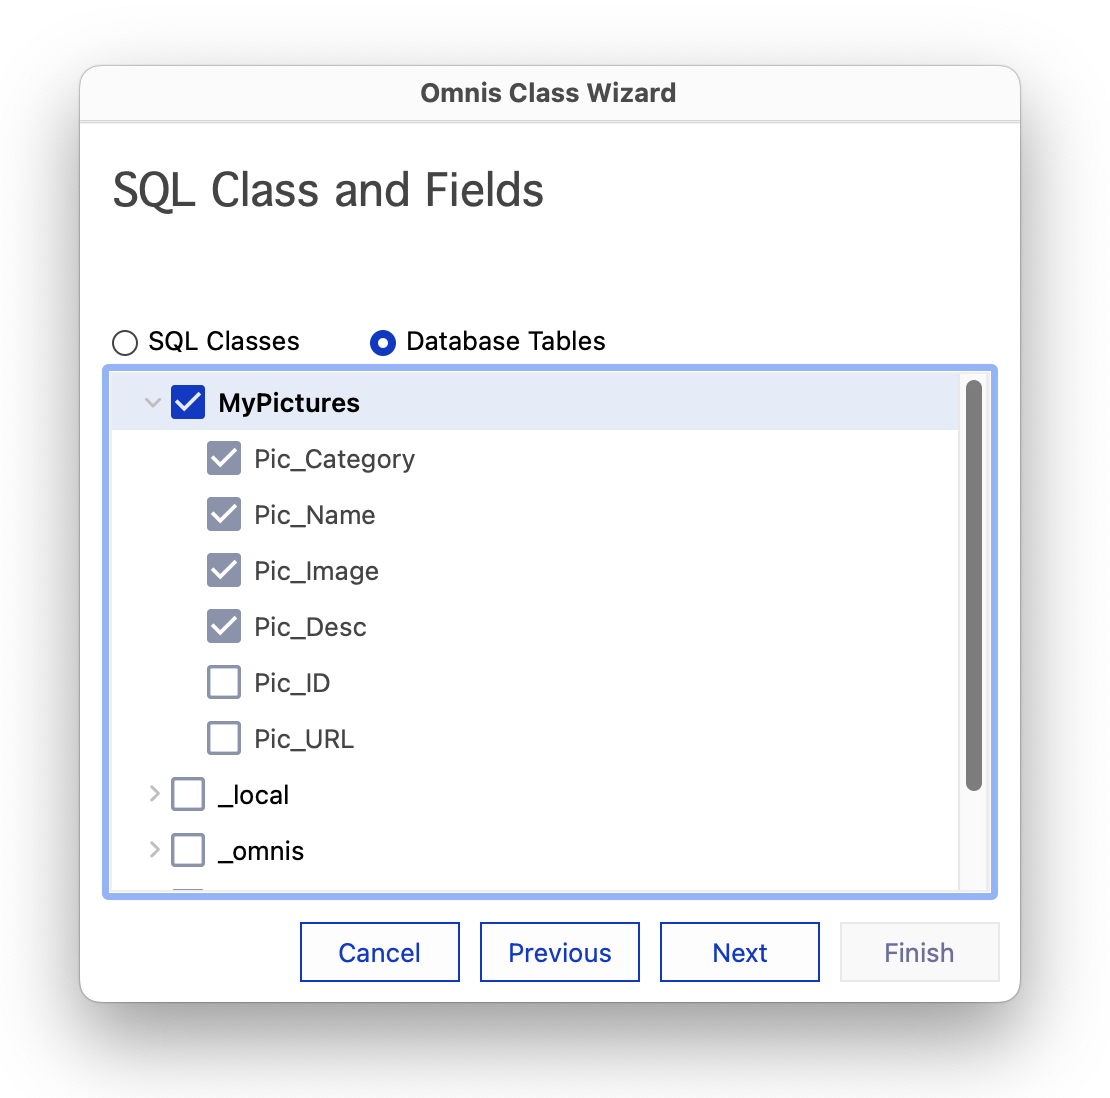
If you have created a database session already, and the required SQL classes (schema classes), then at this stage you can select the SQL Classes option and choose the relevant tables or columns to be displayed on the form.
The Form Wizard creates a remote form called PicsWebForm and opens it in design mode. The wizard also creates a schema class (in this case called sMyPictures) and a remote task; these are listed in the Studio Browser.
Having used the wizard to create a form, you can skip most of the remainder of this tutorial and jump straight to the section about testing the remote form.
This and the following sections show you how to create a database session and a Remote Form from scratch. If however you want to do this quickly using a Form Wizard, you can complete the Creating a Web Form using a wizard section, and skip all these sections.
This section shows how you can use the SQL Browser to create a new session for an existing SQLite database, provided in the download, that is already populated with data. However, you could use a database from another vendor, such as Oracle, Sybase, DB2, or MySQL, or some other data source connected via ODBC (your edition may restrict which database/s you can use). You can use the SQL Browser during development to set up, modify and examine your database, or multiple databases on different servers, and you can use the SQL Browser to move database tables from one server or data source to another.
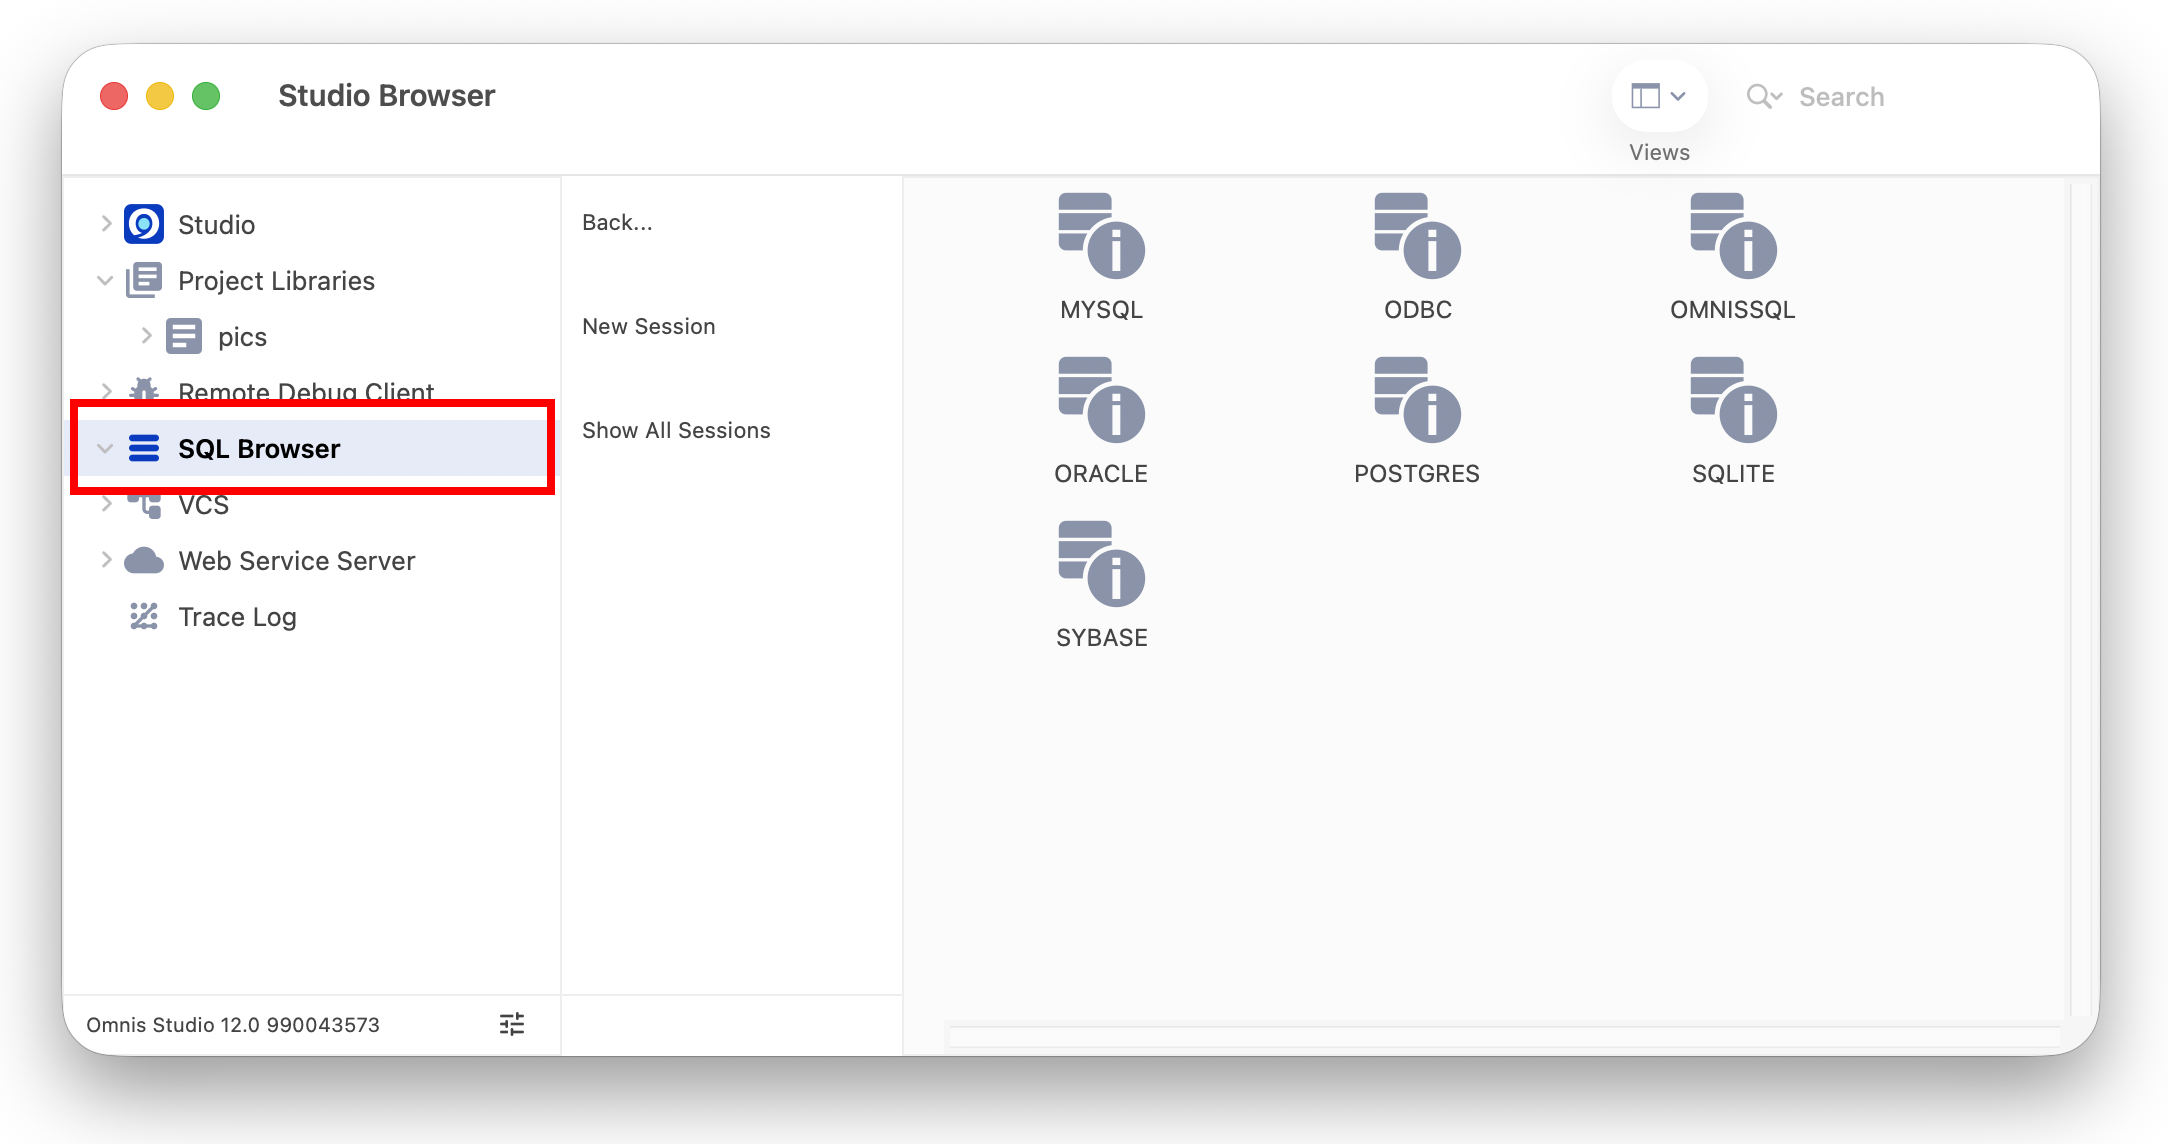
Note that some of the session templates may not appear if your edition of Omnis Studio does not support a particular database, or you do not have the necessary clientware installed, but you should see templates for PostgreSQL and SQLite in all editions of Omnis Studio.
The Modify Session window will open which contains all the information needed to connect to your database. (Not all the fields on the session template are needed for all databases.)
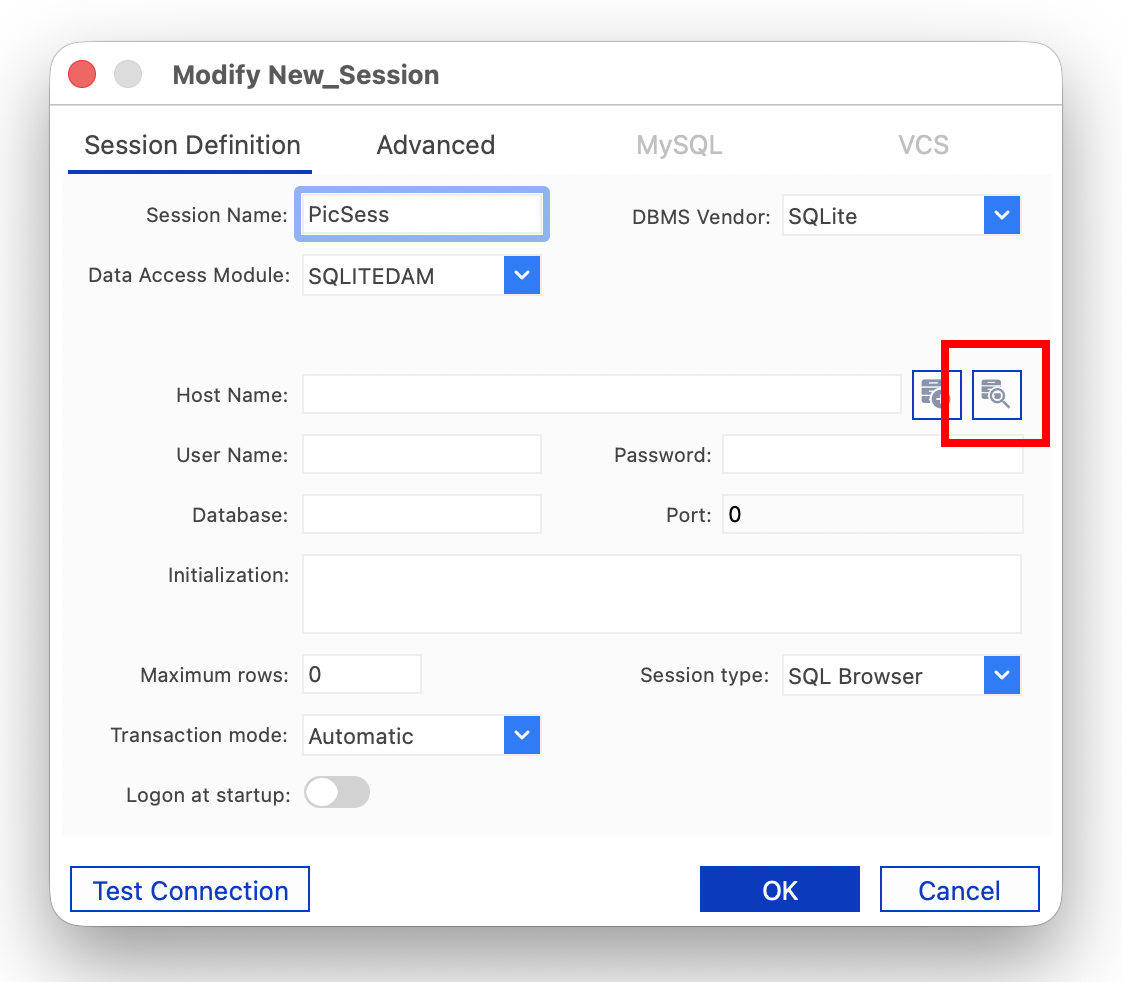
Now you need to connect this session template to the SQLite database available in the zip download. On the Modify Session window, the Host Name box needs to contain the path to the SQLite database file that you wish to use, in this case the Pics.db file you downloaded.
Click the Select Data File button, located to the far right of the Host Name box (as shown highlighted above)
Navigate to the 'pics.db' database file (provided in the zip download) located in the <Omnis Software>\welcome\tutorial folder in the writable part of your Omnis installation (or wherever you placed the file)
Under Windows, it will be located in AppData\Local such as:
On macOS, look for the ‘tutorial’ folder in the Application Support folder, such as:
/Users/<username>/Library/Application Support/Omnis/Omnis Studio <version>/welcome/tutorial
When you have located the pics.db database file on your system, click OK and the path to this file will appear in the Host Name box.
Note that there is also a New Data File button on the Modify Session window that you can use to create a new empty SQLite database, but for this tutorial you will use the existing database file, as above.
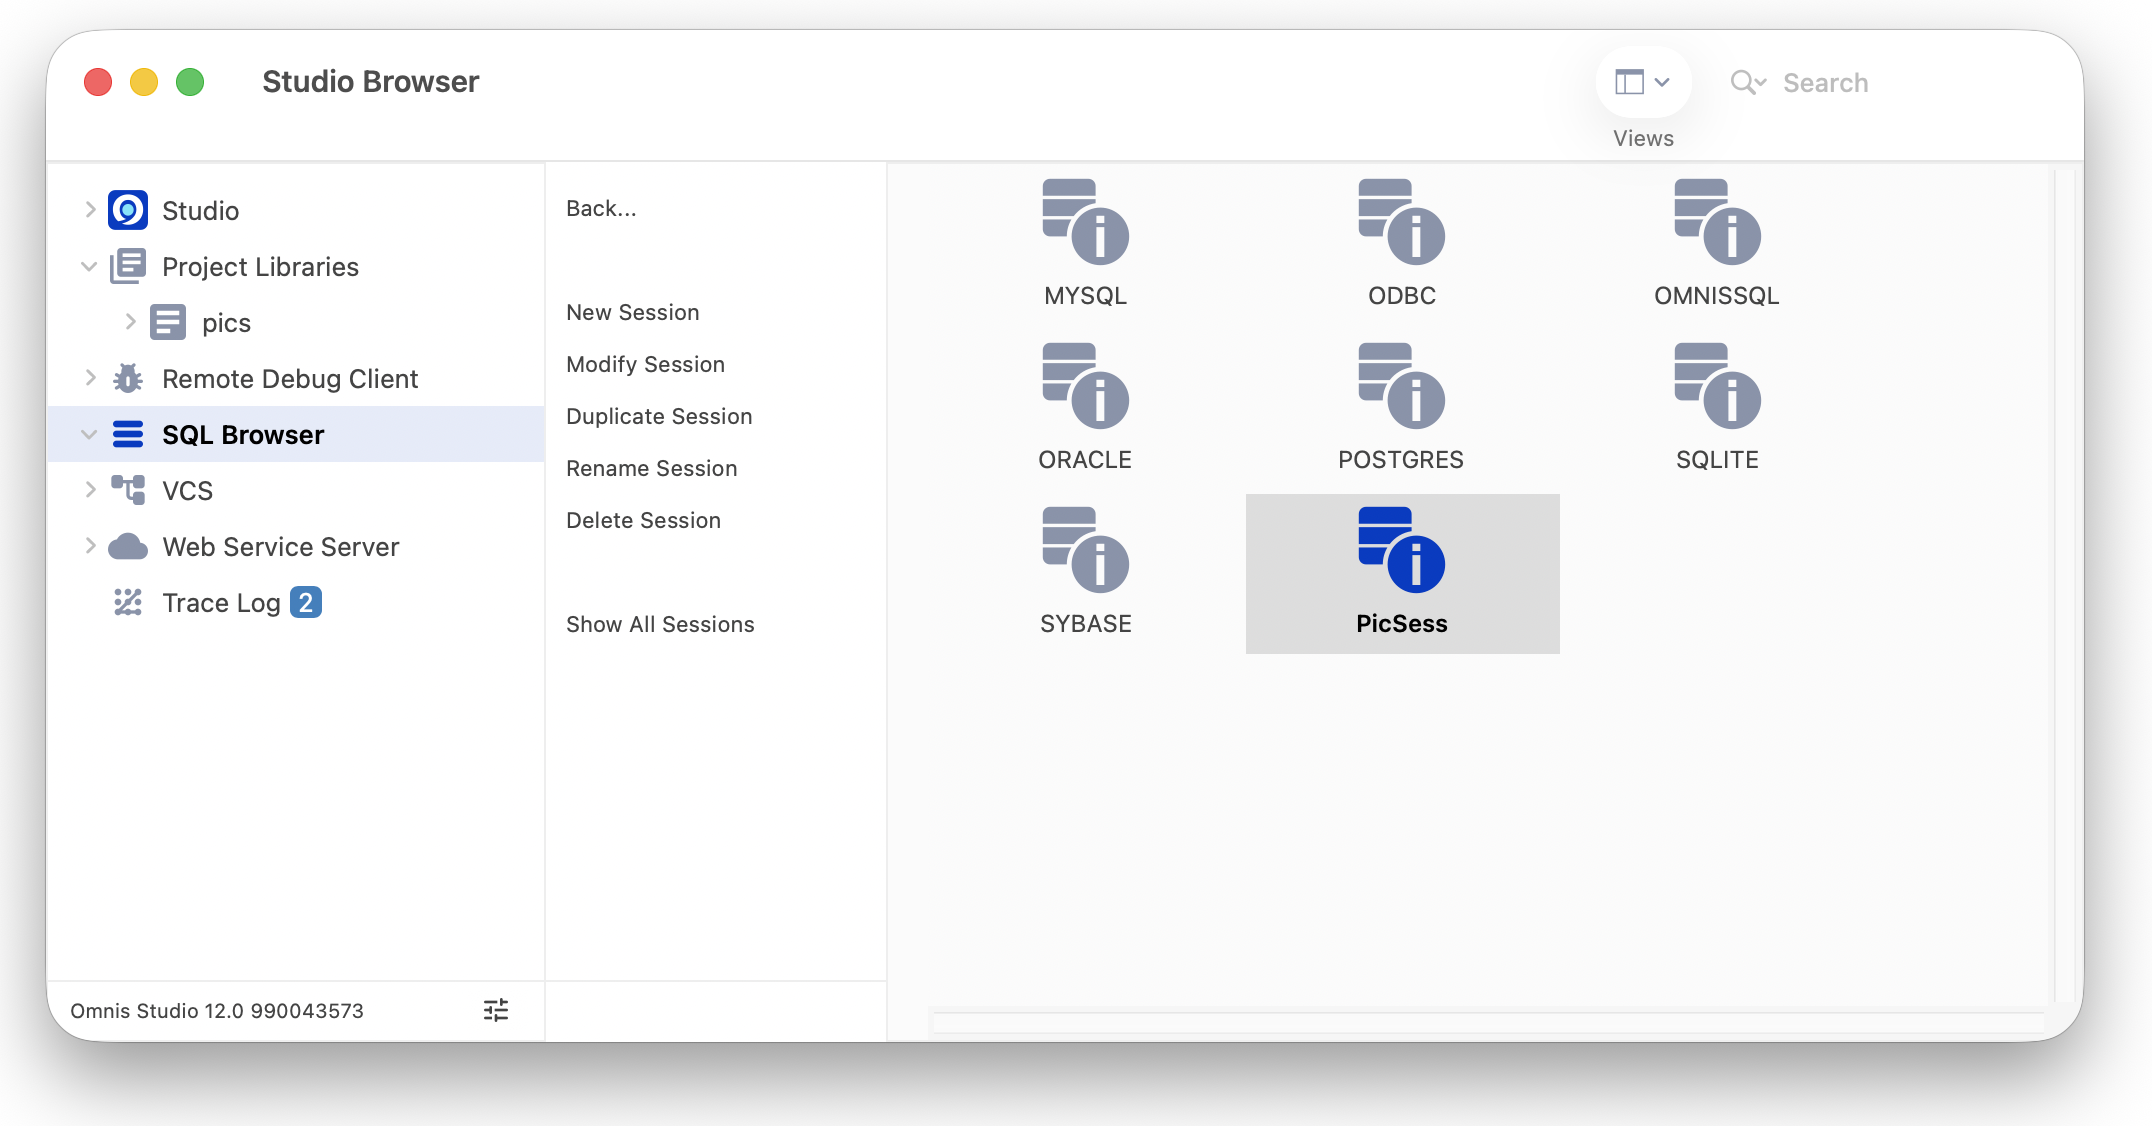
The new PICSESS session template will appear in the list of available session templates.
To open the database session:
You should see your PICSESS session template displayed in the list of sessions.
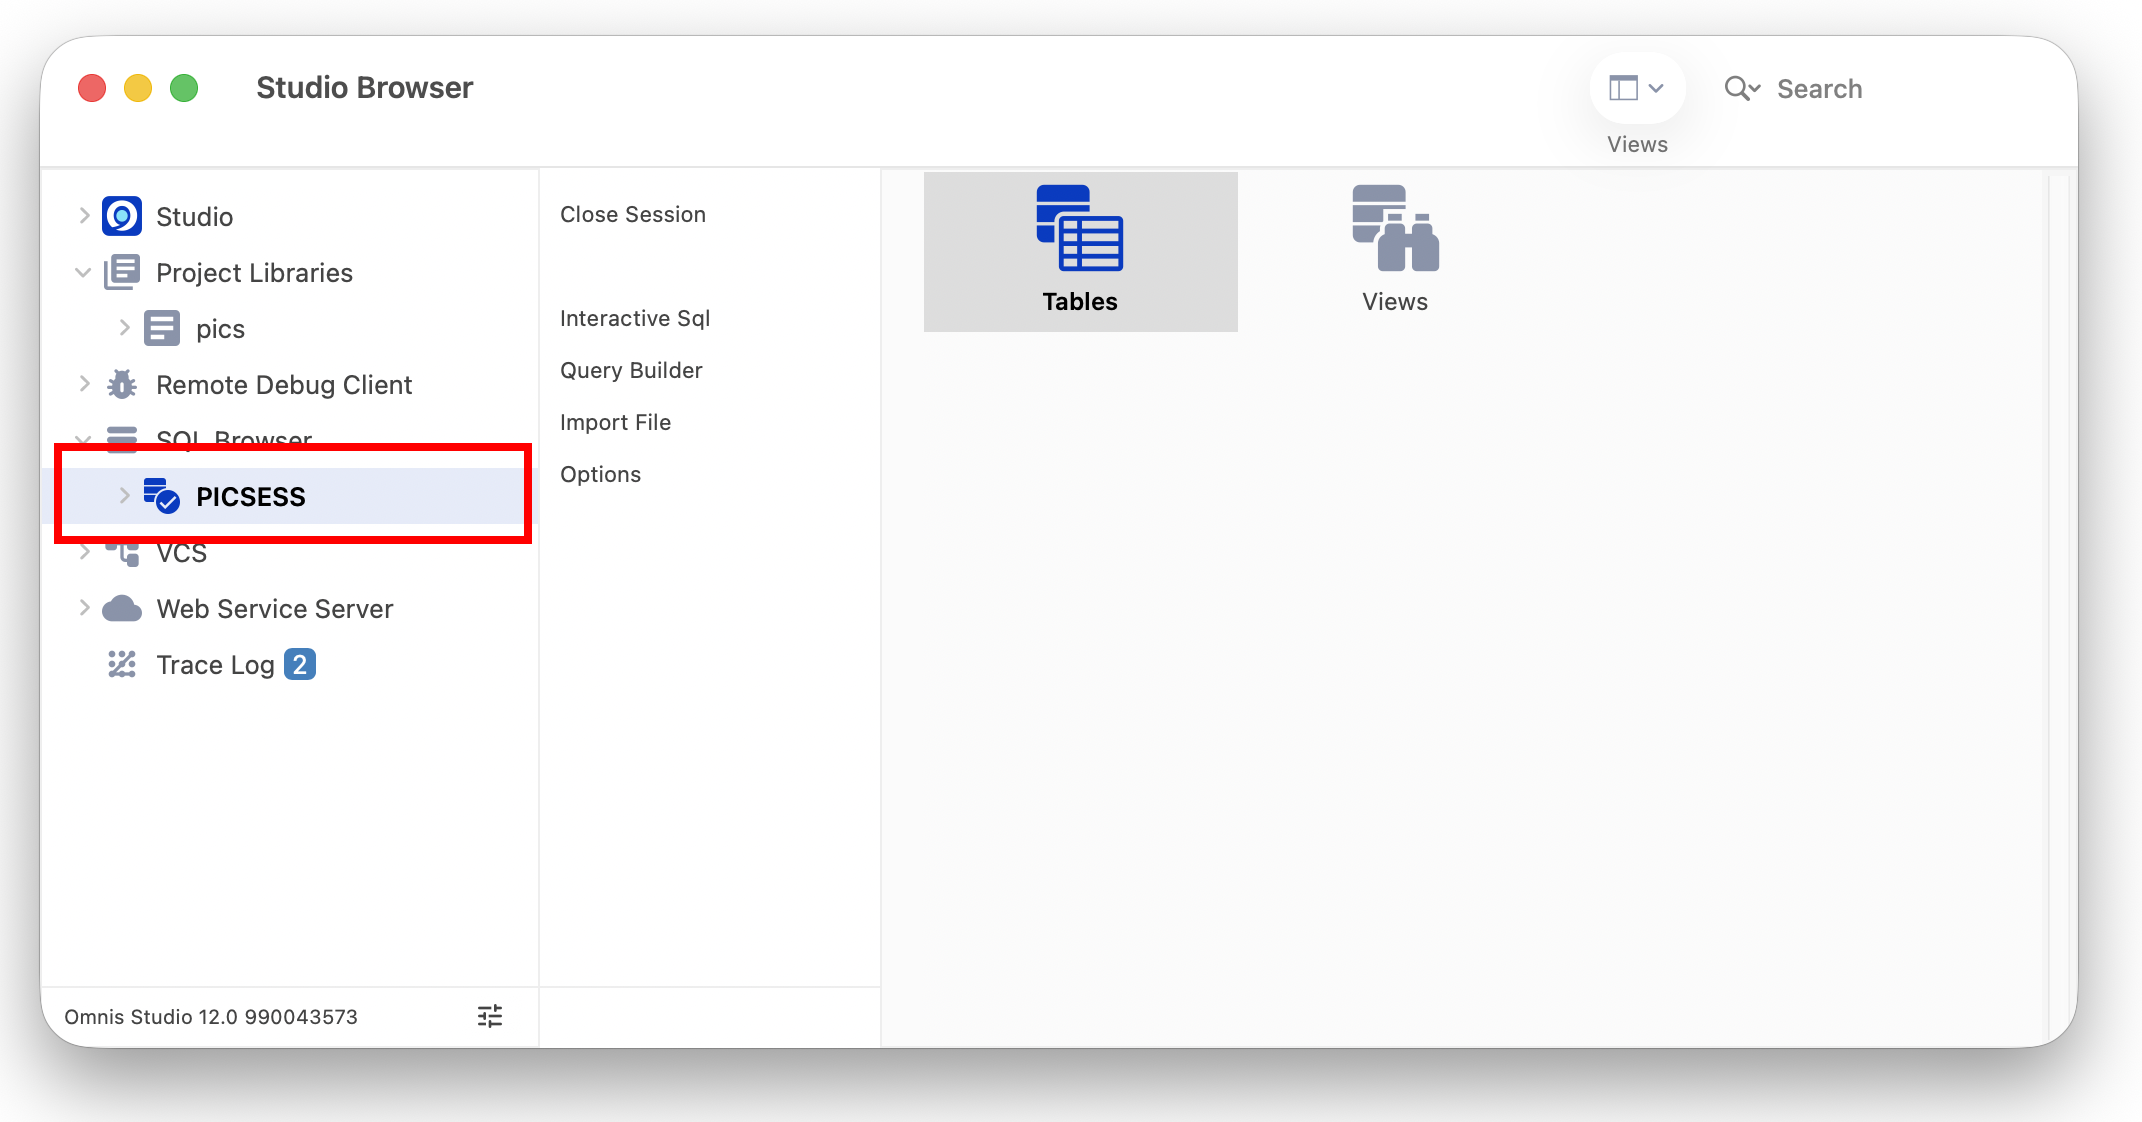
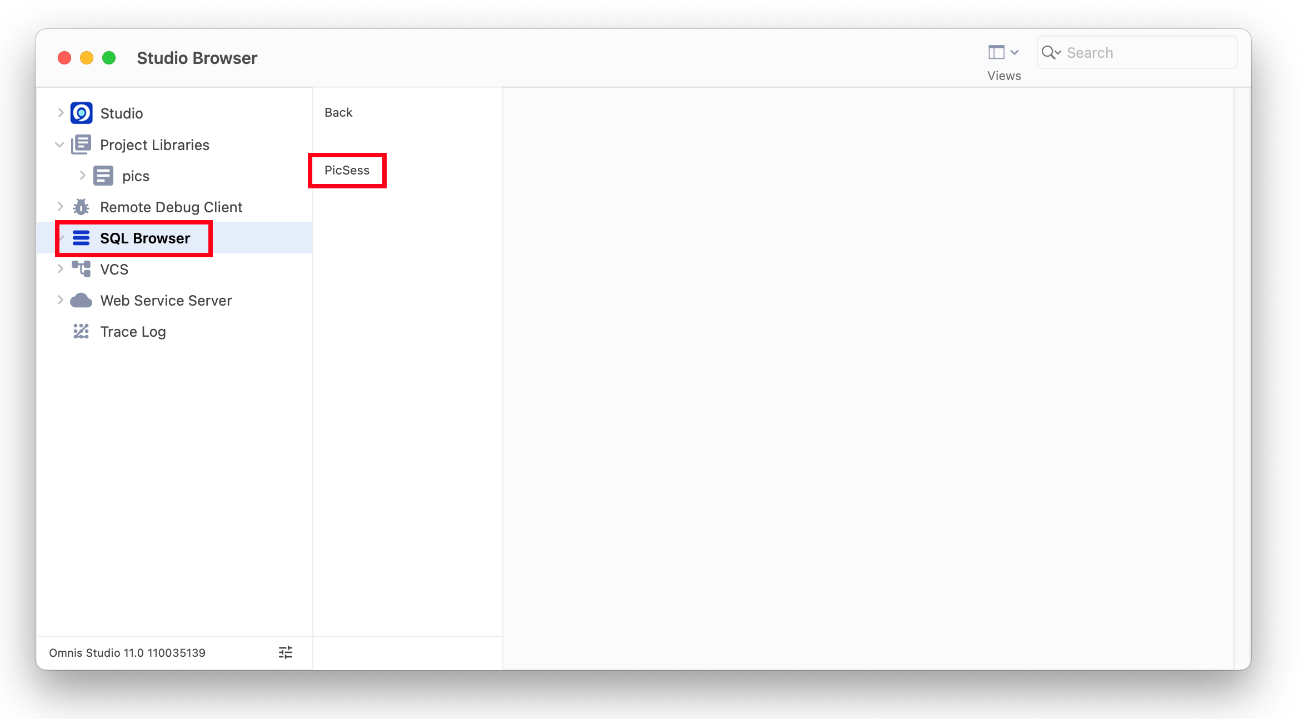
The PICSESS session appears under the SQL Browser branch of the Folders tree list and the Tables and Views icons are displayed on the right. (Different databases may contain different database objects.)
Note that if you have quit and restarted Omnis Studio, then you will need to reopen your database connection/session, as above, to continue this tutorial.
To view the tables contained in the PICS database:
To view the contents of the MyPictures table:
Select the MyPictures table and click on the Show Data option, or right-click on the table and select Show Data from the context menu.
Expand the Interactive SQL window, resize the Pic_Image column (by dragging the vertical line in the table header), and scroll down to view the data.
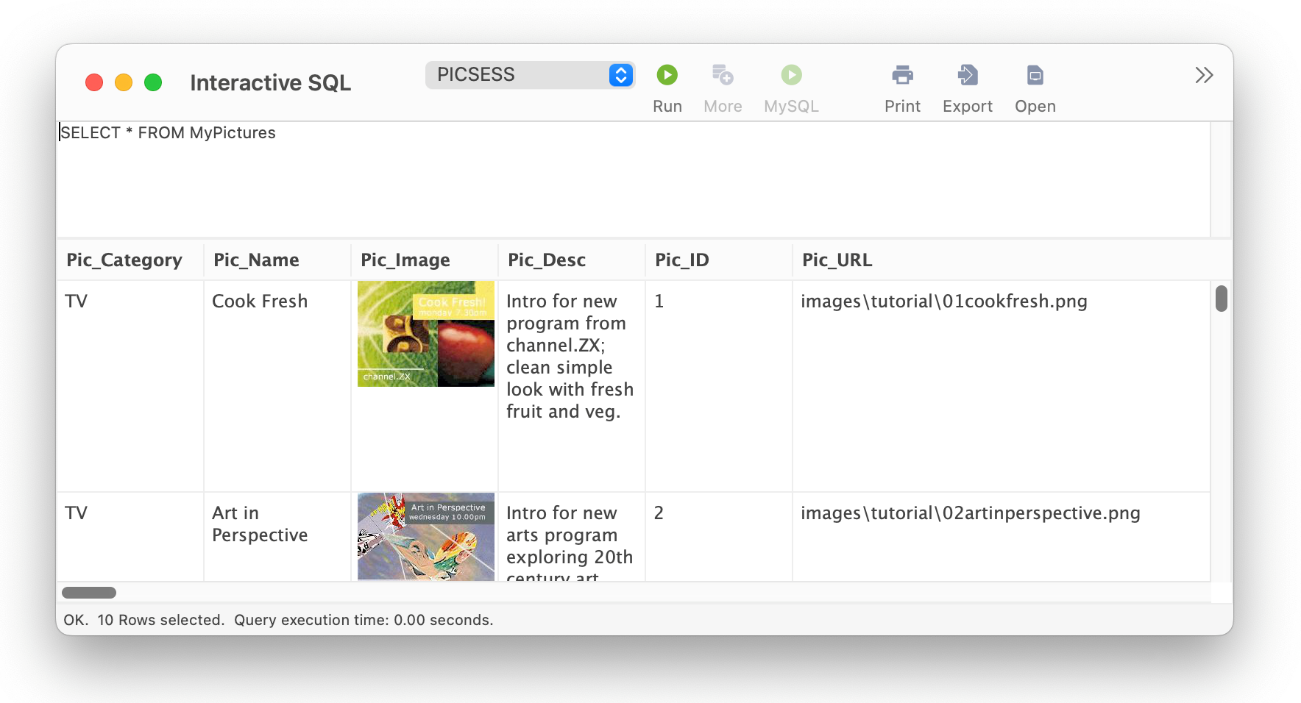
Note the Interactive SQL tool has entered the SQL needed to view the whole of the MyPictures table (SELECT * FROM MyPictures), but you can use this tool to return whatever data you like by entering your own SQL statements and clicking on the Run button. For example, you could add an 'Order By Pic_Category' clause, then click Run to sort the data on Pic_Category; in this case the Books would appear at the top.
Now you have used the SQL Browser in the Development version of Omnis Studio to create the PicSess session, and to explore the tables and data in the database, you need to provide a way for your library to access the data in the database, using that session information.
Note that if you have quit and restarted Omnis Studio, then you will need to reopen your database connection/session, as described in the ‘Opening a Database Session’ section, to continue this tutorial.
To allow your library to access the data in the MyPictures table you must first create a Schema class in your library that defines the column structure of the table.
Make sure that the Libraries branch of the Folders tree list is expanded so that you can see the PICS library in the tree list (see below).
Then make sure that the SQL Browser branch of the Folders tree list is expanded so that you can see Tables under the PicSess session in the tree list.
Click on the Tables branch of the Folders tree list to select it; you will see the table MyPictures listed in the Browser list.
Drag the MyPictures table from the list of tables and drop it on the PICS library in the Folders tree list to create a schema class; drop the table when the PICS library is highlighted, as shown.
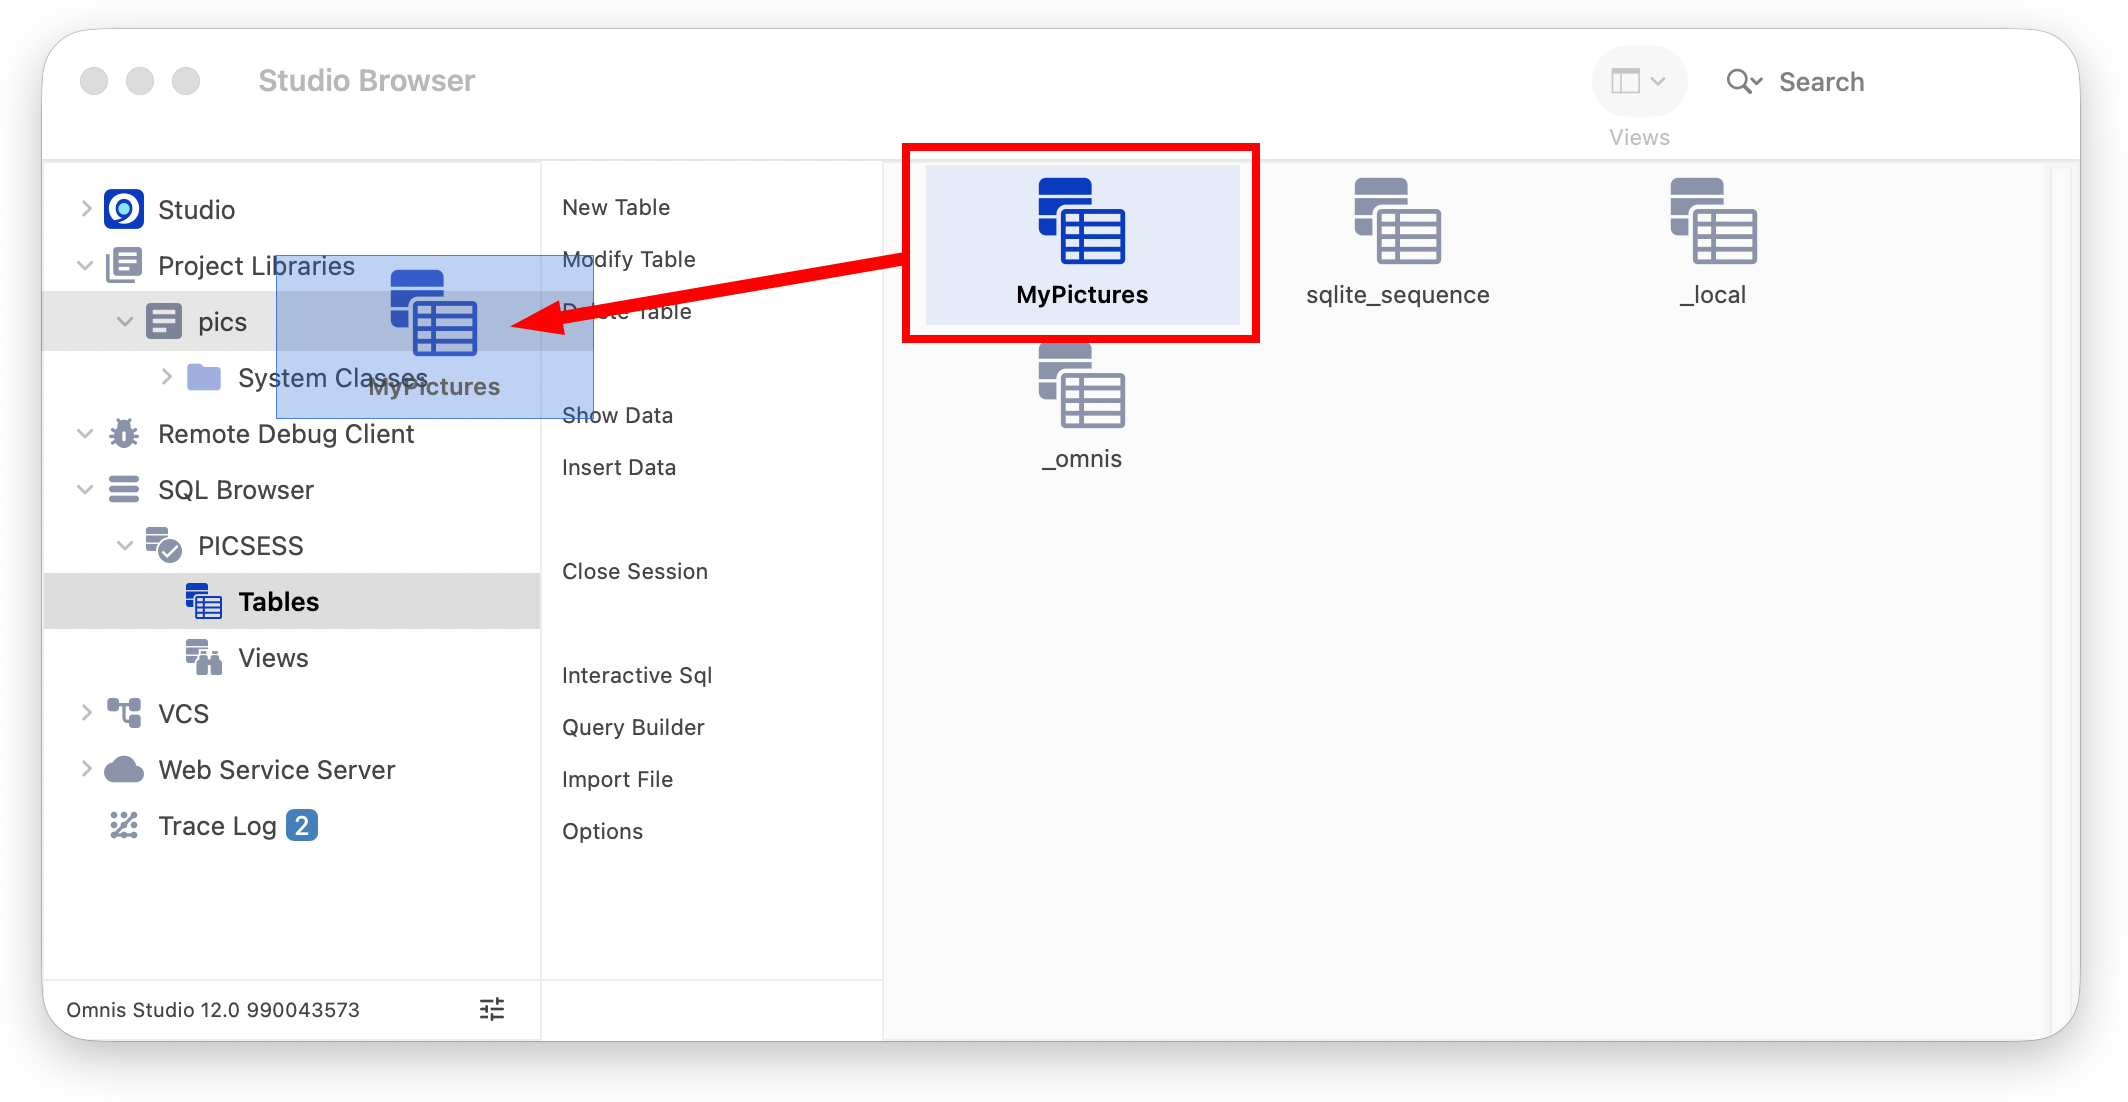
You should see a new schema class called MyPictures appear in the Browser list.
This schema class was created by Omnis automatically to match the definition of the database table when you dropped the MyPictures table onto the PICS library. (If you create your own app using your own database, you could do the same using the tables in your database, that is, drag a table onto your library to create a schema class.)
To edit the schema class:
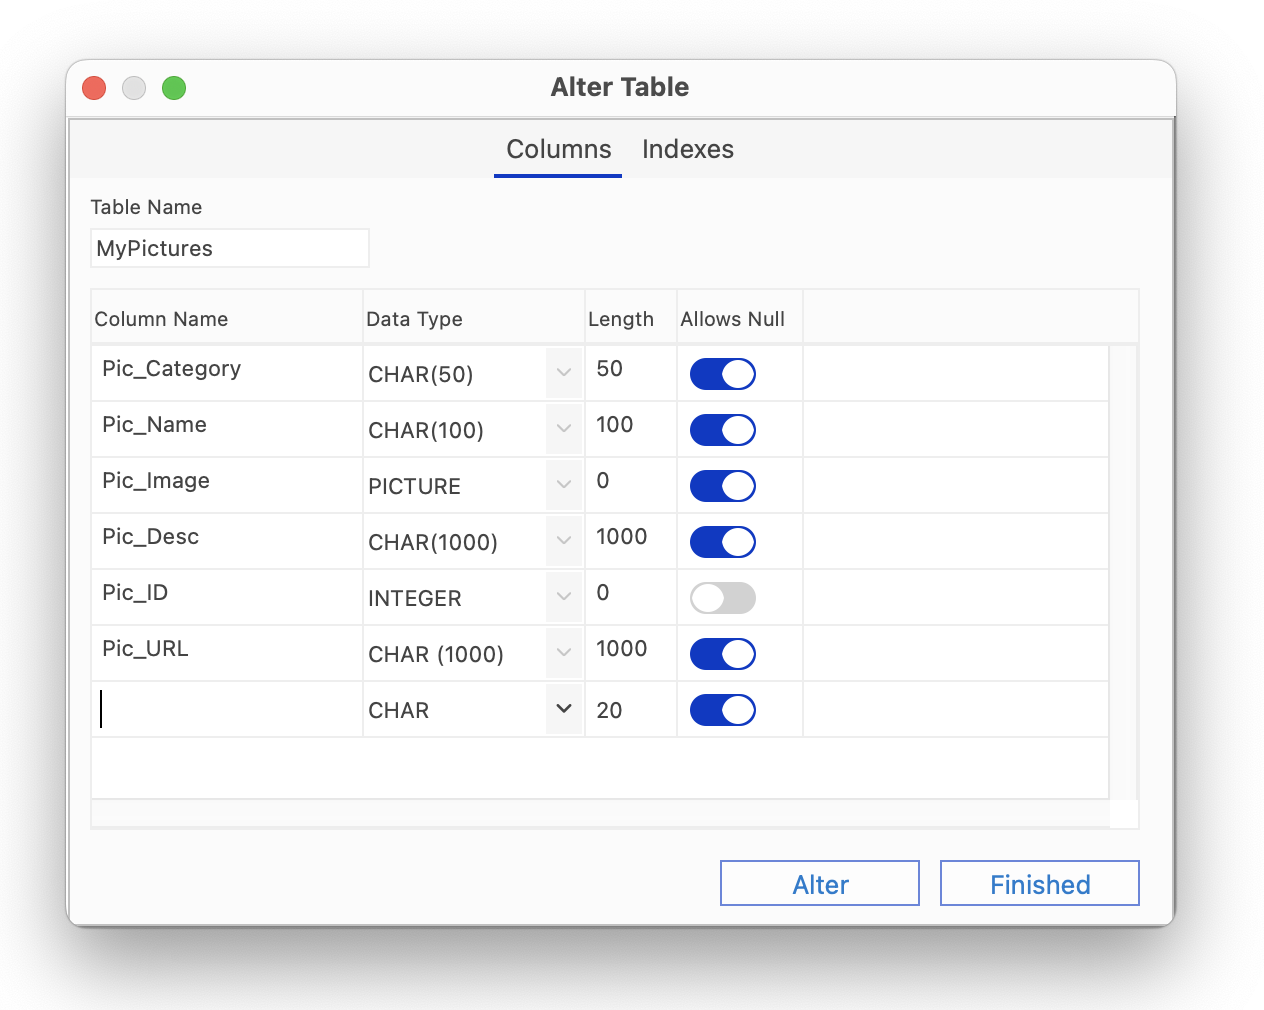
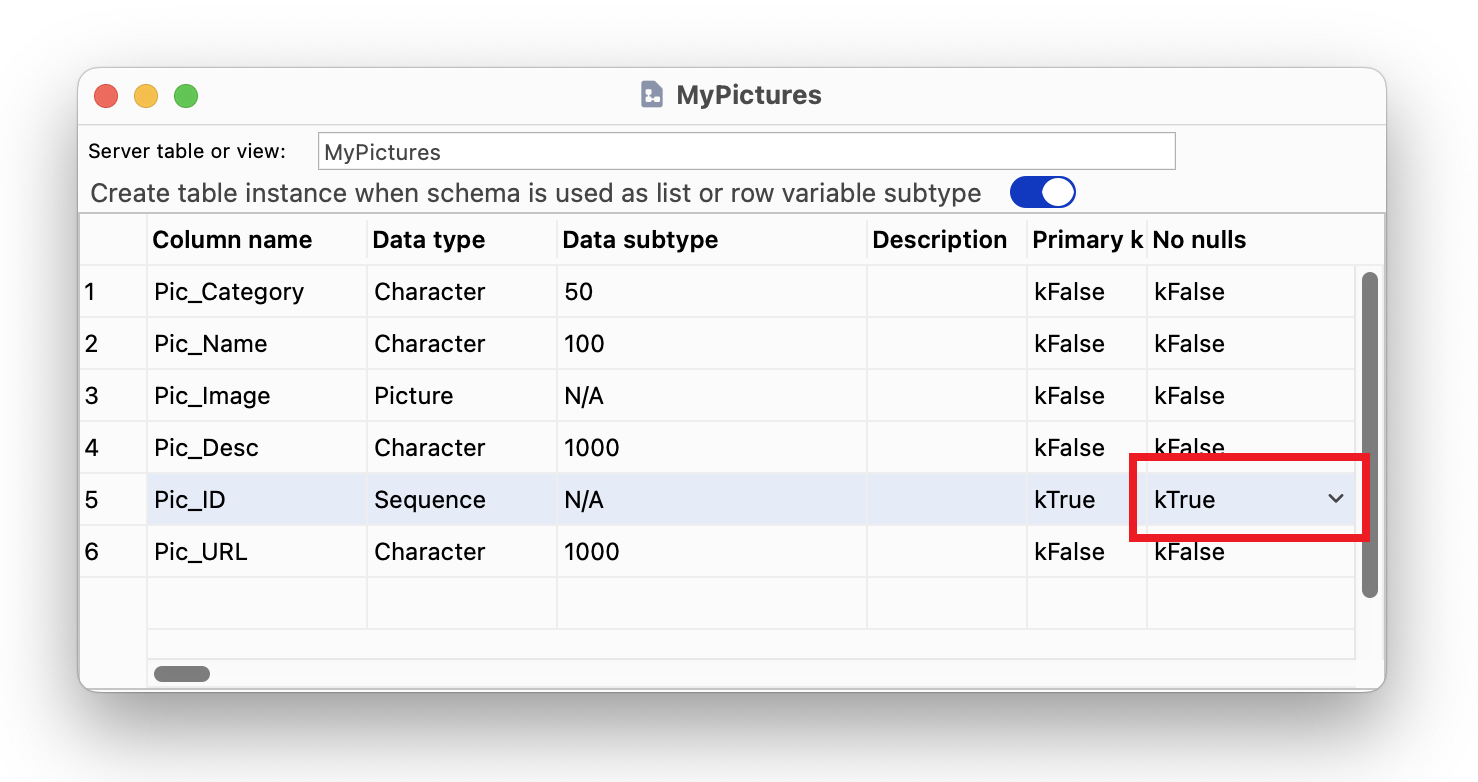
The 'Server table or view' box at the top of the schema editor contains the name of the database table MyPictures that is related to this Omnis schema class. Each of the entries in the schema contains the name and Omnis data type of one of the columns in the table. Note the data type is the equivalent Omnis data type to that of the column defined in the SQLite database table.
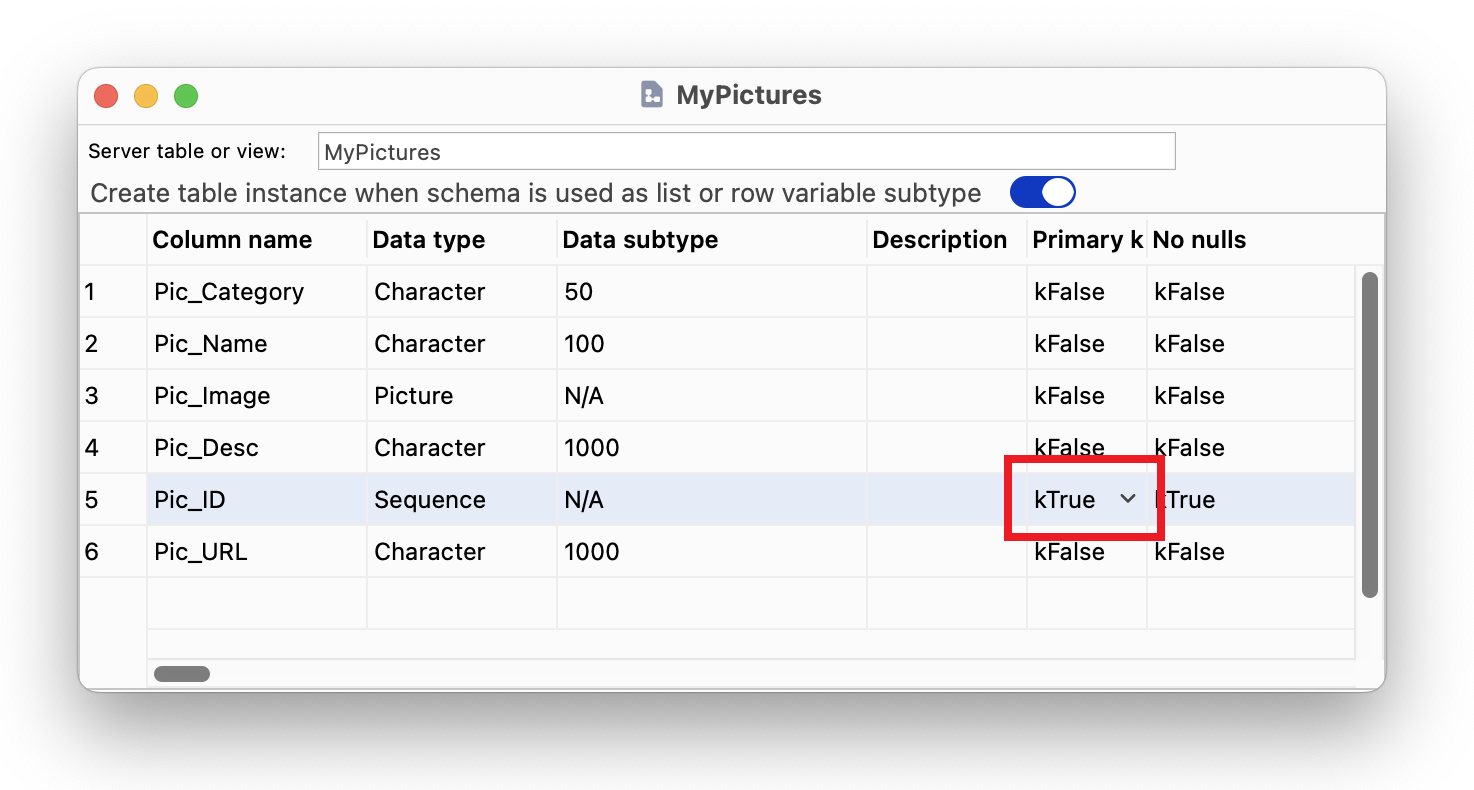
To ensure that certain kinds of queries execute in the most efficient manner it is recommended that one column in each table should be designated as the Primary Key. It is important that the value of the primary key column in each row is unique because it is used to identify a particular row of data when it is to be updated or deleted. In other words, only one row in each table should contain a specific value in the primary key column.
In addition, Omnis sets the No nulls column to kTrue, so the value is incremented automatically every time a new record is entered.
When you have finished modifying a class in Omnis you can simply close the editor window to save it, or you can use the Save option from the File menu, or press Ctrl/Cmnd‑S. You can also select the Auto Save option from the File menu to force Omnis to save any updates automatically.
IMPORTANT: the following section shows how you can create a desktop form, so if you are only interested in creating a web or mobile app (or you are using the Community Edition), you can skip this section entirely. If you want to create a web form, go to the ‘Creating a Web Form using a wizard’ section.
Having created the data structure for your database (the MyPictures schema), you can create a window or form to browse and insert data locally using a window class.
Remember, if you have quit and restarted Omnis Studio, then you will need to reopen your database session, as described in the ‘Opening a Database Session’ section.
The radio buttons on the Omnis Class Wizard allow you to select the style of form to create. Select the first radio button that reads "One field per column based on schema or query class".
Note that if different text is displayed next to the first radio button, you have selected the wrong type of wizard so you should press the Cancel button on the wizard window and choose the SQL Form Wizard.
Note that if at this point you get the message "There are no SQL sessions available for selection. Please use the SQL Object Browser to open a session and try again", you need to cancel the wizard and open a database connection, as described earlier.
Note that if at this point you get the message "There are no file classes available for selection. Please create a file class in your library and try again", you have selected the wrong type of wizard so you should press the OK button and choose the SQL Form Wizard.
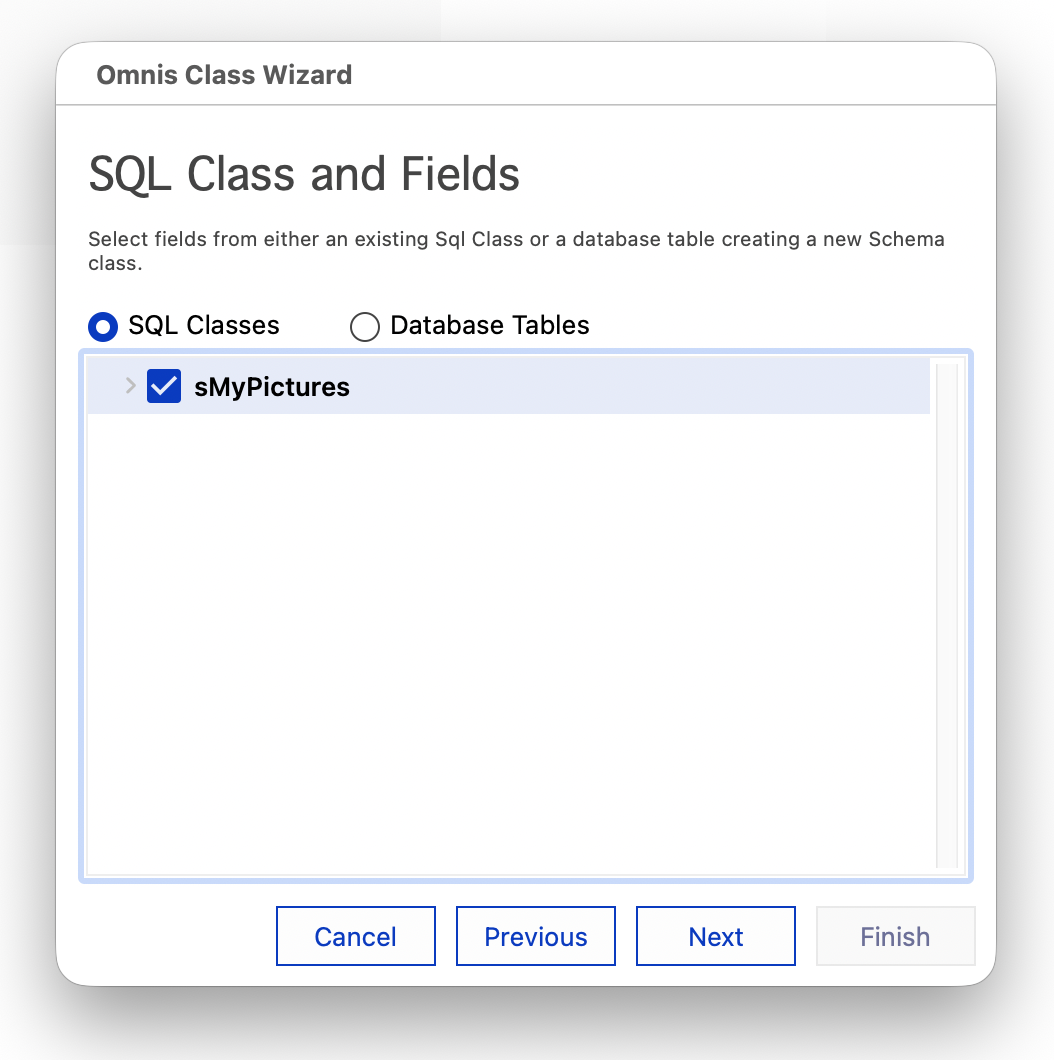
Click the check box to select the sMyPictures schema and press the Next button to move on to the stage where you will
Press the Finish button to create the form.
Note that at any time prior to pressing the Finish button you can press the Previous button to go back and review or change a selection.
After the wizard has finished creating the form, the Window Class Editor will open with the new PicsWindow window class in design mode, ready for you to modify as you wish. The Component Store (on the left-hand side) and Property Manager (on the right) are opened automatically.
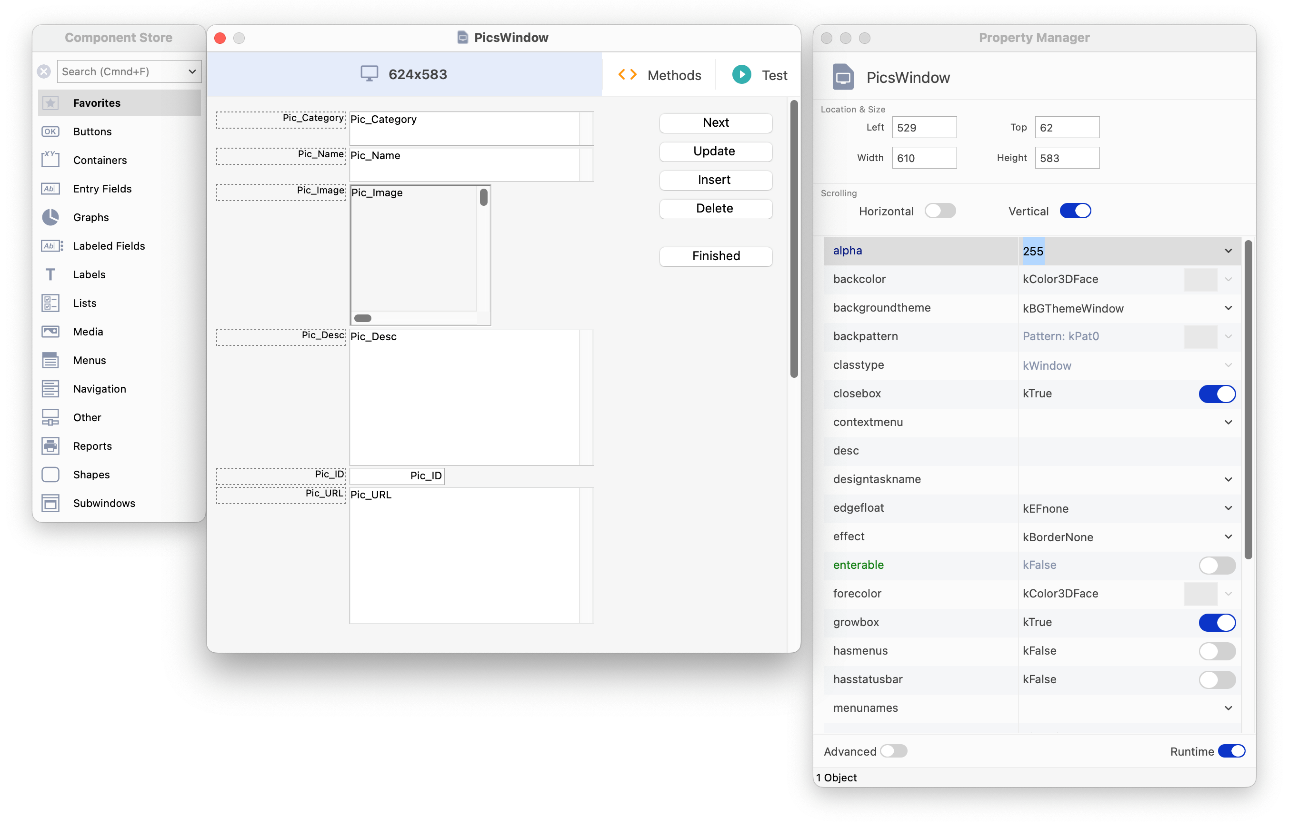
The Component Store (left) is a palette containing the objects and fields that you can add to the forms and windows in your library, while the Property Manager (right) lets you view and modify the values of properties of the currently selected object, e.g. in this case, the window class. At this stage, you do not need to use these tools.
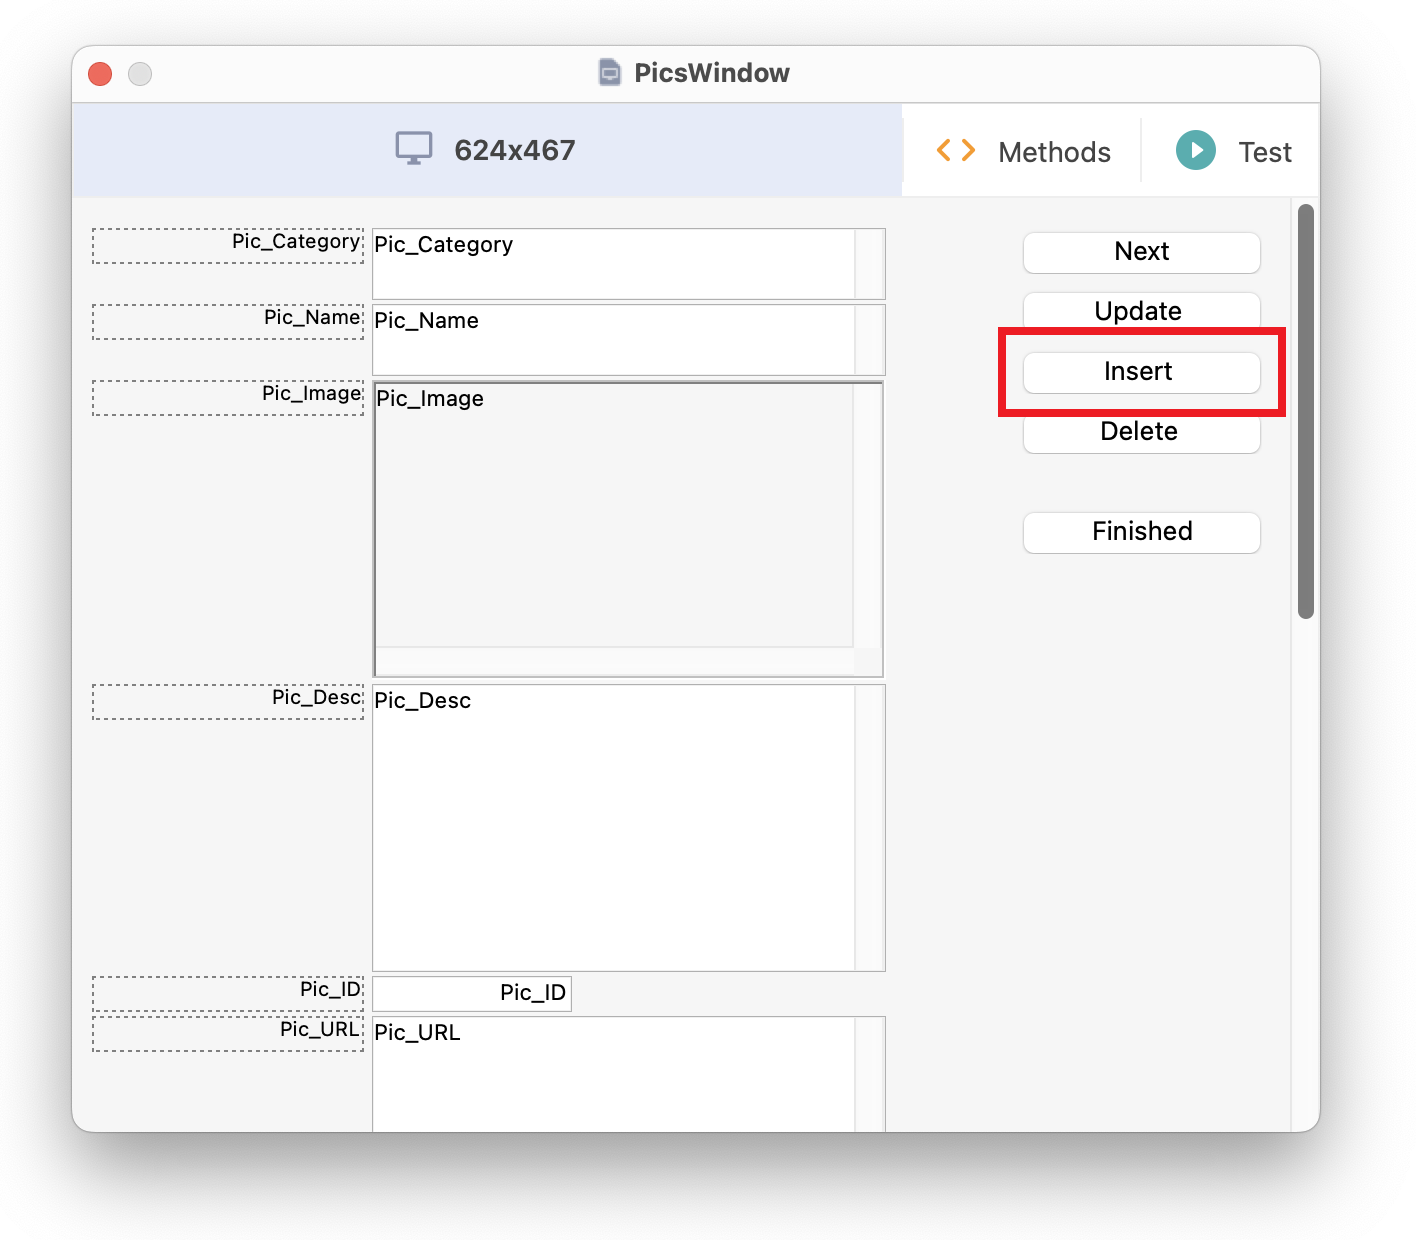
Before you can open the window and use it to insert data, you must make a small change to the Insert button. Doing this will introduce you to the Omnis Method Editor which is an all-purpose tool with built-in debugger for adding Omnis code to the objects and classes in your library.
The Pic_ID column in the SQLite database we are using is an INTEGER data type with a Primary Key, known as an INTEGER PRIMARY KEY, which will store a unique integer value automatically. The “trick” is to insert the value of Pic_ID as NULL and SQLite will insert the next available numeric value; in effect the value of Pic_ID is incremented by 1 automatically and the new value is inserted. If you delete a data record the value of Pic_ID in that record is never reused; SQLite will always use a new unique value when inserting a new row.
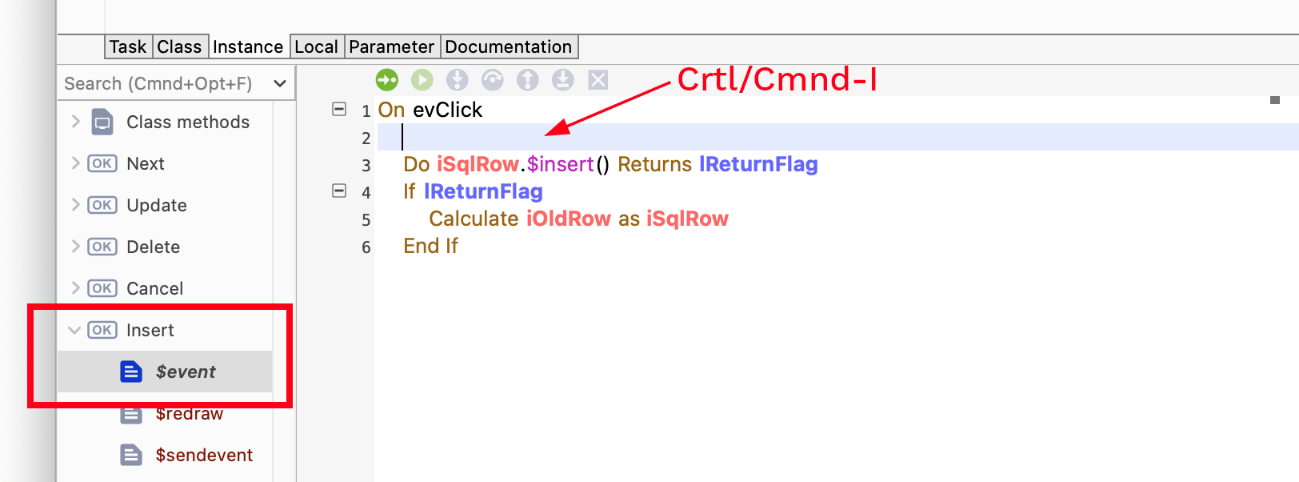
The Omnis Method Editor and Code Editor will open and the $event method behind the Insert button will be highlighted. This method will be executed when you click on the button; in this case the method inserts the current values in the iSqlRow variable into the database, and it's before this line you need to make a small addition.
Note you can press Ctrl/Cmnd-+ to increase the font size in the Code Editor.
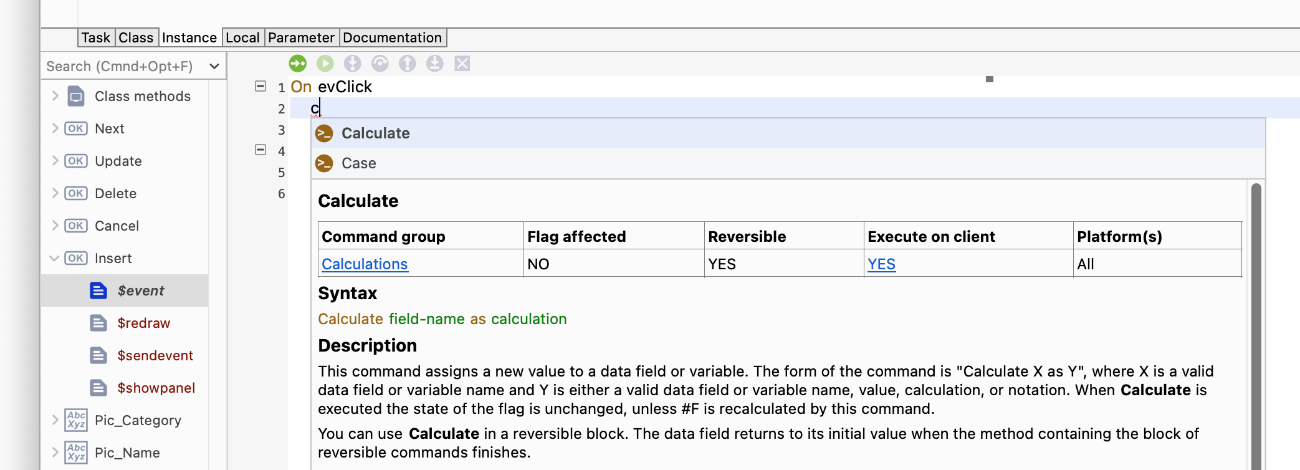
In this case, the Calculate command is the first command in the list so, assuming Calculate is selected, press the Return key to enter the command.
As soon as you select the Calculate command, the cursor is placed in the code line where a field or variable name is required. If you know the variable name, and in this case the column name, you can enter the text: iSqlRow.Pic_ID (this is the row variable and column name containing some data).
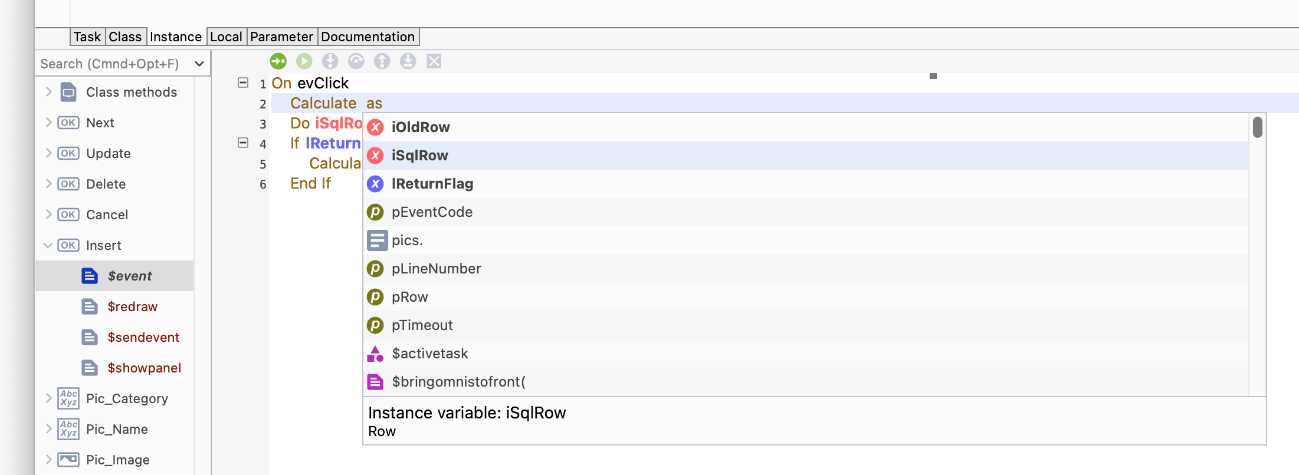
Alternatively, you can use the Code Assistant: to do this, type the first letter of the variable, in this case “i”, and select the iSqlRow variable name from the list that drops down
You can select the variable name with the pointer, or to keep your hands on the keyboard, use the Up or Down Arrow keys to move up and down in the list and press the Return key to confirm your choice, in this case select iSqlRow. This variable is contained in the form and was added automatically by the SQL form wizard – when the form is opened the variable will contain the current row of data.
Having selected the variable name from the Code Assistant (or entered the name manually), type a dot (period), then enter the database column name, in this case, Pic_ID – the complete text should be: iSqlRow.Pic_ID
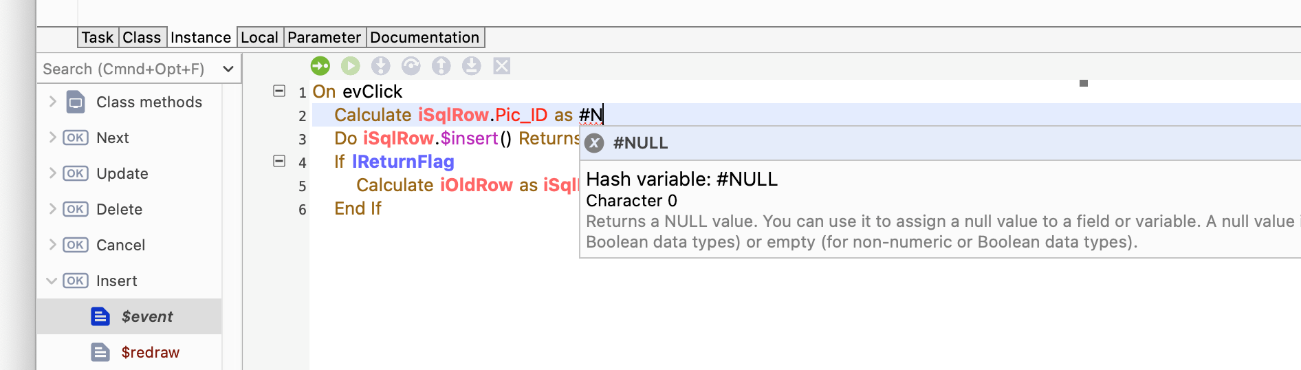
Press the Tab key to move the cursor to the end of the line to enter the Calculation, then enter #NULL
To enter #NULL you can type “#” (Shift+3 or Option/Alt+3 or Fn+Option+3 on a Mac keyboard) and the Code Assistant will display all the “hash variables”, or in this case, type “#N” and use the Down Arrow and Return keys to select “#NULL” from the Code Assistant.
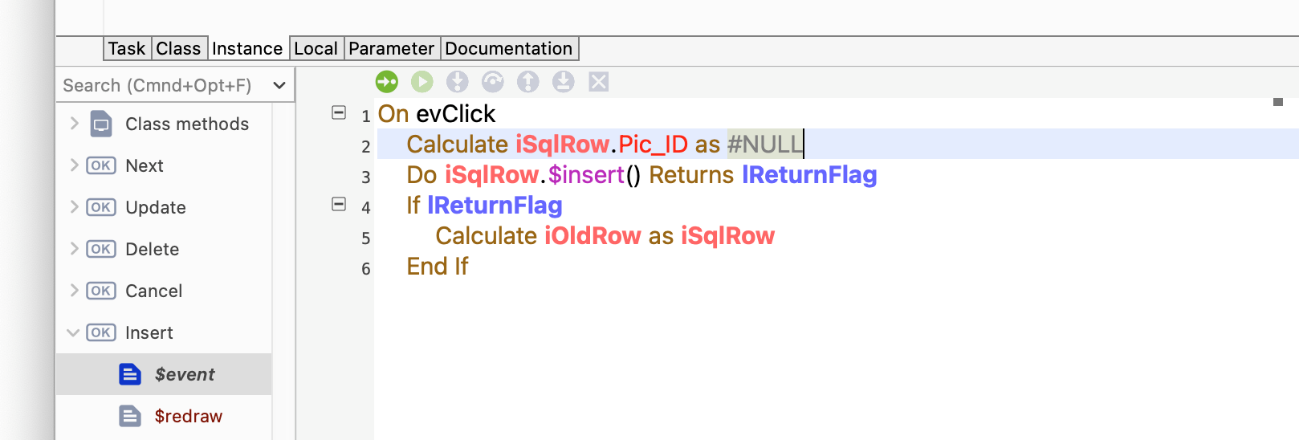
#NULL is a so-called "hash variable", a built-in Omnis variable (constant), that represents a NULL value. The line of code you added to the Insert button ensures that whatever value is entered into the field in the open window, just before the row of data is inserted, the value of Pic_ID in the window is set to NULL and SQLite will insert a new value automatically. The complete code line is:
Calculate iSqlRow.Pic_ID as #NULLYour method should now look like the following:
Now you can test the form you have created to ensure that in runtime mode it performs as expected. To do this:
Click on the Test button in the Design bar to test or open the window class
Alternatively, you can press Ctrl/Cmnd-T to test or open a form or window, or you can Right-click on the window background and select Open Window
This will create a window instance on the screen. The window is opened on top of the design window. Note that when you press Ctrl/Cmnd-T to test your form you must first make sure that the design window for PicsWindow is the top window and not some other Omnis window such as the Component Store or Property Manager.
If you don't see any data in your form, check that the database session is open (for example, if you have closed and reopened Omnis, then resumed the tutorial, you will need to open the database session again via the SQL Browser, as described in an earlier section in this tutorial).
When you are developing a form, you can press Ctrl/Cmnd-T at any time to switch between the design mode and runtime (open mode), and back to design mode again.
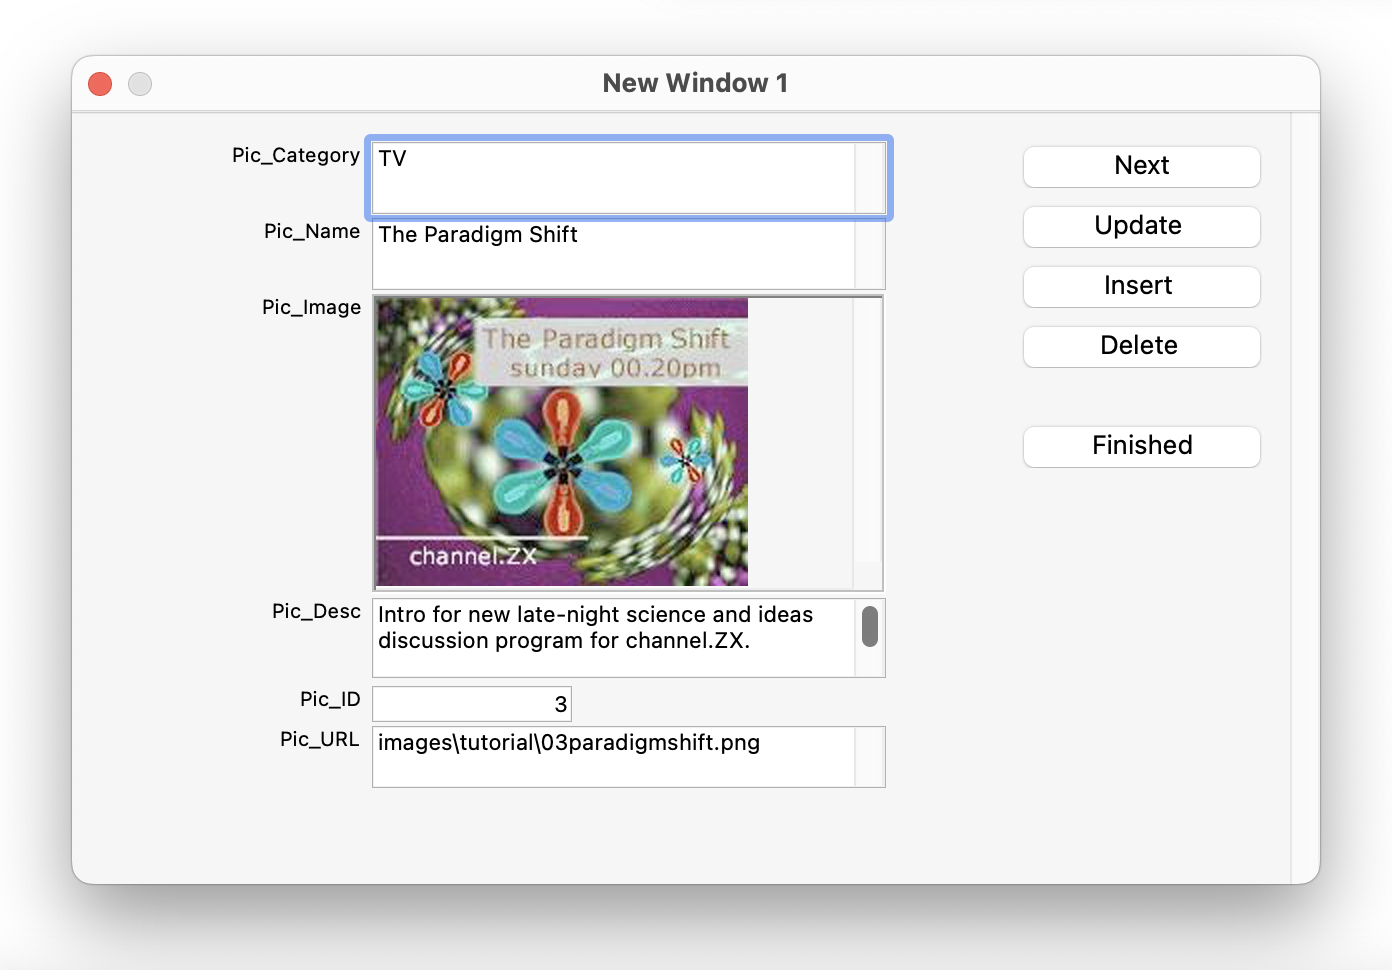
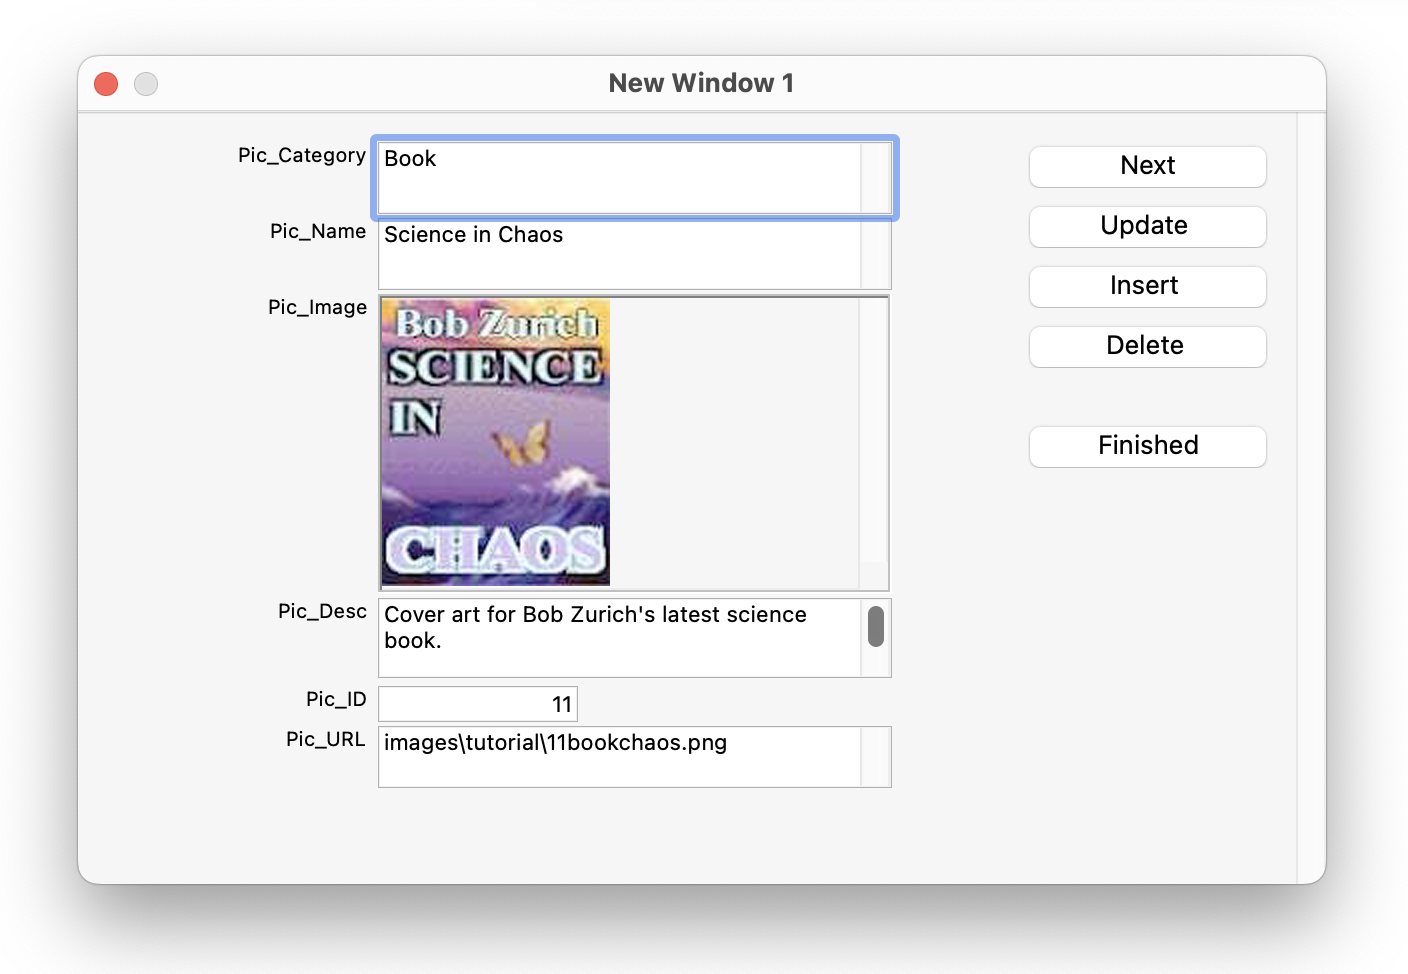
Next you can insert a new record in the database. To insert data (a record), first enter some data into the fields as follows (the precise details are not important for this test, but do insert the PNG image into Pic_Image and insert the correct text in Pic_URL):
| Field | Data to enter… |
|---|---|
| Pic_Category | Book |
| Pic_Name | Science in Chaos |
| Pic_Image | Insert '11bookchaos.png' from the tutorial folder you downloaded: to do this, use the Paste from File option, available from the Edit menu (you might need to press Alt or Option under Windows to show the menu bar including the Edit menu): you may need to select the PNG image type to see the file. |
| Pic_Desc | Cover art for Bob Zurich’s latest science book |
| Pic_ID | leave this field blank; a new unique value of Pic_ID will be inserted for you automatically |
| Pic_URL | images\tutorial\11bookchaos.png (this is not required for the desktop window, but this information is required when viewing the data in a web browser created in the next part of the tutorial) |
Important note: Your form must be in open/runtime mode to test it and edit/enter data.
After you have clicked (once only) on the Insert button, click on Next until you cycle through to the new record you just entered.
Close the pics window and the design window.
In this section, you will build a remote form “from scratch” starting with a blank form and adding controls one by one. Alternatively, you could use the SQL Form Wizard which automates the whole process and is much quicker. So, to save yourself time, you may like to jump to the ‘Creating a Web Form using a wizard’ section instead.
In this section of the Tutorial, you are going to create a JavaScript-based web form (called a “Remote form class” in Omnis) to browse your database in a desktop web browser. You can deploy the remote form on the Omnis App Server* & Web Server to allow anyone to look at your picture database in a browser on a desktop computer or mobile device (*this would require a Web license to run your app, which is available for free with the Community Edition, or for a license fee with other editions).
This section assumes you have created a database session manually, not using the SQL Form Wizard. And remember, if you have quit and restarted Omnis Studio, then you will need to reopen your database session, described in the ‘Opening a Database Session’ section, to complete this section.
To create a remote form from scratch (i.e. not using a wizard):
Click the PICS library in the Folders tree list on the Studio Browser window to show the New class options.
Click on the New Class option in the Studio Browser, then the RemoteForm option; name the new class PicsWebform and press Return.
The new Remote Form will appear in the Studio Browser (note that if you are using the Community Edition there will also be a Remote_Task class).
When you design a remote form the Component Store will open automatically docked to the left side of the Remote form editor. It contains 40 or so ready-made JavaScript components, arranged in functional groups, which you can drag and drop onto your remote form.
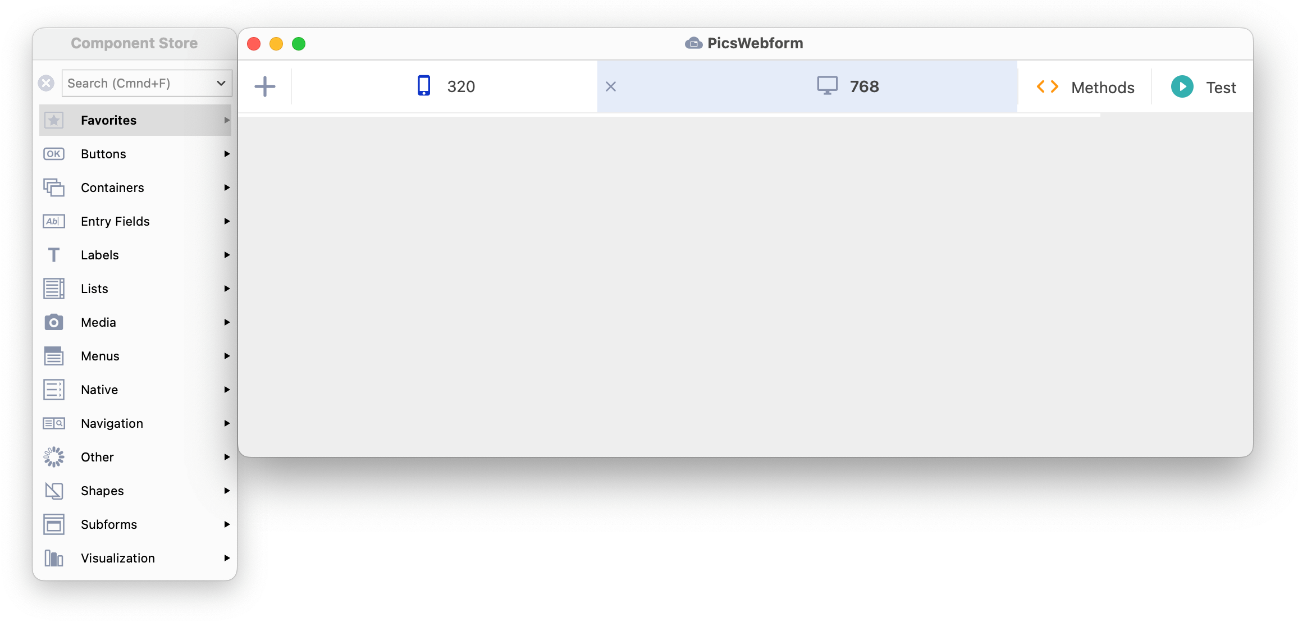
The remote form has two layout breakpoints, set to 320 and 768, which are shown in the Design bar of the Remote form editor; there are also options to show the Methods for the form and to Test the form in a web browser (you can use these later). The layout breakpoints allow the layout of the form to change at runtime as the size of the client browser changes (mobile or desktop). If necessary, enlarge the form design window and click on 768 to select it.
You will add some fields and other controls to the design layout for the 768 layout breakpoint, and later in this section you can adjust the layout for the 320 breakpoint, so your form can be displayed on phones as well.
You can add fields to your form by dragging icons from the Component Store and dropping them onto the form.
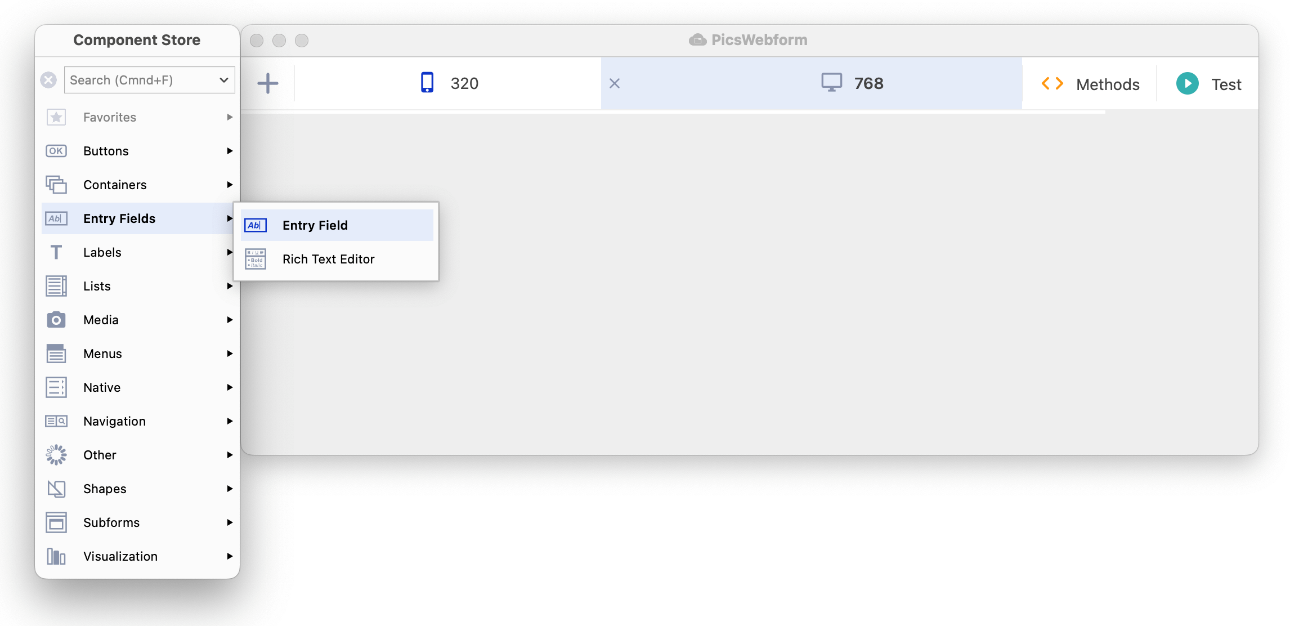
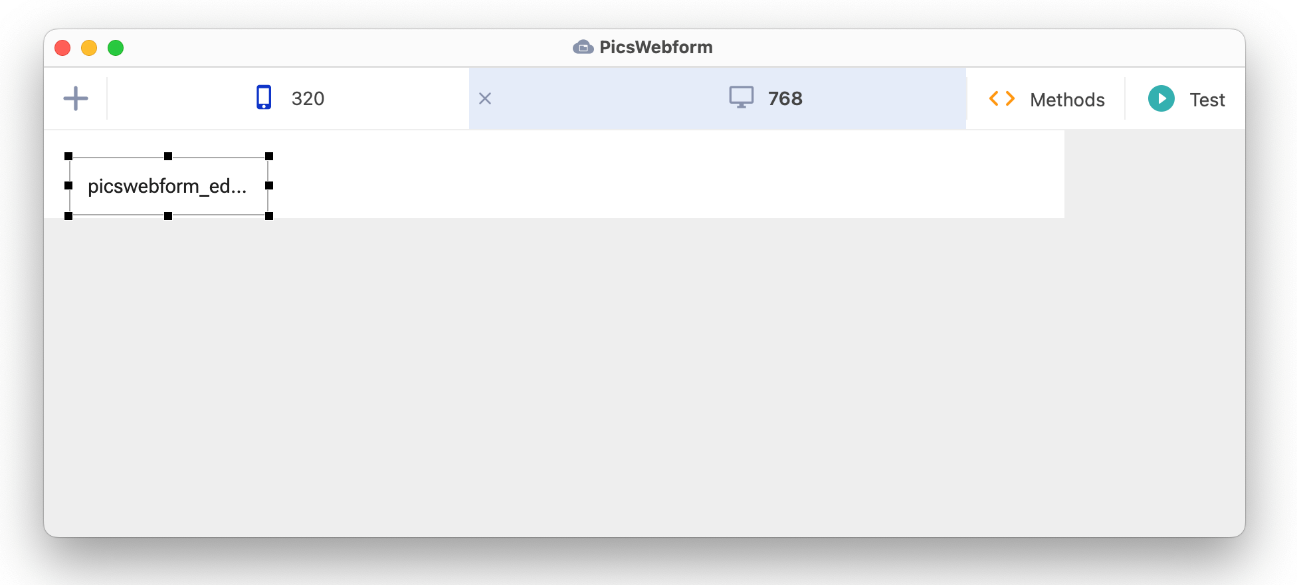
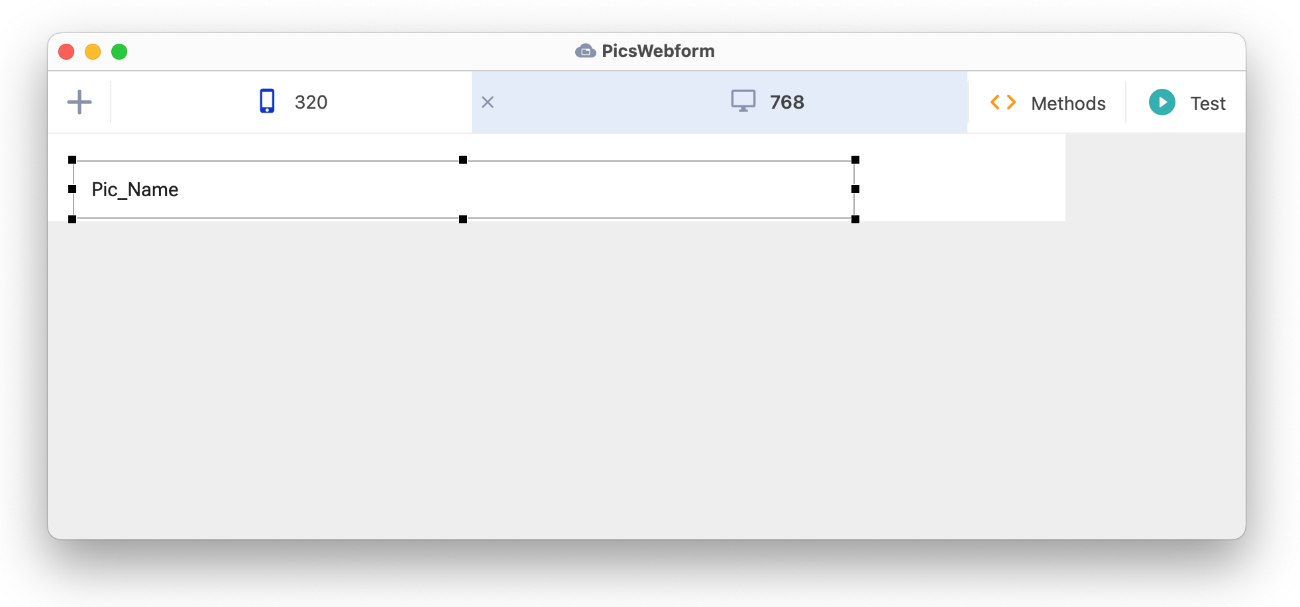
An Entry Field control is placed on your form and assigned a default name, but you can change it using the Property Manager.
The Advanced option in the Property Manager will be disabled (off) when you first launch Omnis, so the Property Manager will display a simpler subset of properties: for the purposes of the tutorial, all the properties you need should be visible with Advanced disabled.
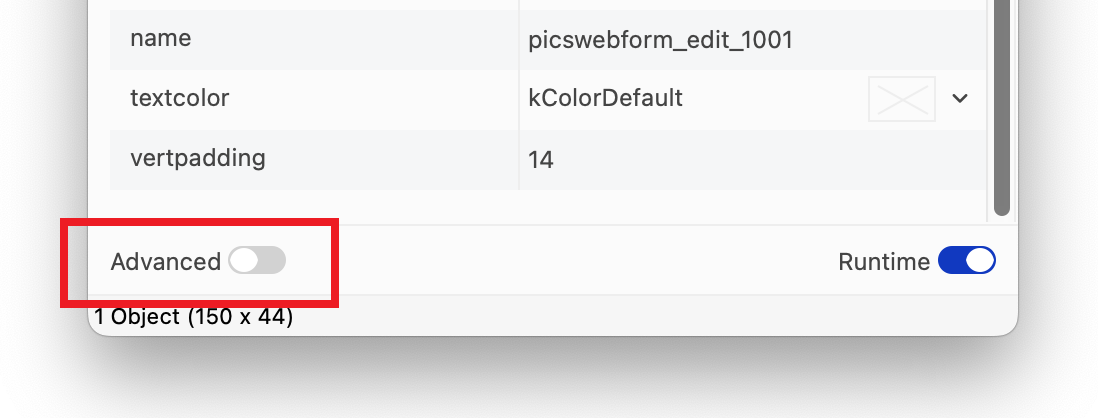
Once you are familiar with Omnis, as well as the components and their properties, you might like to enable the Advanced option to show all properties whenever the Property Manager is opened.
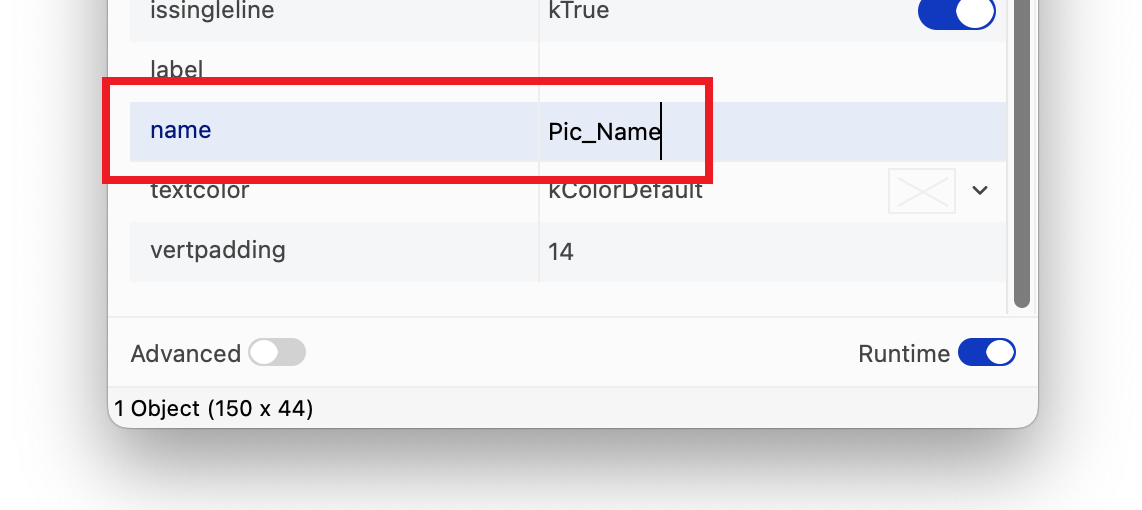
Locate the name property in the list of properties in the Property Manager (you may need to scroll the list).
Click in the cell next to the name property, delete the name assigned by Omnis automatically and enter Pic_Name
Your form should look something like the following.
The minimum height of the current layout is set to 2 pixels below the bottom of the lowest control on the form and this is adjusted automatically as you add or move components. The minimum height is stored in the $layoutminheight remote form property for each layout breakpoint, while the padding is stored in $layoutpadding (default is 2). The minimum height of the remote form is shown as the white area enclosing all the controls on the form.
Next you need to add a dataname or variable name to the edit field you have created to associate the entry field with a column in your database.
Before you can add a dataname to the edit control, you need to add a Row variable to the form that will link your form to the MyPictures table in your database. You can add just the variable alone, or you can add or copy the code needed in the form, which contains the required variables, and then add the variable(s) directly in the code.
If you are using the Community Edition of Omnis Studio, you can jump to the ‘Pasting in the code...’ section below and enter the code and variables manually.
Otherwise, if you are using the Professional Edition of Omnis Studio, or the free trial, you can copy the code from the PicsWindow (window class) you created in the previous section of this tutorial, or if you did not complete that section you can grab the code from one of the pics.lbs or pics2.bs library in the ‘final’ folder.
To copy code from a window class: (not for Community edition users)
Press F2/Cmnd-2 to bring the Studio Browser to the top and double-click the PicsWindow class to open it in design mode.
Double-click somewhere on the background of PicsWindow (not on a field) to open the Omnis Method Editor for the form.
Make sure the $construct method is visible and selected (see below), then select all the lines of code in the $construct method and Copy them (press Ctrl/Cmnd-C or use the Edit>>Copy menu option).
Close the Method Editor and close the PicsWindow class.
Double-click on the PicsWebform remote form to open it in design mode and double-click on the background of the remote form to open the Method Editor for this class (not the Pic_Name entry field).
Make sure the $construct method is visible and selected under Class methods (on the left), then click on the first line in the right pane of the Code Editor and Paste the code you copied
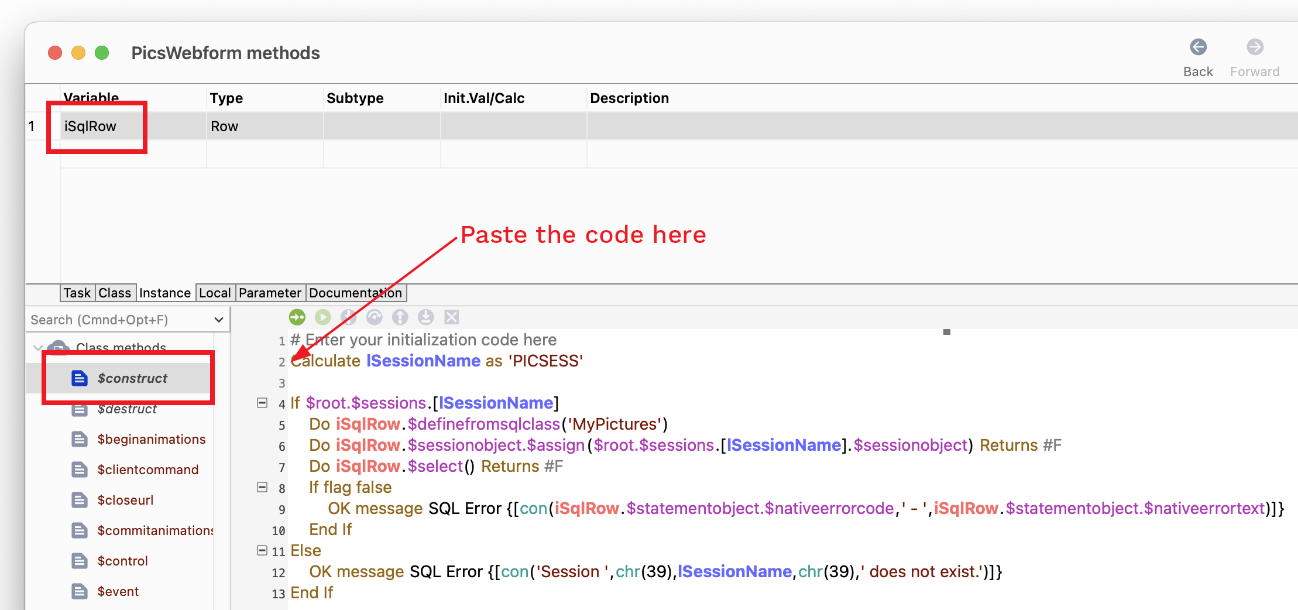
When you paste a method or some code containing any variables from one class to another in Omnis, the variables and their definitions are also copied across. Therefore, you will notice that in the Variable pane, Omnis has created the iSqlRow instance variable (under the Instance tab) and the lSessionName local variable (under the Local tab).
If you did not create the PicsWindow window class (or are using the Community edition), you can copy the code text from this page (using the Copy icon, top right of the code box), and create the variables yourself.
Calculate lSessionName as 'PICSESS'
If $root.$sessions.[lSessionName]
  Do iSqlRow.$definefromsqlclass('MyPictures')
  Do iSqlRow.$sessionobject.$assign($root.$sessions.[lSessionName].$sessionobject) Returns #F
  Do iSqlRow.$select() Returns #F
  If flag false
    Do $cinst.$showmessage(con(iSqlRow.$statementobject.$nativeerrorcode,' - ',iSqlRow.$statementobject.$nativeerrortext),'SQL Error')
  End If
Else
  Do $cinst.$showmessage(con('Session ',chr(39),lSessionName,chr(39),' does not exist.'),'SQL Error')
End If
Next you need to paste the code in the correct place in the PicsWebform.
Double-click on the PicsWebform remote form to open it in design mode (if it’s not already open)
Double-click on the background of the remote form (not the Pic_Name entry field) to open the Method Editor for the class.
Make sure the $construct method is visible and selected under Class methods (on the left, see below), then click on the first line in the right pane of the Code Editor and paste the code text you copied
At this stage the code text contains the variable names (for lSessionName and iSqlRow) but they need to be defined. You will notice that since the code contains undefined variables it is not color coded, but you can fix this next. To do this:
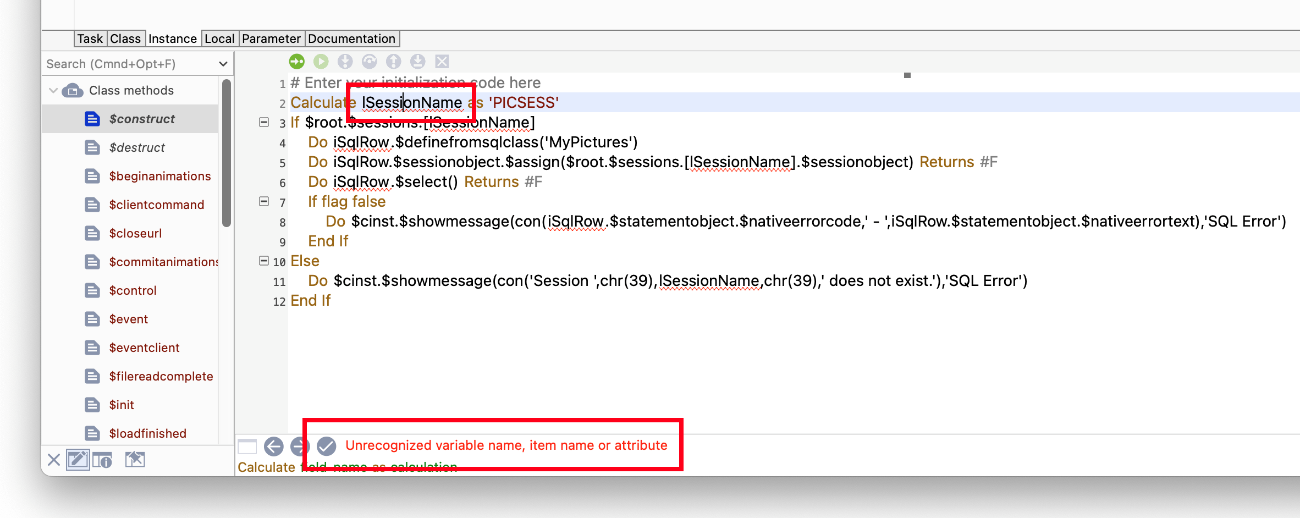
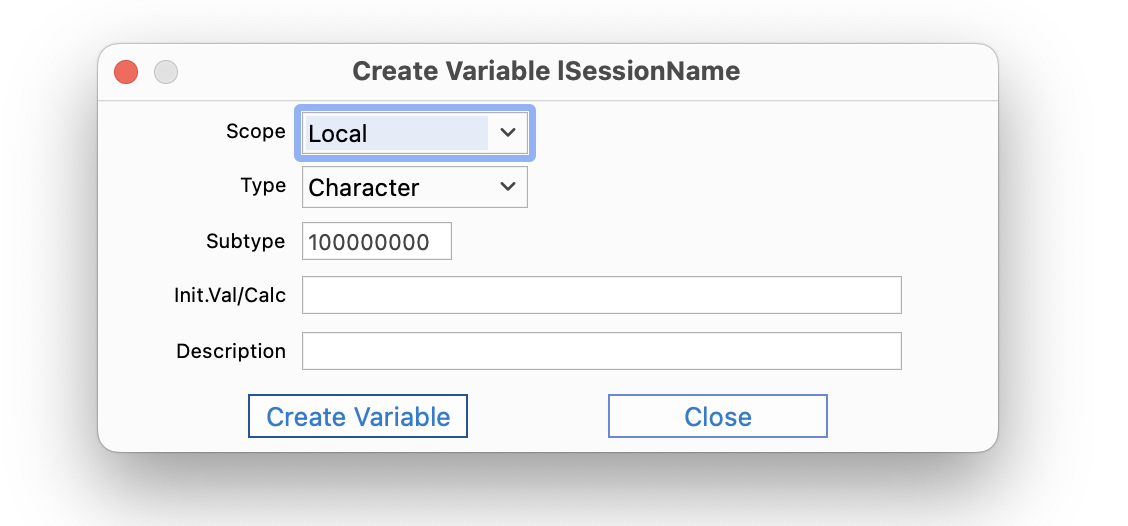
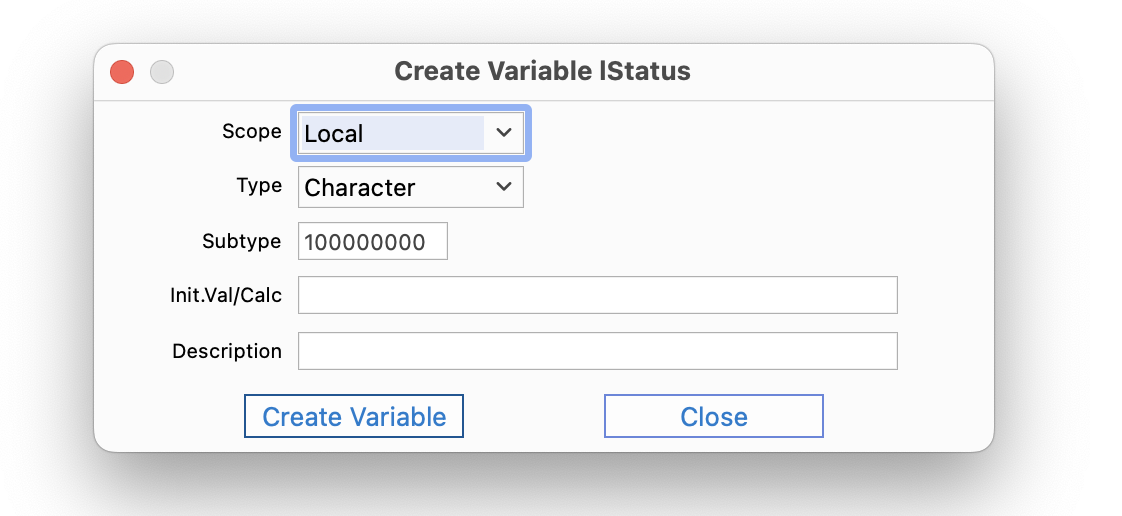
In the Create Variable dialog for lSessionName, ensure that Local is selected for Scope, Character for Type, and click on Create Variable to create the lSessionName local variable. Omnis chooses the scope and type automatically based on the name and context of the code.
The lSessionName is now defined and should have its correct syntax color coding in the Code Editor.
Next click anywhere within the iSqlRow variable name in the code
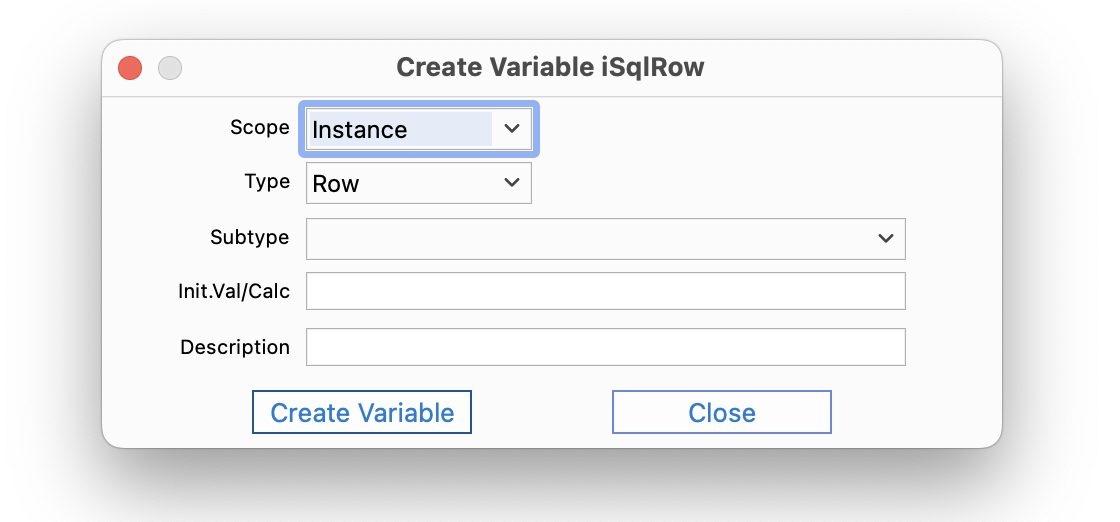
At the bottom of the Code Editor window, click on the Fix button, and define the iSqlRow variable with Instance as the Scope and Row as the Type, and click on Create Variable:
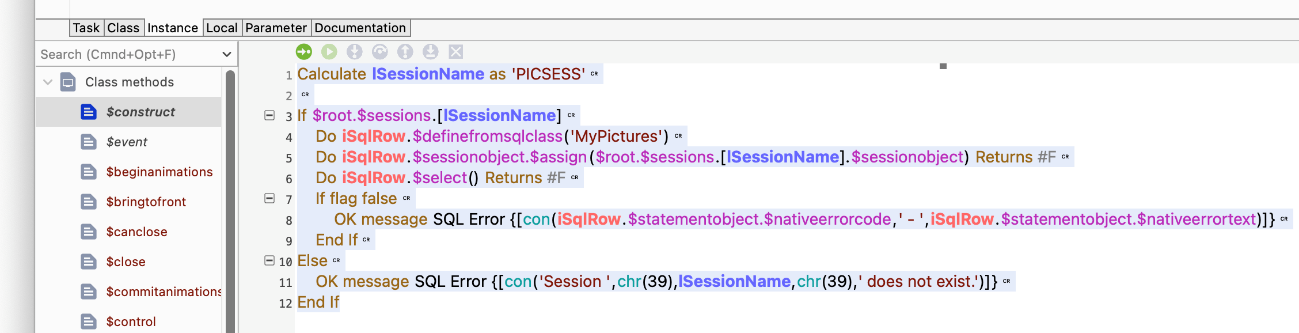
Now that you have defined the variables, the iSqlRow and lSessionName variables should appear under their respective tabs (Instance and Local) in the Variables pane, and your code should look like the following, including the syntax color coding:
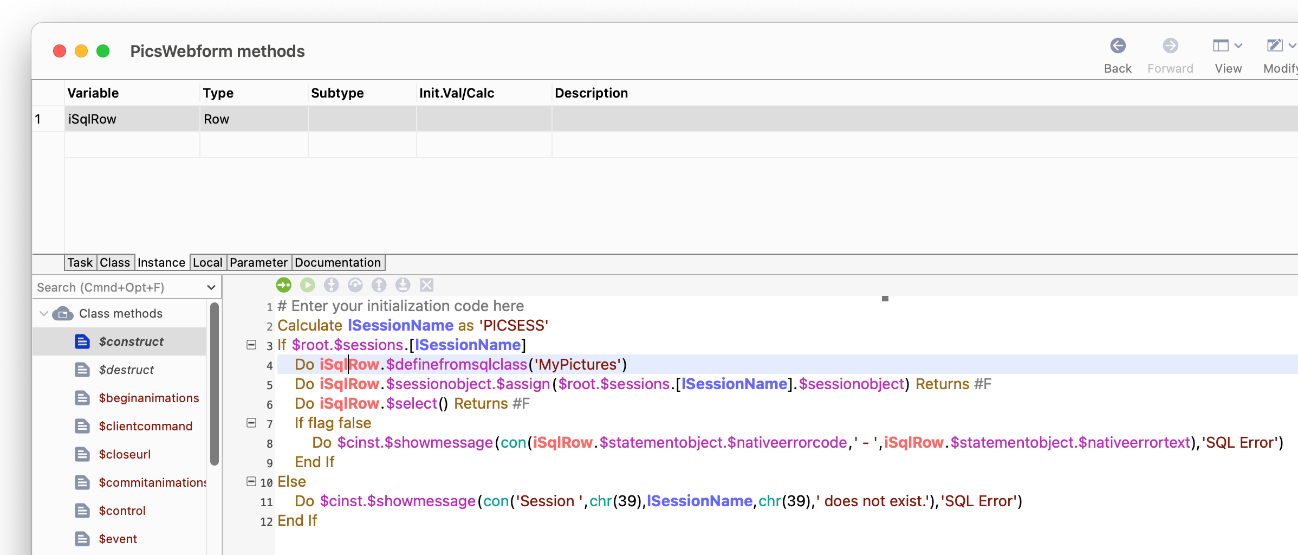
So what does this code do? The $construct method will be executed when the remote form is opened (in the client web browser), so you can use this method to initialize the form and perform any other functions. The three lines of code starting ‘Do iSqlRow…’ inside the first If statement in the $construct method do the following:
The first line defines the row variable iSqlRow based on the MyPictures Schema class in your library (using the $definefromsqlclass method), which itself links to the table in your SQLite database.
The next line of code creates a session object based on the session template called PICSESS you created previously in this tutorial (using the $sessionobject property).
The third line of code performs a SELECT on your database which creates a results set of data (using the $select method).
The other code in the $construct method is for handling errors.
Close the Method Editor; your PicsWebform should still be open
Click on the Pic_Name field in your PicsWebform to select it, then press F6/Cmnd-6 to open the Property Manager (or bring it to the top).
Locate the Dataname property in the Property Manager which should appear in the top panel of the Property Manager under the Data heading
Enter the dataname: iSqlRow.Pic_Name
You can type the variable name and column name in full, or to use the Code Assistant, type the first letter of the variable name, in this case “i”, and select the variable name from the popup, then add a “dot” (full stop/period) and type the column name Pic_Name.
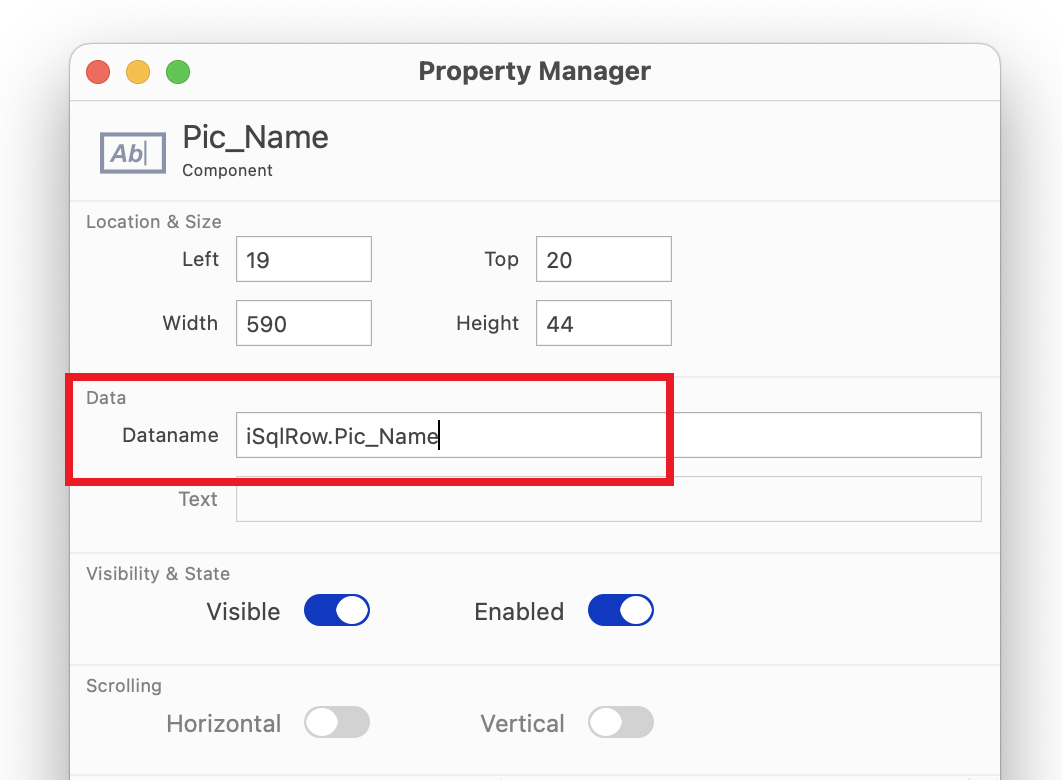
Pic_Name is a column in the iSqlRow variable that is linked to the Pic_Name column in the MyPictures table in the database.
You need to create some other fields in the form, but rather than creating them from scratch you can copy the Pic_Name field and change the properties of each field.
Click on the Pic_Name field and copy it using Ctrl/Cmnd-C then Ctrl/Cmnd-V to paste a copy (or use the Edit>>Copy / Paste menu options). Alternatively, you can hold down the Ctrl key (on Windows) or Alt/Option key (on macOS), click inside the Pic_Name field and drag it to a new position to duplicate it
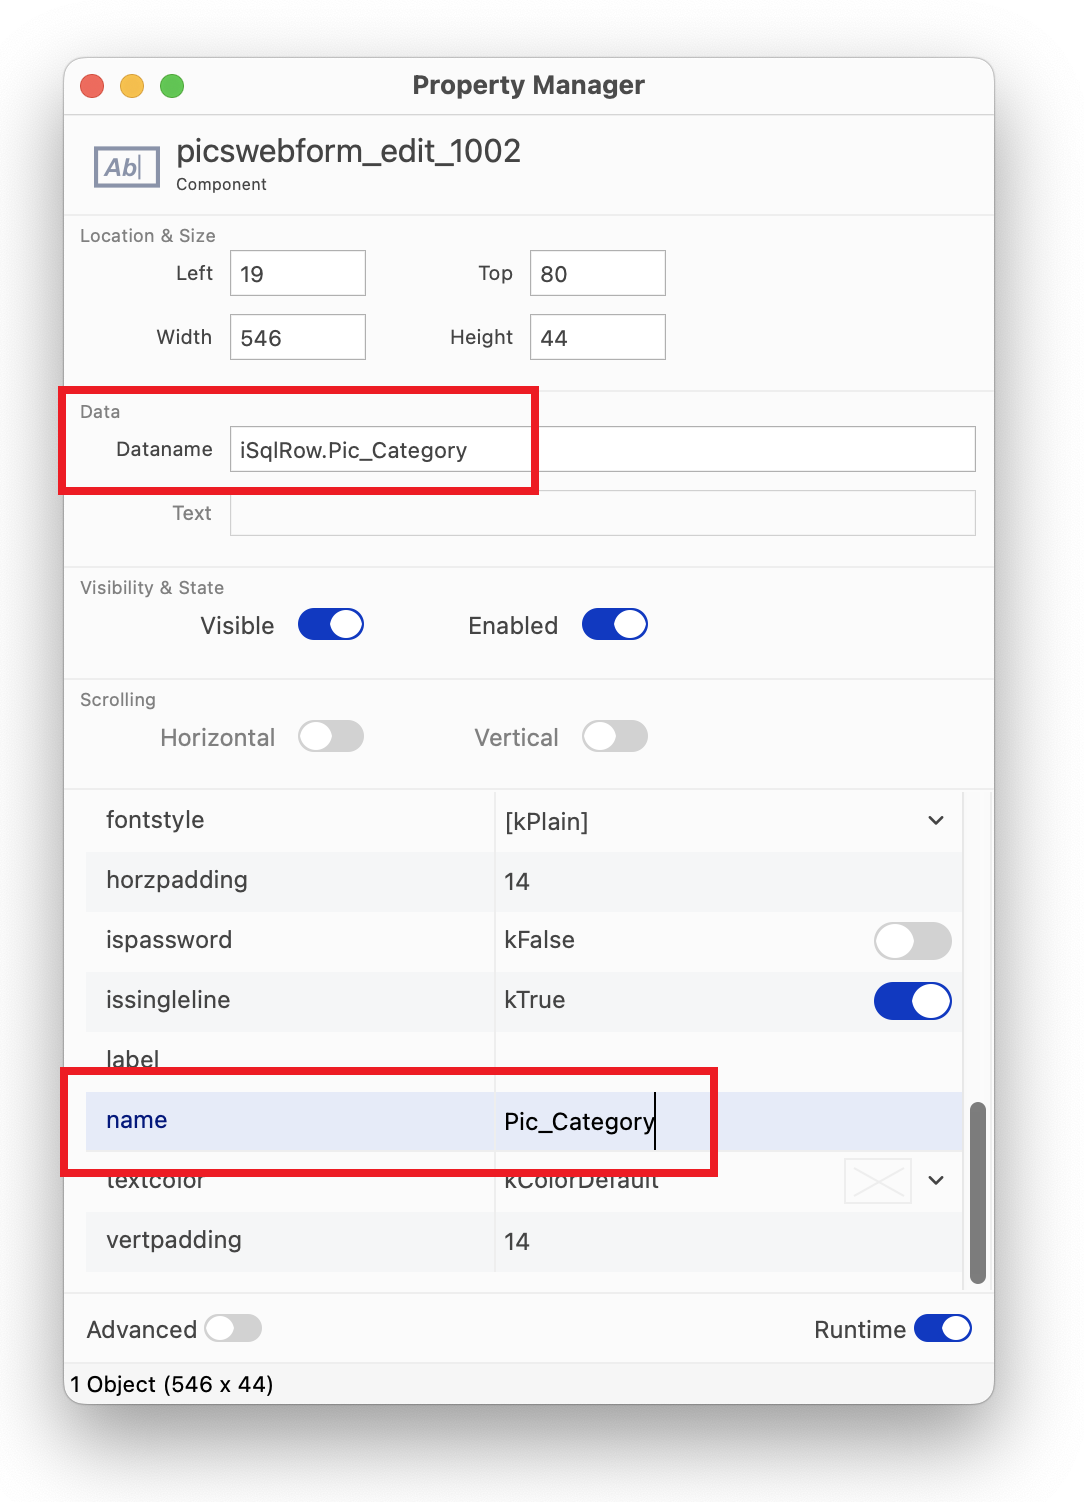
With the NEW field selected, press F6/Cmnd-6 to open the Property Manager (or bring it to the top), and change the following properties of the new field:
dataname = iSqlRow.Pic_Category
name = Pic_Category
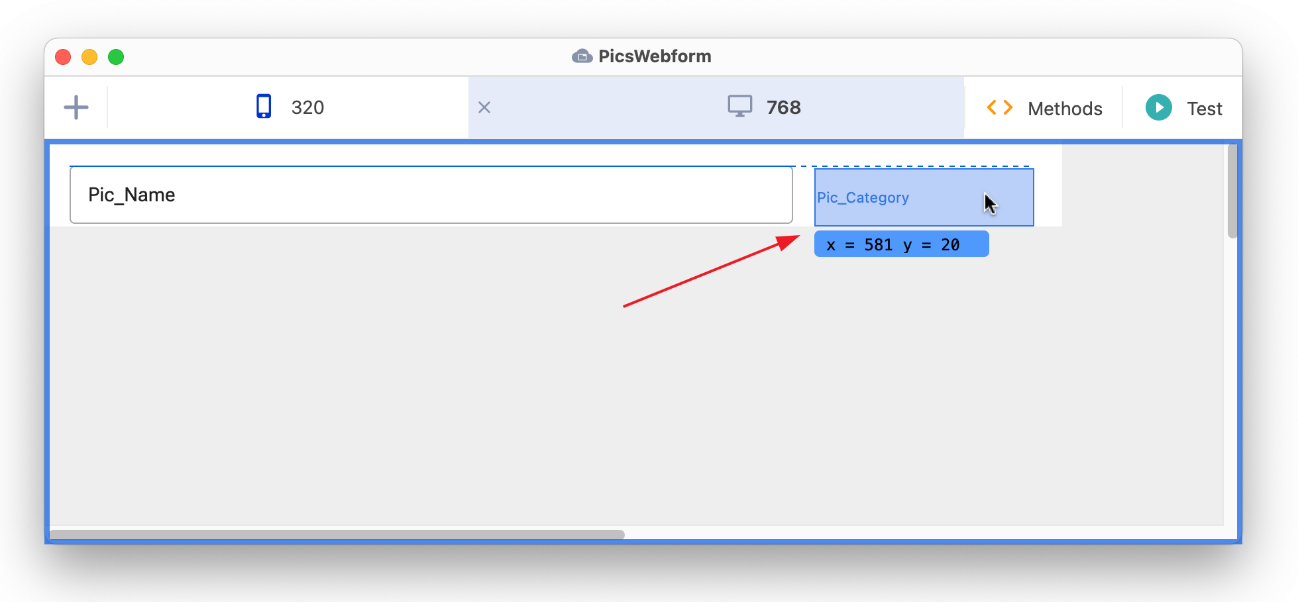
The Position Assistance (shown as dotted lines, as above) will help you line up the controls by their top edges; when the dotted line appears you can release the control and it will snap into position.
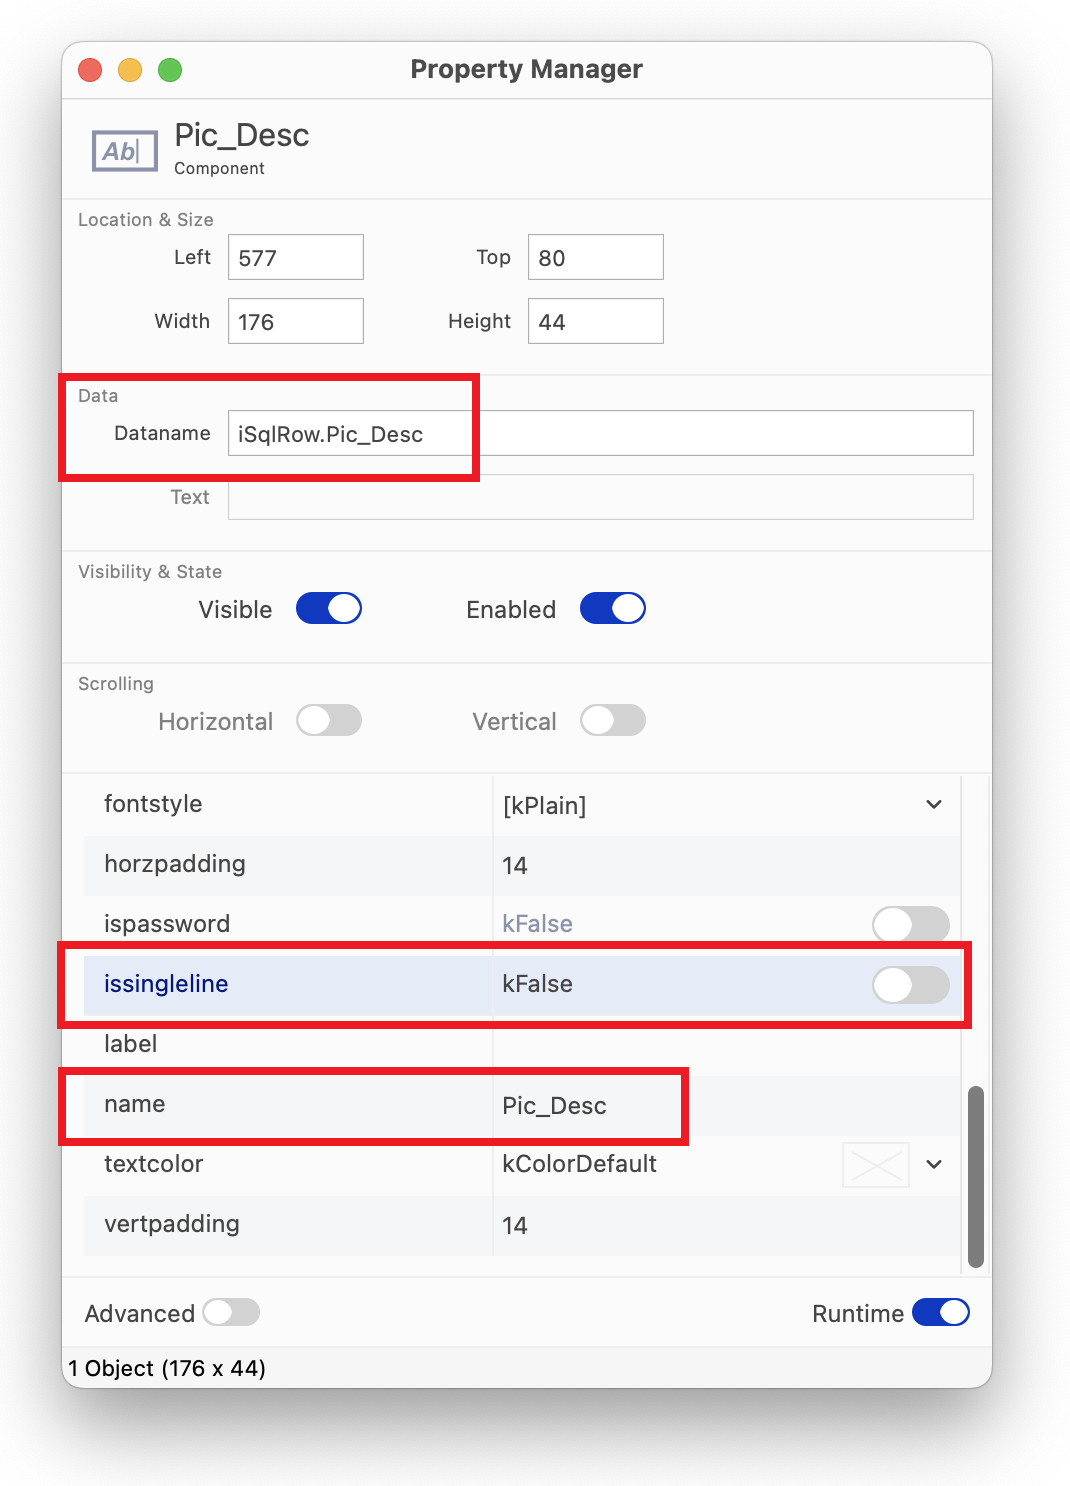
Now you need to create a further field.
You can use the Position Assistance to line up the left edges of the fields and to distribute them equally in a vertical direction.
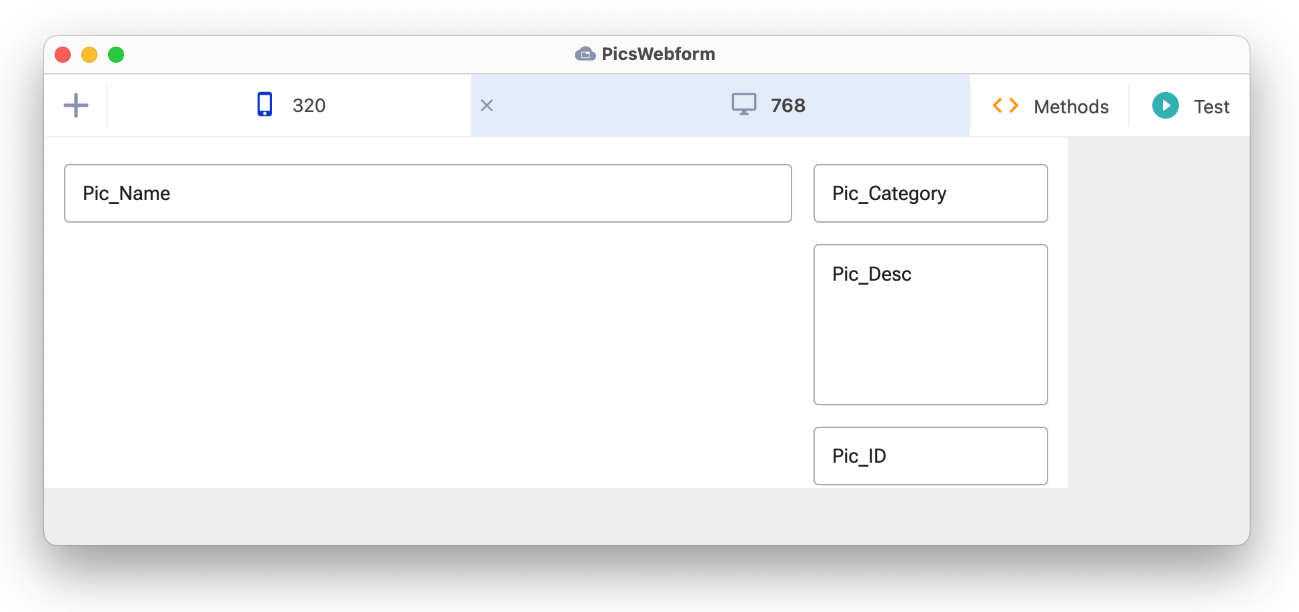
Your form should look something like the following:
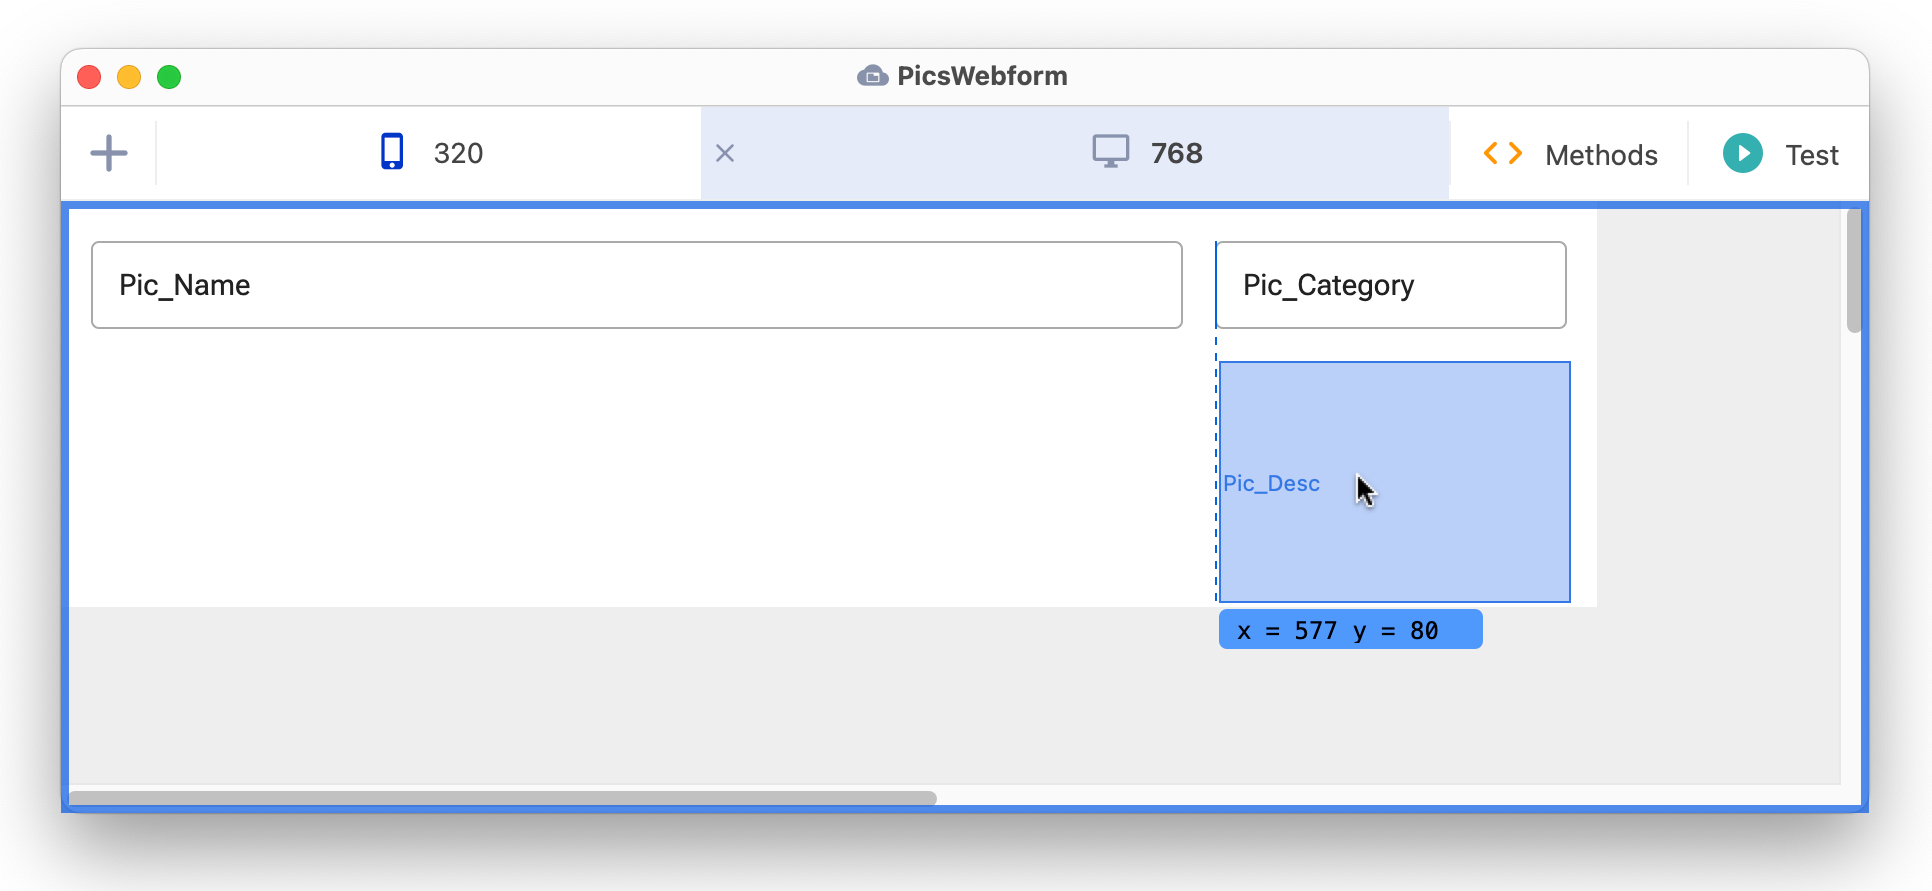
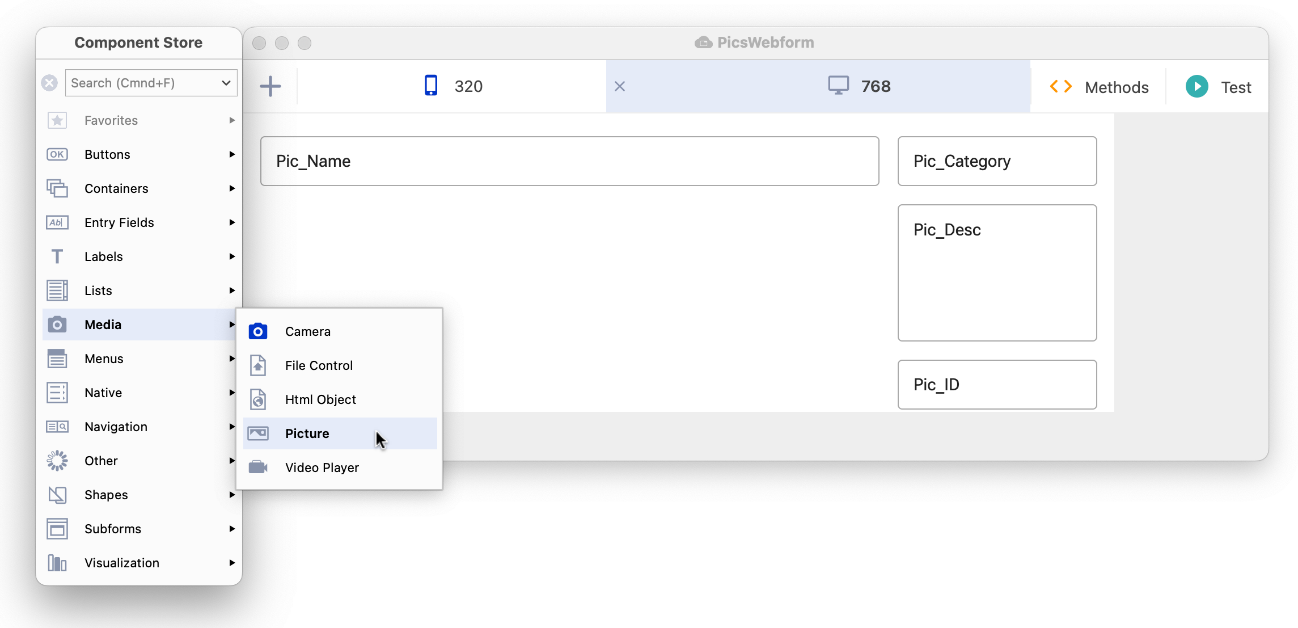
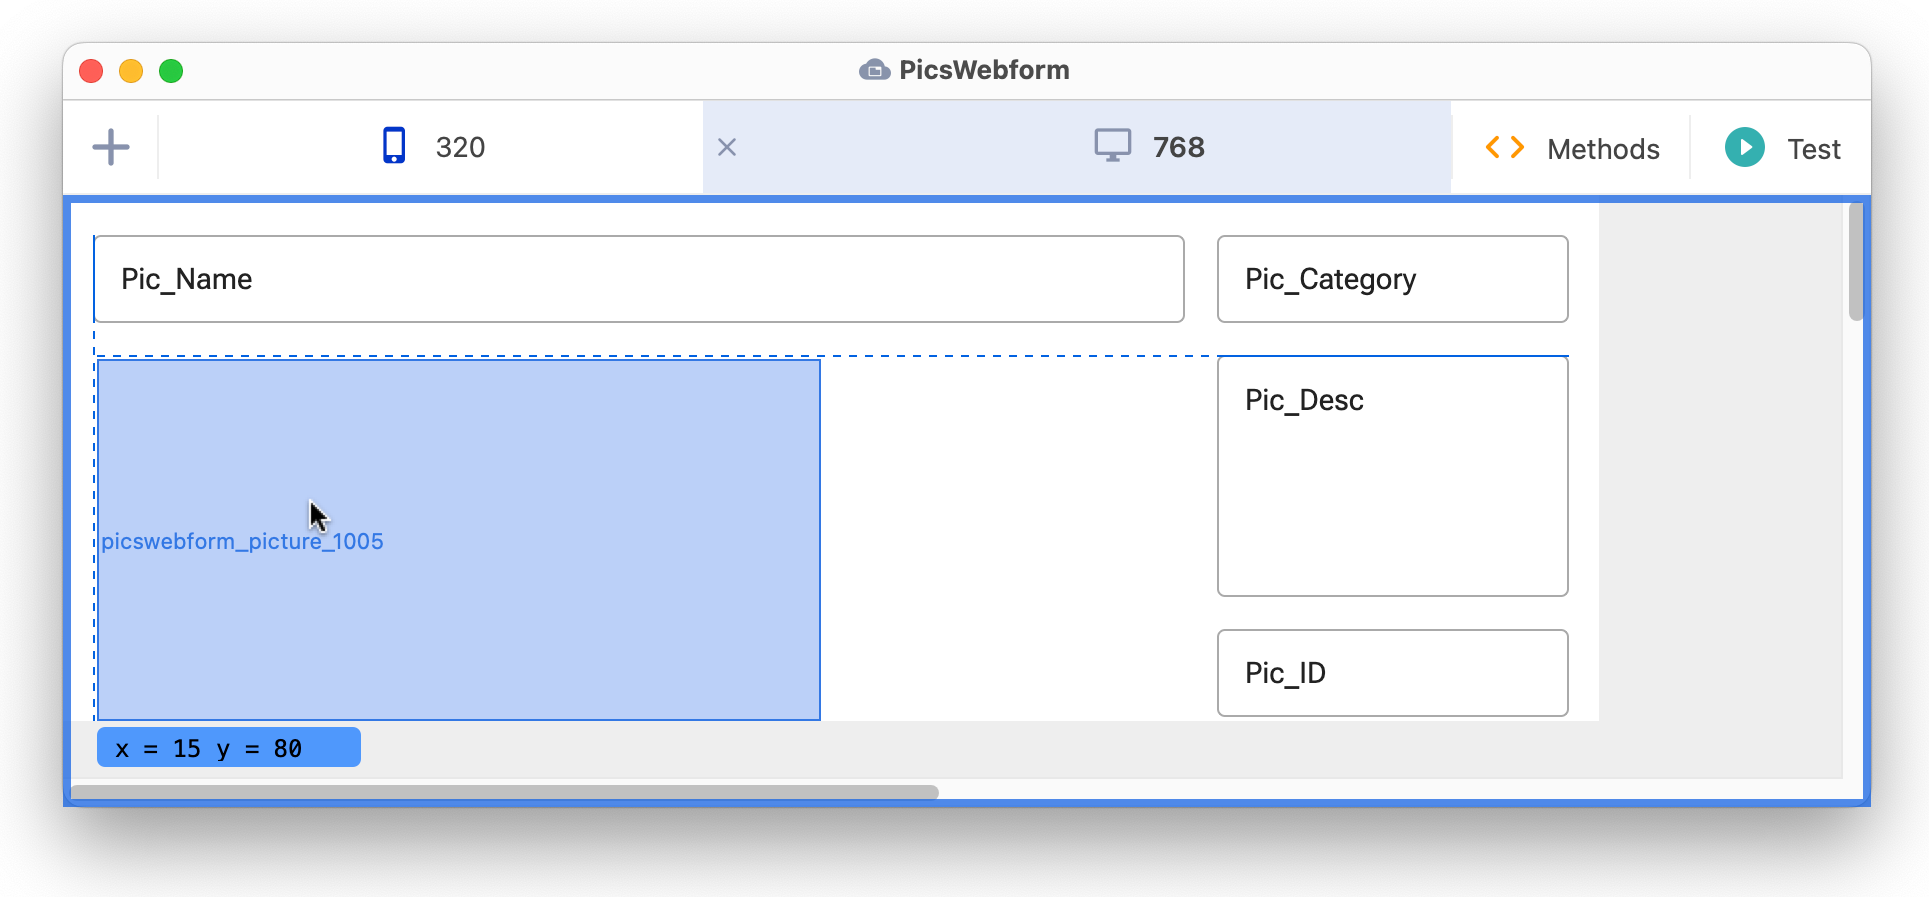
Next you need to add a Picture control to your form. You can find the Picture control in the Media group in the Component Store, which should be docked to the left of the Remote form editor.
Drag the Picture control from the Component Store and drop it onto your remote form, placing it under the Pic_Name field.
Resize the Picture control by dragging its handles, and use the Position Assistance to line up the left edge with the Pic_Name field, and its top edge with the Pic_Desc field.
Make sure the Picture control is selected, and press F6/Cmnd-6 to open the Property Manager.
Change the properties as follows (you can type the variable name iSqlRow or select it from the Code Assistant, then add a dot (fullstop/period) and add the column name Pic_URL):
dataname = iSqlRow.Pic_URL
name = Pic_Image
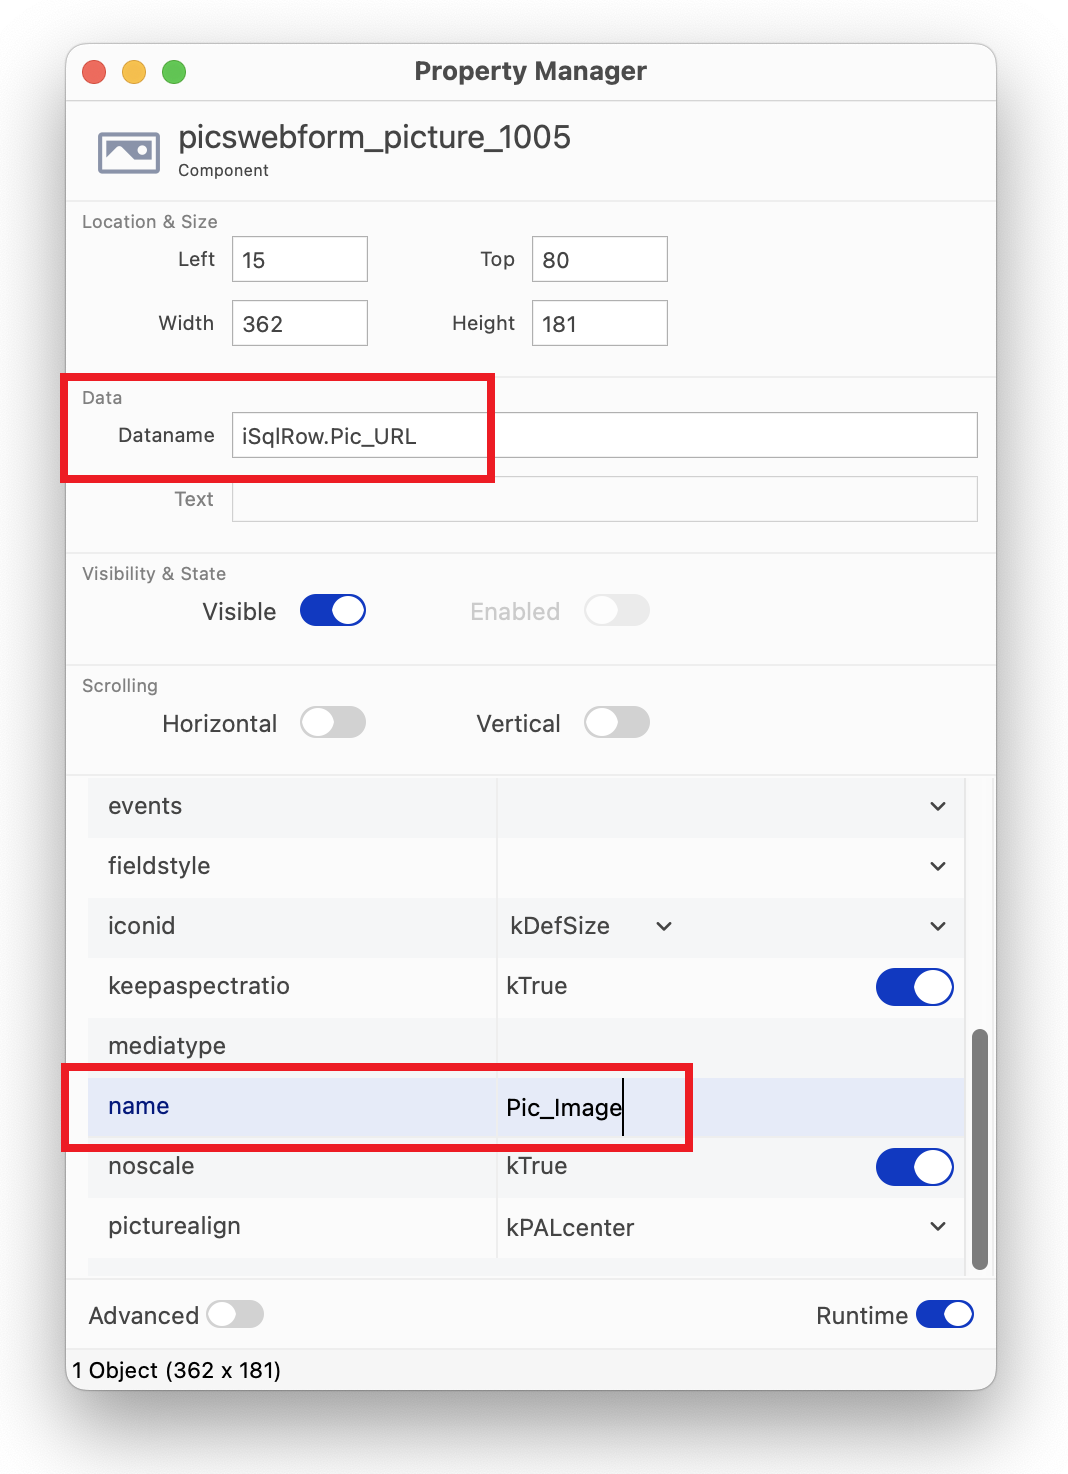
The Pic_URL column contains the location (relative path) of each picture referenced in the SQLite database.
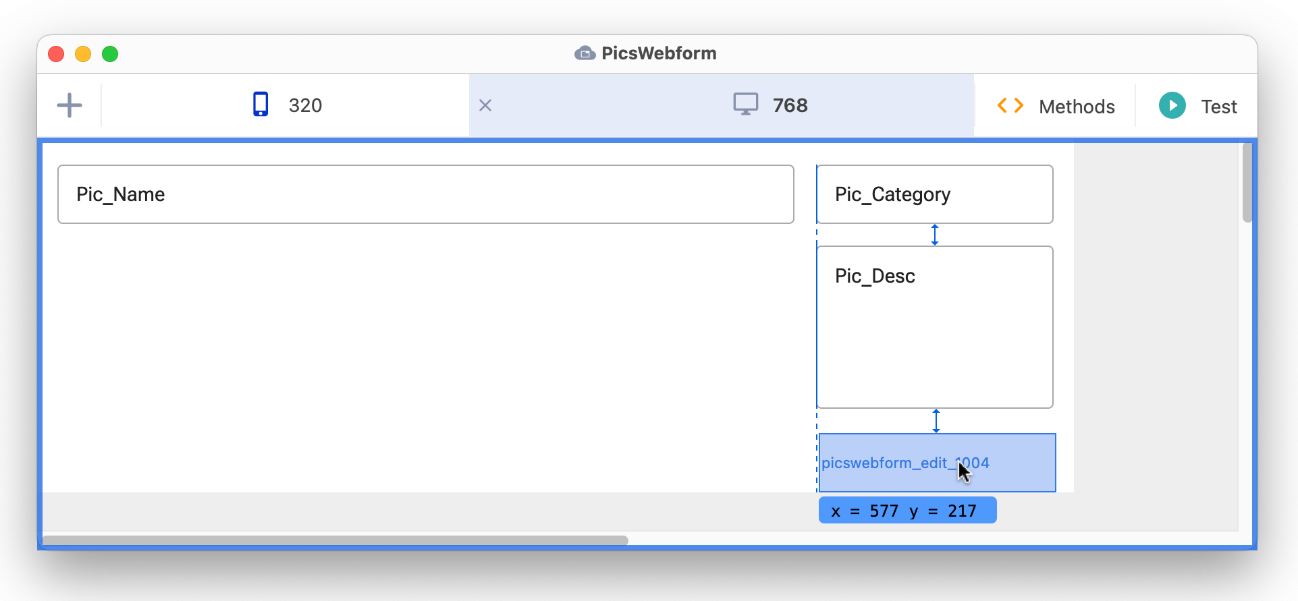
Next you need to create a Button in your form to allow the end user to load each data record, that is, each row in the database.
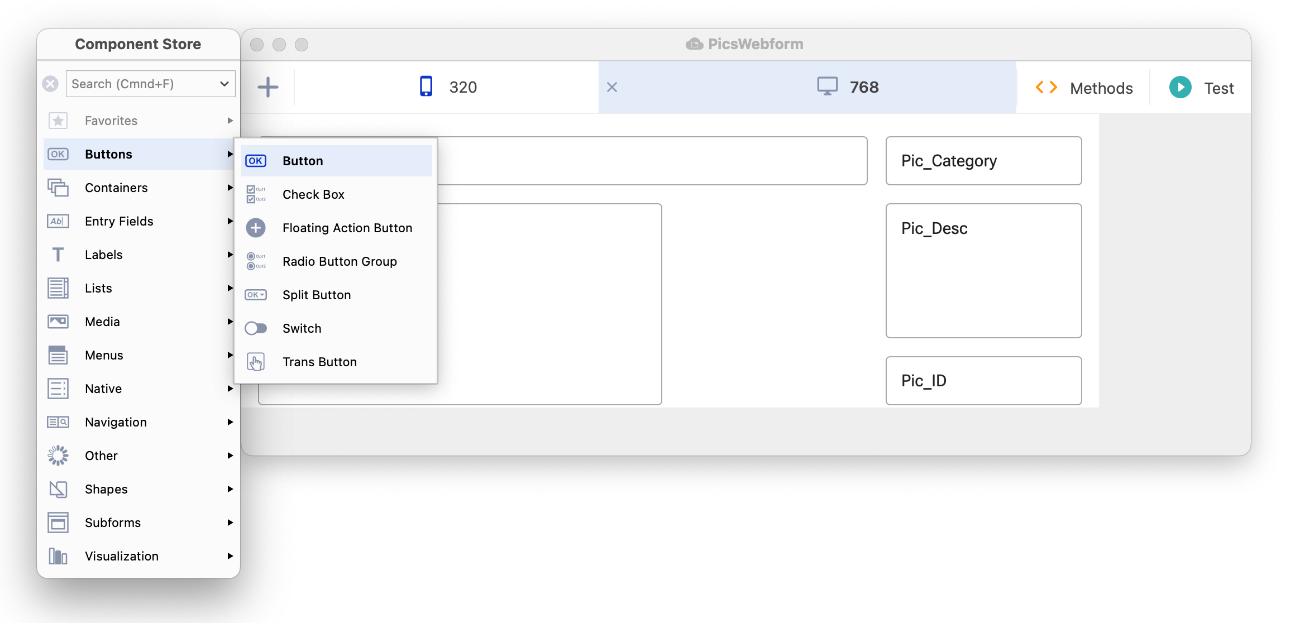
Drag the Button onto your form and drop it under the Picture control.
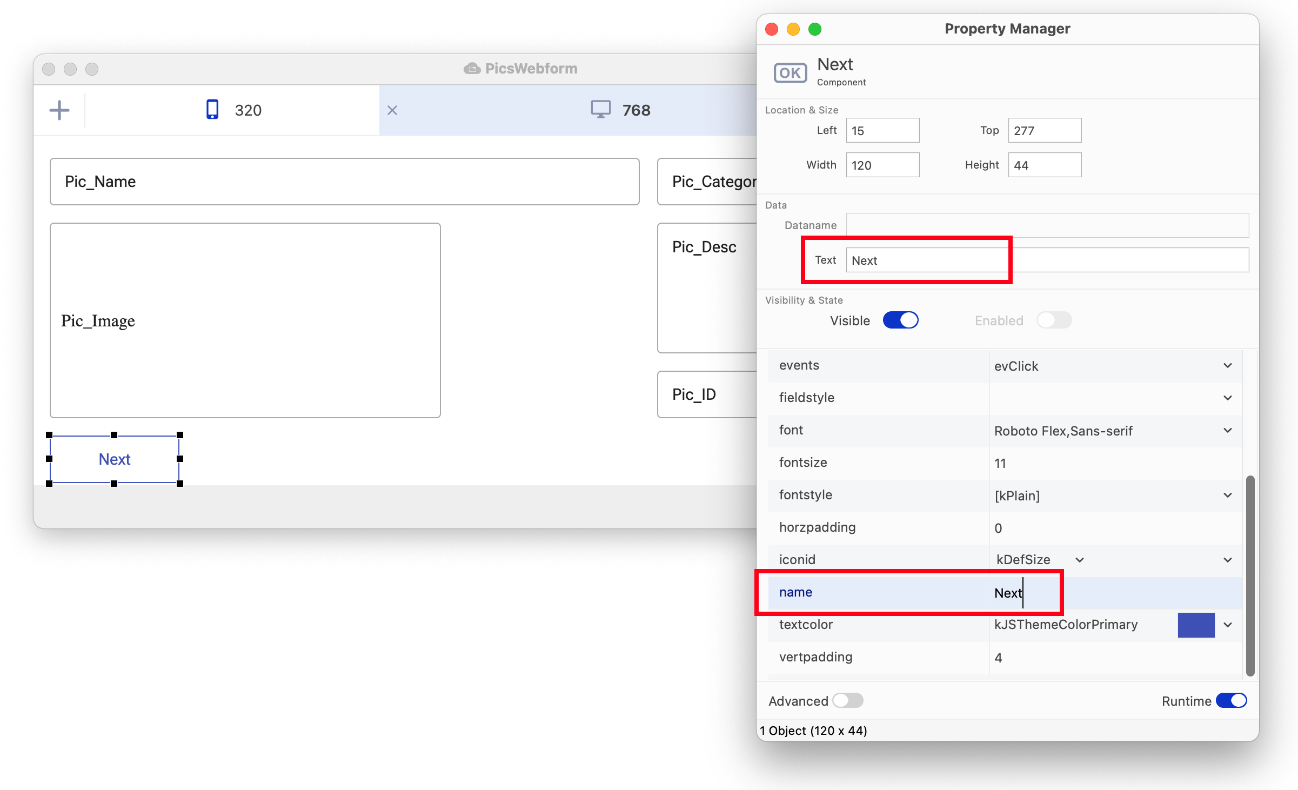
With the button selected, press F6/Cmnd-6 to open the Property Manager (or bring it to the front), and change its properties as follows:
name = Next
text = Next
You need to add some code to the Next button; you can copy the code text from here:
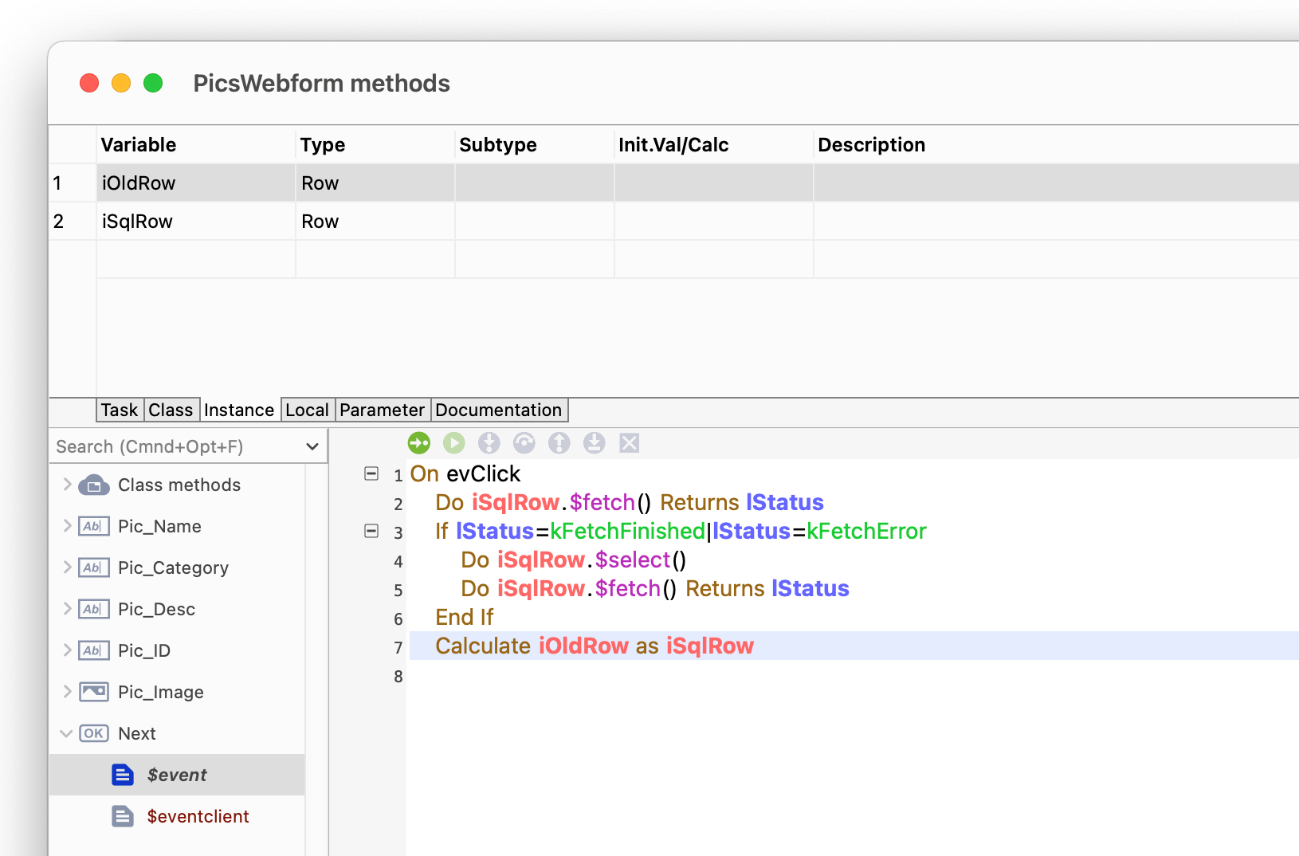
On evClick
Do iSqlRow.$fetch() Returns lStatus
If lStatus=kFetchFinished=kFetchError
  Do iSqlRow.$select()
  Do iSqlRow.$fetch() Returns lStatus
End If
Calculate iOldRow as iSqlRow
(Alternatively, if you are using the Professional Edition or free trial, you can copy the code from the Next button on the PicsWindow window class you created previously in this tutorial, or from one of the pics libraries in the ‘final’ folder; you’ll need to copy the code from the $event method for the Next button.)
Note when you double-click on an object, Omnis will open the Method Editor and select the object’s $event method, in this case, $event for the Next button on your form. This method will contain the code that will be executed when the end user clicks on the button, i.e. it is the event method for the button.

Note that if you copied the code from this page you will need to create the local variable lStatus type = Character, and the instance variable iOldRow type = Row. (If you copied the code from the Next button in the PicsWindow class, the variables will also have been copied automatically, so you can skip the next part about creating the variables.)
To create the variables, click in the variable name in the Code Editor, click on the Fix button (at the bottom of the Code editor window), and create the variable in the Create Variable dialog, remembering to select the correct Scope and Type for each (although Omnis will try to select these for you automatically).
This is the definition for lStatus:
This is the definition for iOldRow:

The iOldRow and iSqlRow variables are needed to load or "fetch" each successive row of data from the database (in the result set from the database SELECT).
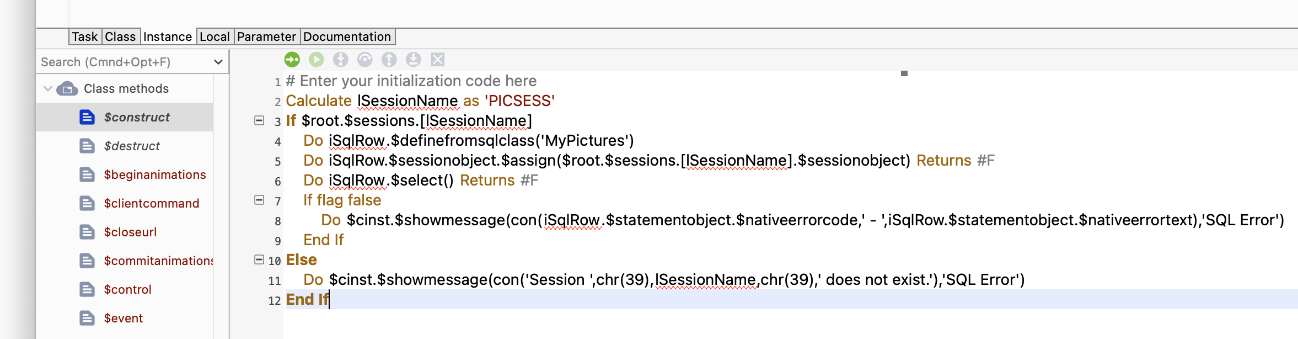
Your Method Editor should look the same as the following, including the syntax color coding for the variables you defined:
(If you copied the code from the PicsWindow window class you can delete the last line of code ‘Do $cwind.$redraw’ since it will have no effect in a web form, or you can comment it out by clicking anywhere in the line (or selecting the whole) and pressing Ctrl/Cmnd-/. A # symbol is added to the line and it becomes inactive code.)
At present the fields on your PicsWebform are positioned to be displayed in a browser on a desktop computer or tablet (on the 768 layout breakpoint), but you can reposition the fields on the 320 breakpoint so the same remote form can be displayed on different devices, including mobile phones.
Open the PicsWebform in design mode, or click on it to bring it to the top.
Click on 320 in the Design bar at the top of the Remote form editor to select the 320 layout breakpoint.
To tidy up the fields on the 320 breakpoint layout you can start with the layout from the 768 breakpoint you already designed (at this stage the fields are randomly placed).
Drag the lower edge or corner of the remote form to make the form larger, that is, increase its height.
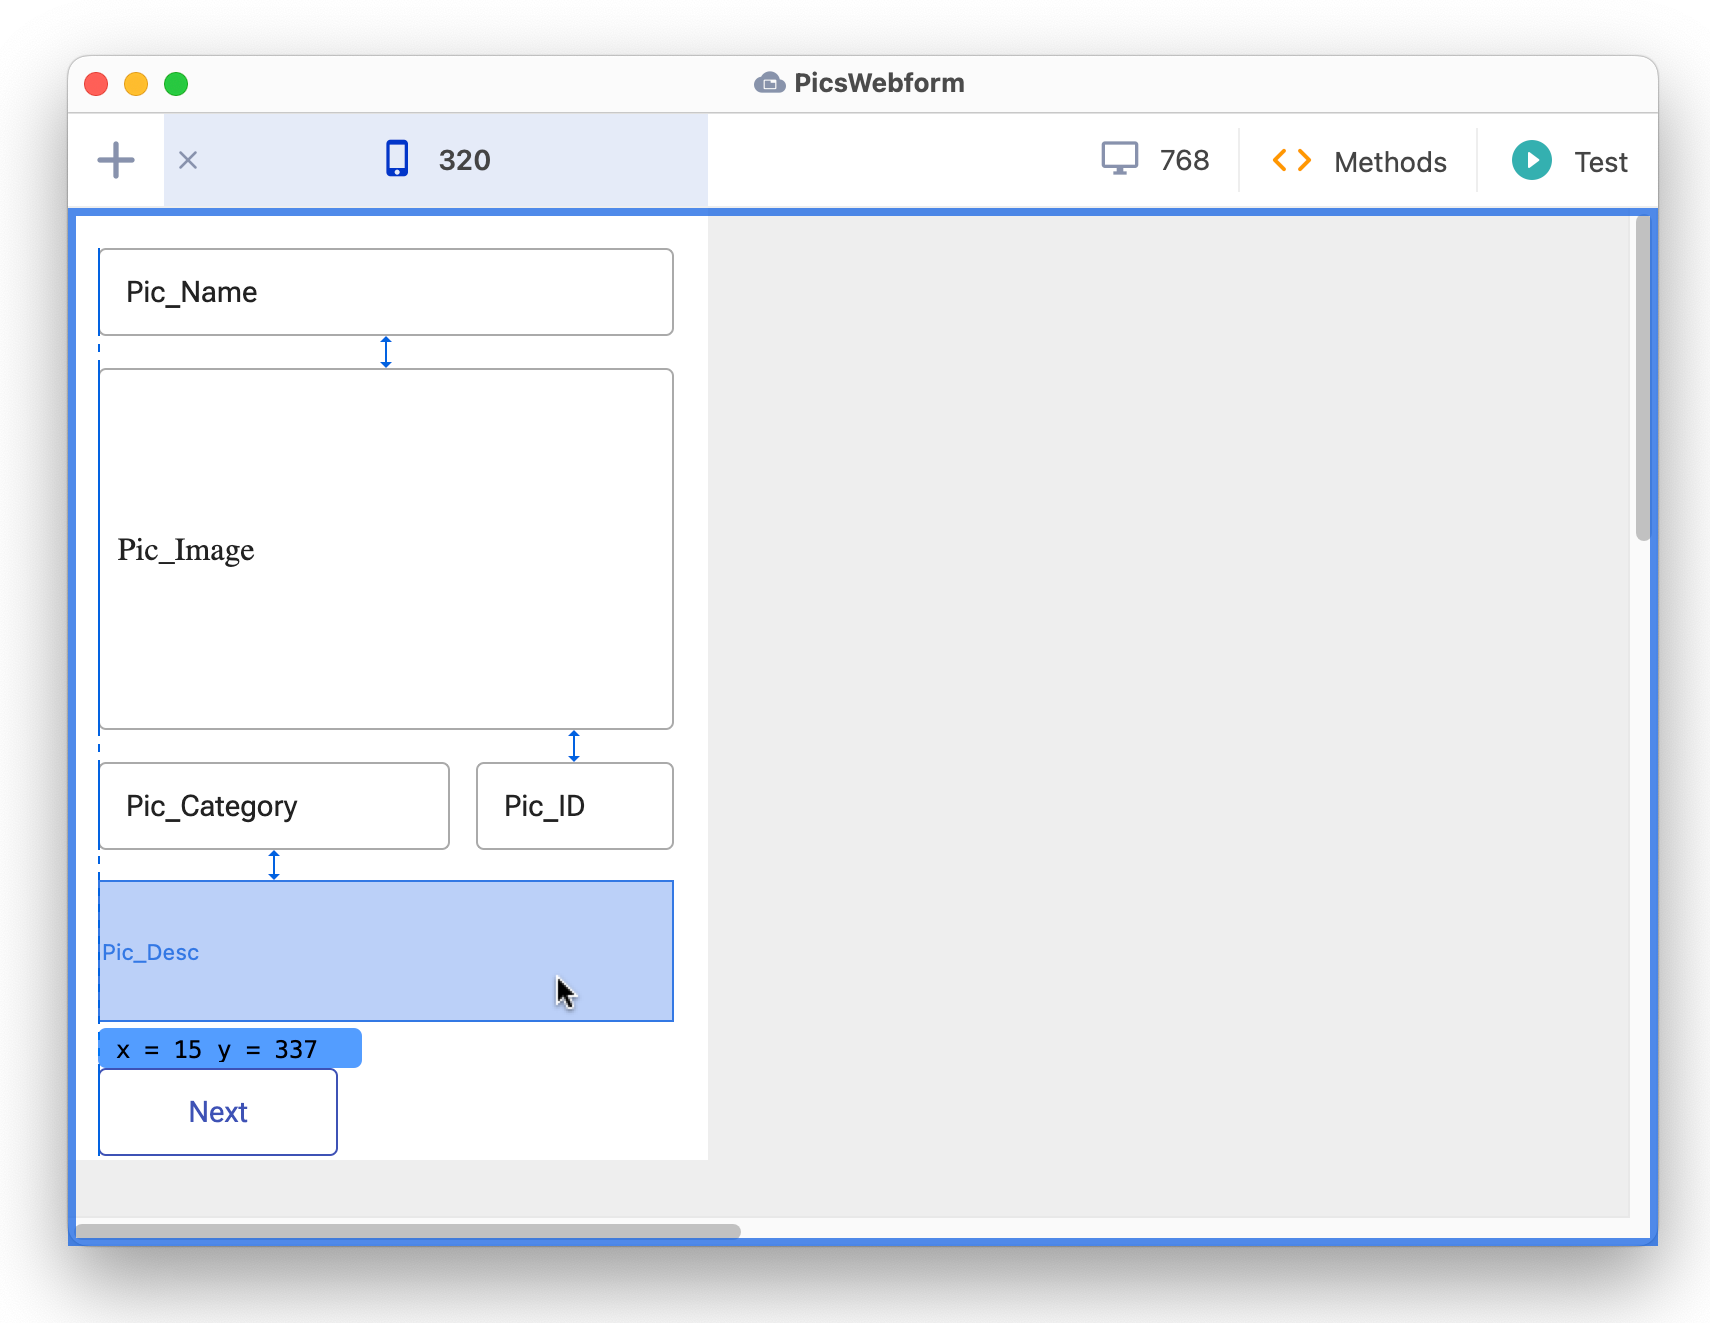
Drag the Next button down (or position it at the top if you would prefer), then resize and re-position all the other fields to fit the width of the 320 layout breakpoint; you can use the Position Assistance to help you line up the controls (as shown below).
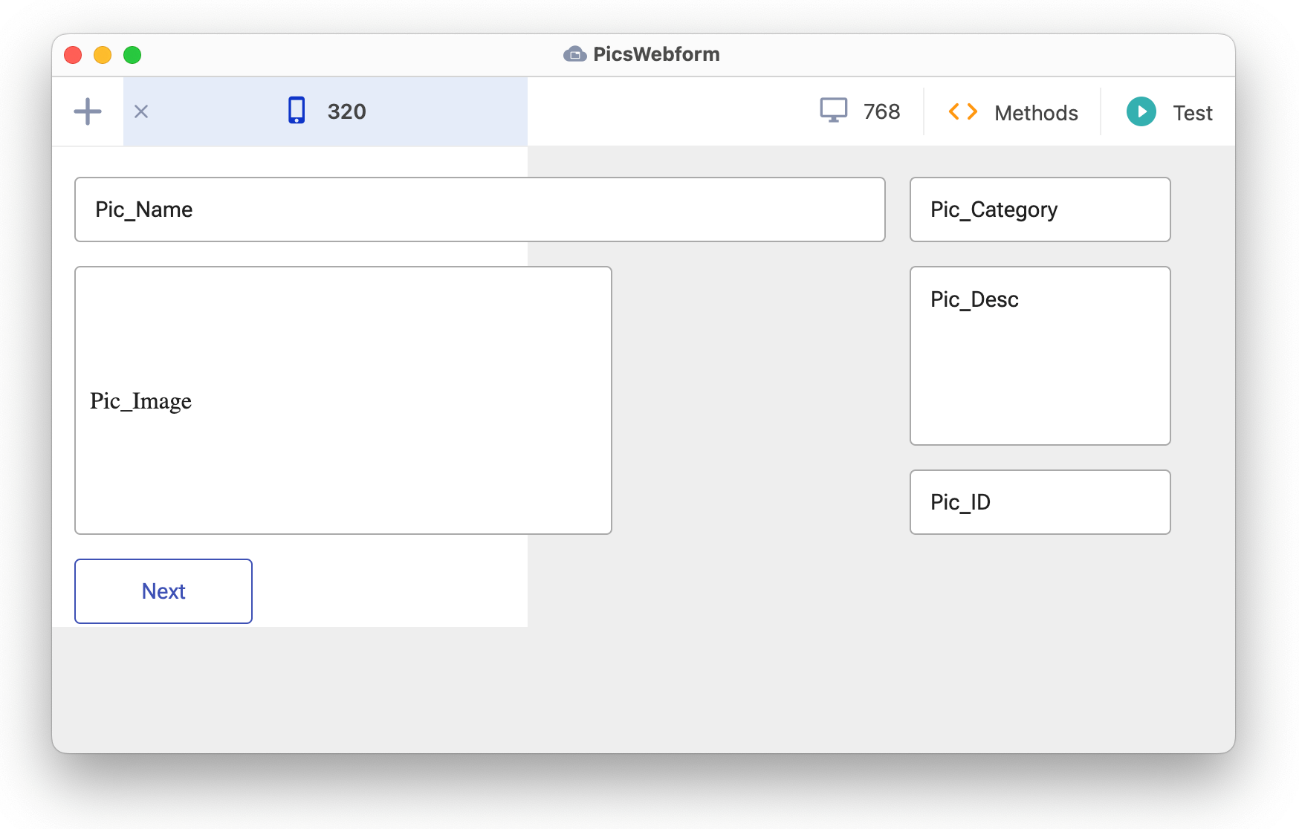
Your remote form should look something like the following:
To test your remote form in a web browser, the library needs a Remote Task, which handles the client connections at runtime when you test or deploy your application. However, when you test a remote form, and if your library does not contain a Remote task, one will be created for you automatically and assigned to your Remote form.
So you can skip to the Testing your Web Form section.
If you created your remote form from scratch it may look different from the JavaScript remote form created using the wizard (i.e. it only has a Next button), but testing a remote form is the same. Remember, if you created your own SQL session and have quit and restarted Omnis Studio, then you will need to reopen the PicSess database session, as described earlier in the ‘Opening a Database Session’ section.
If the PicsWebform form is not open in design mode, double-click on it in the Studio Browser to open it.
To test a Remote form, you can click on the Test button in the Design bar in the Remote form editor
Alternatively, to test a remote form you can press Ctrl/Cmnd-T at any time, or Right-click on the background of the form and select Test Form.
Your remote form should open in your default web browser, such as Chrome, Safari, Firefox, or Edge. However, you can test a Remote form in a different browser (other than your default web browser), by Right-clicking on the background of a Remote form and selecting the Select Browser and Test Form option, then choosing the browser.
If the data is not displayed this may be because the Pics database session is not open (maybe you closed Omnis Studio and returned to the tutorial later). If you need to open the database session, close the browser tab, return to Omnis Studio, click on SQL Browser in the Studio Browser, click on the Open Session option, then click on PicSess to open the database session, as described in the ‘Opening a Database Session’ section.
Having re-opened the PicSess session, return to your PicsWebform in design mode, click on the Test button (or press Ctrl-T) to open it in your web browser and try clicking the Next button again, or if the PicsWebform form is still open in your web browser you can return to the browser and Refresh/Reload the web page.
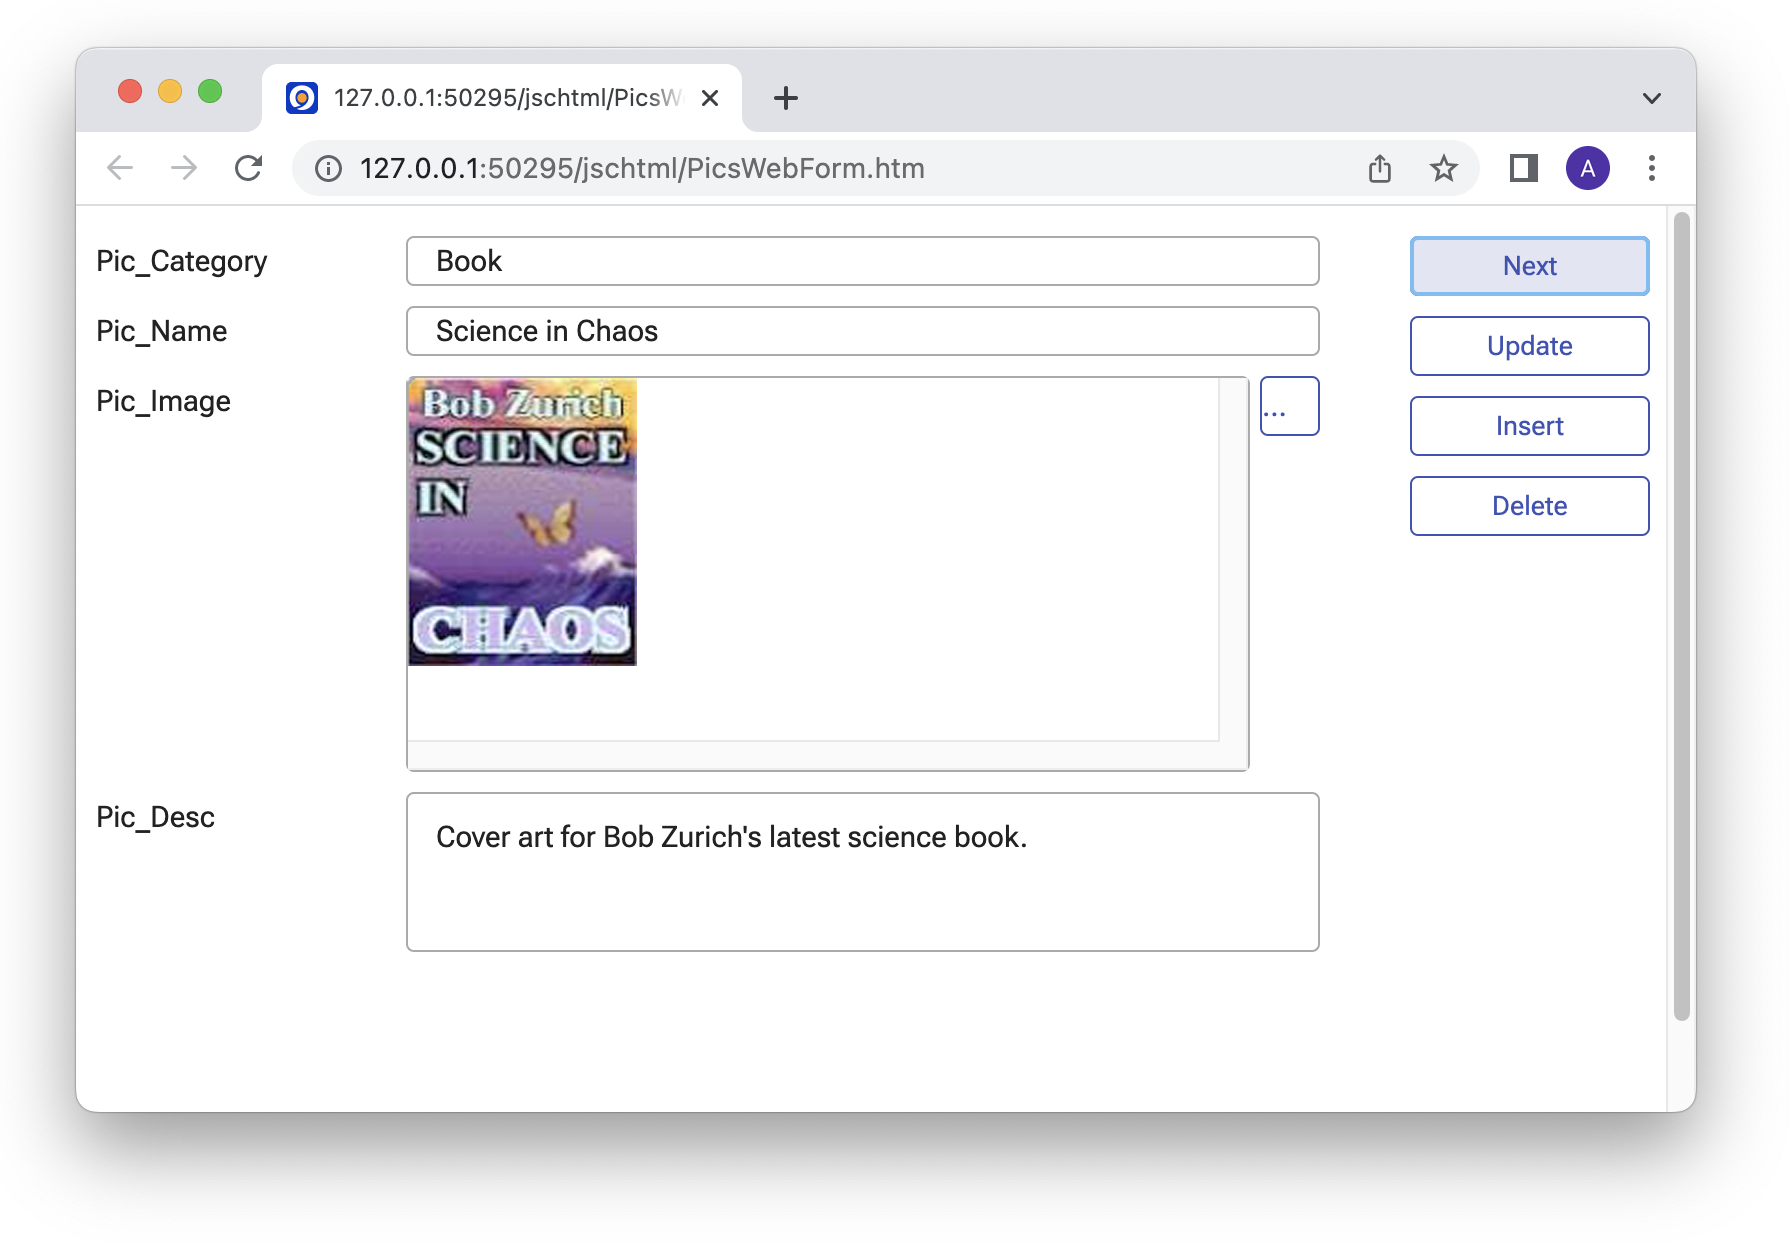
Assuming your PicsWebForm is open in your web browser (and that you have added the code to the Insert button, described in the previous section), then you can insert a new record into the database. To insert data you must first enter some data into the fields as follows:
| Field | Data to add |
|---|---|
| Pic_Category | Book |
| Pic_Name | Science in Chaos |
| Pic_Image | Use the Upload button to insert the '11bookchaos.png' from the tutorial folder you downloaded in the zip file |
| Pic_Desc | Cover art for Bob Zurich’s latest science book |
Note that you did not include the Pic_ID and Pic_URL columns on the form; Pic_ID will be inserted automatically using the code you added to the Insert button.
Click on the Next button to cycle through the data and you should see the record you just inserted.
When you test a remote form, using the Test button (or Test Form option or Ctrl/Cmnd-T), Omnis creates an HTML page for you automatically, containing the JavaScript client; in this case the page is called 'PicsWebform.htm' and is placed in the html folder inside the Omnis Studio tree (the browser connects to the page using your ‘Localhost’ and a random test port setting). The test HTML page displays your remote form by connecting to your development version of Omnis Studio and the Pics library you have created.
You can view the source for the test HTML page in your browser to see the embedded JavaScript client object – look for the <div> with id=omnisobject1, and some of the other parameters that relate to the name of the library (data-omnislibrary="pics") and the remote form you created (data-omnisclass="PicsWebForm").
<div id="omnisobject1" style="position:absolute; top:0; left:0;

width:100%; height:100%;" data-webserverurl="_PS_"

data-omnisserverandport="" data-omnislibrary="pics"

data-omnisclass="PicsWebForm" data-themename="default"

data-appid="pics.PicsWebForm" data-dss="'js320x480Portrait',

'js768x1024Portrait'" data-param1="" data-param2=""
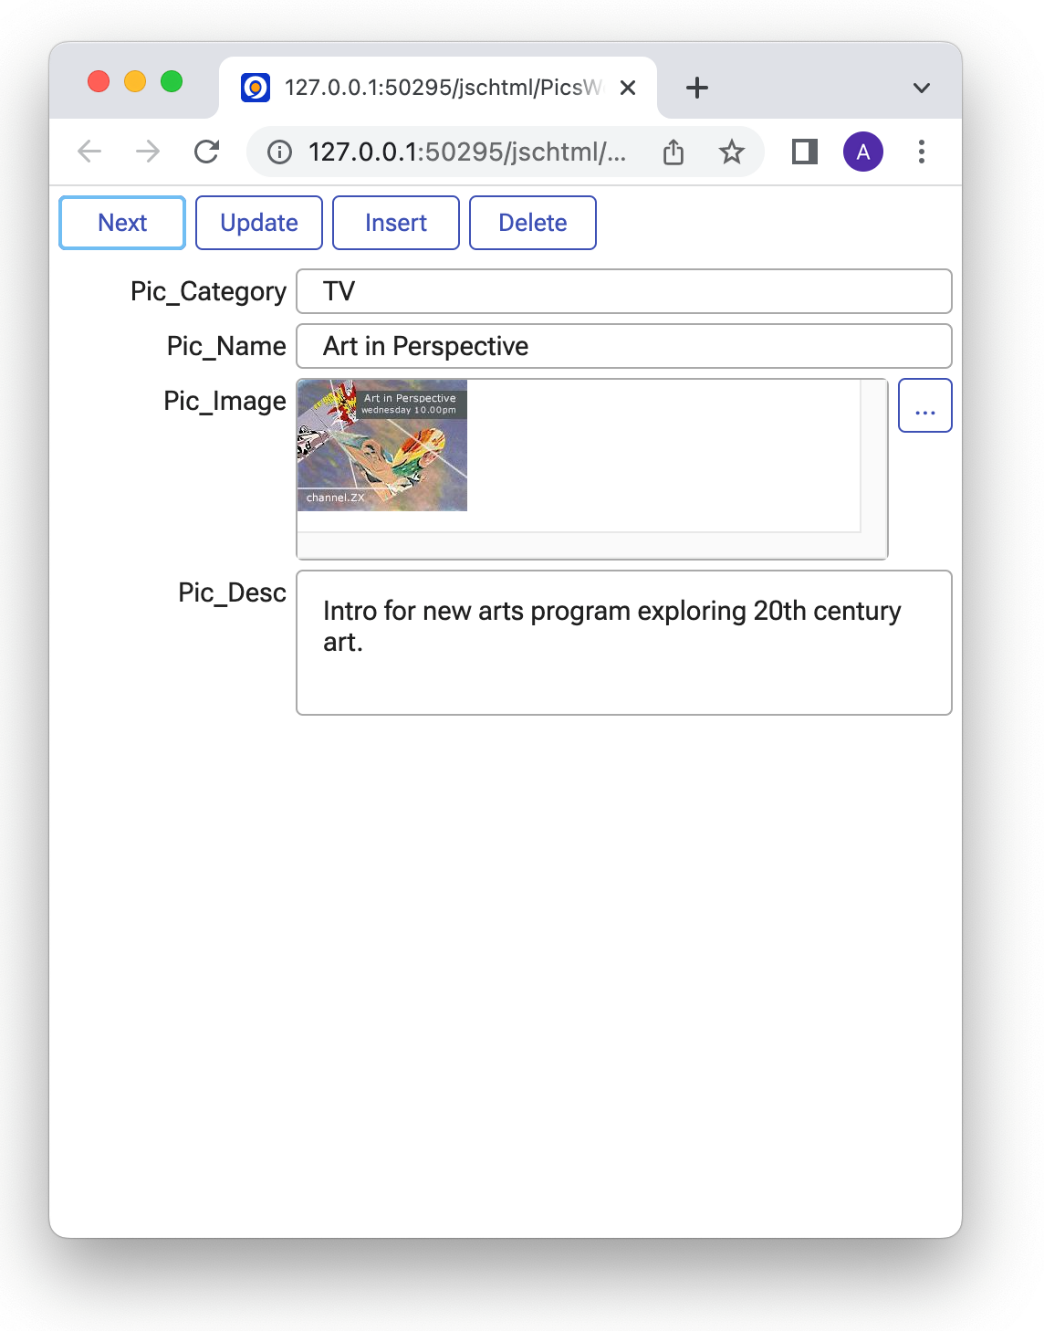
data-commstimeout="0"></div>Next you can resize your desktop web browser, that is, make it narrower, and the form will switch to display the layout for the 320 breakpoint. It will look something like this (if you used the Remote form wizard):
You can animate the transition between the two layouts, by setting the animatelayouttransitions property.
Close your web browser (or tab) and open the PicsWebform remote form in Omnis in design mode
Click on the background of the form and open the Property Manager or bring it to the top by pressing F6/Cmnd-6
Enable the Advanced option at the bottom left of the Property Manager to show all the properties and tabs
The animatelayouttransitions property is not shown under the basic view mode (when Advanced is disabled); when you switch to Advanced mode, all the properties and group tabs will appear in the Property Manager to categorize different types of properties. For a Remote form, you will see General, Appearance, Methods, and Action tabs.
To locate the animatelayouttransitions property, you can click on the Action tab and select the property
Alternatively, you can enter ‘anim’ or ‘animate’ into the property Search at the top of the Property Manager to find the animatelayouttransitions property.
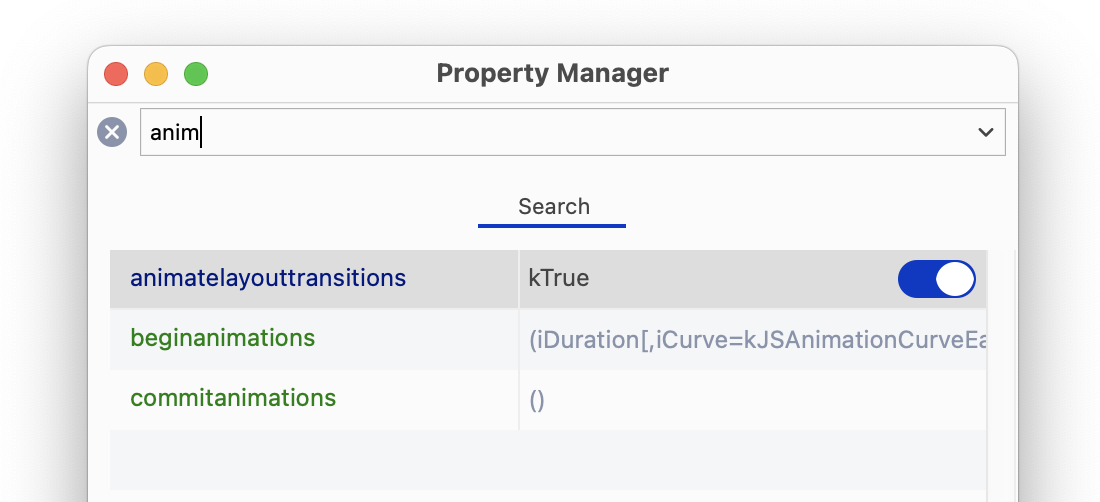
If you want to locate other properties in the Property Manager, you need to clear the search by clicking the X icon next to the search, or deleting the search string.
Resizing your desktop web browser is a quick way to test the different layouts in a remote form, but you can test the form on a mobile device, or any other computer or tablet.
During development and testing you can load the form on any device that is within the same local network WLAN. To do this, you can enter a test URL into the web browser on your mobile or tablet, but replace the Localhost IP address (127.0.0.1) with the IP address of your development computer itself, that is, the computer that is running Omnis Studio and the Pics library.
First, you'll need to open the form in the desktop browser on your development computer to find out the test URL.
Make a note of the URL in the web browser of your development computer, or just leave open the browser, and have ready your mobile phone or tablet, or any other computer within the current WLAN.

Next you need to find out the IP address of your development computer.
On a Windows PC, you can use the ‘ipconfig’ command in the Command prompt to find your IP address, while on macOS you can use ‘ifconfig’ in a Terminal window.
Open the web browser on your mobile device or tablet and enter the same URL displayed in the browser on your development computer, but replace the local host IP (127.0.0.1) with the IP address of your development computer. (You could try this in your desktop browser first and then send the link to your phone.)
The URL will be something like the following (the port number and IP address will be different, otherwise the URL should have the same format):
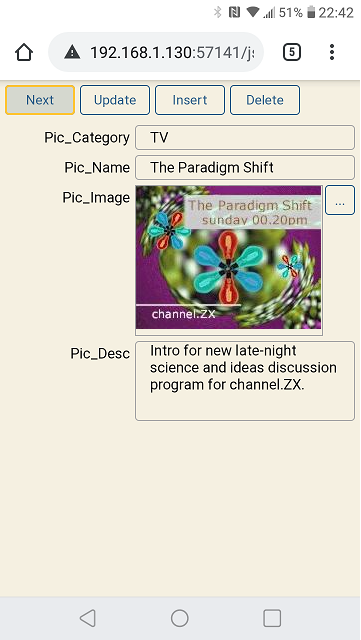
When you submit the test URL on your mobile device the PicsWebform remote form will open, but this time Omnis detects that the form is on a mobile device and displays the correct layout.
When you create a remote form a ‘default’ color theme is selected and applied to the controls and form background automatically, but you can change the theme in the remote quite easily. You need to return to your remote form in design.
If the PicsWebform form is not open, double-click on it in the Studio Browser to open it; or if it is already open, bring it to the front.
Press Ctrl-J, or select the JavaScript Theme option in the View menu.
Select a different theme, and the colors used in the remote form will change; the ‘vintage’ theme is selected in the following screen.
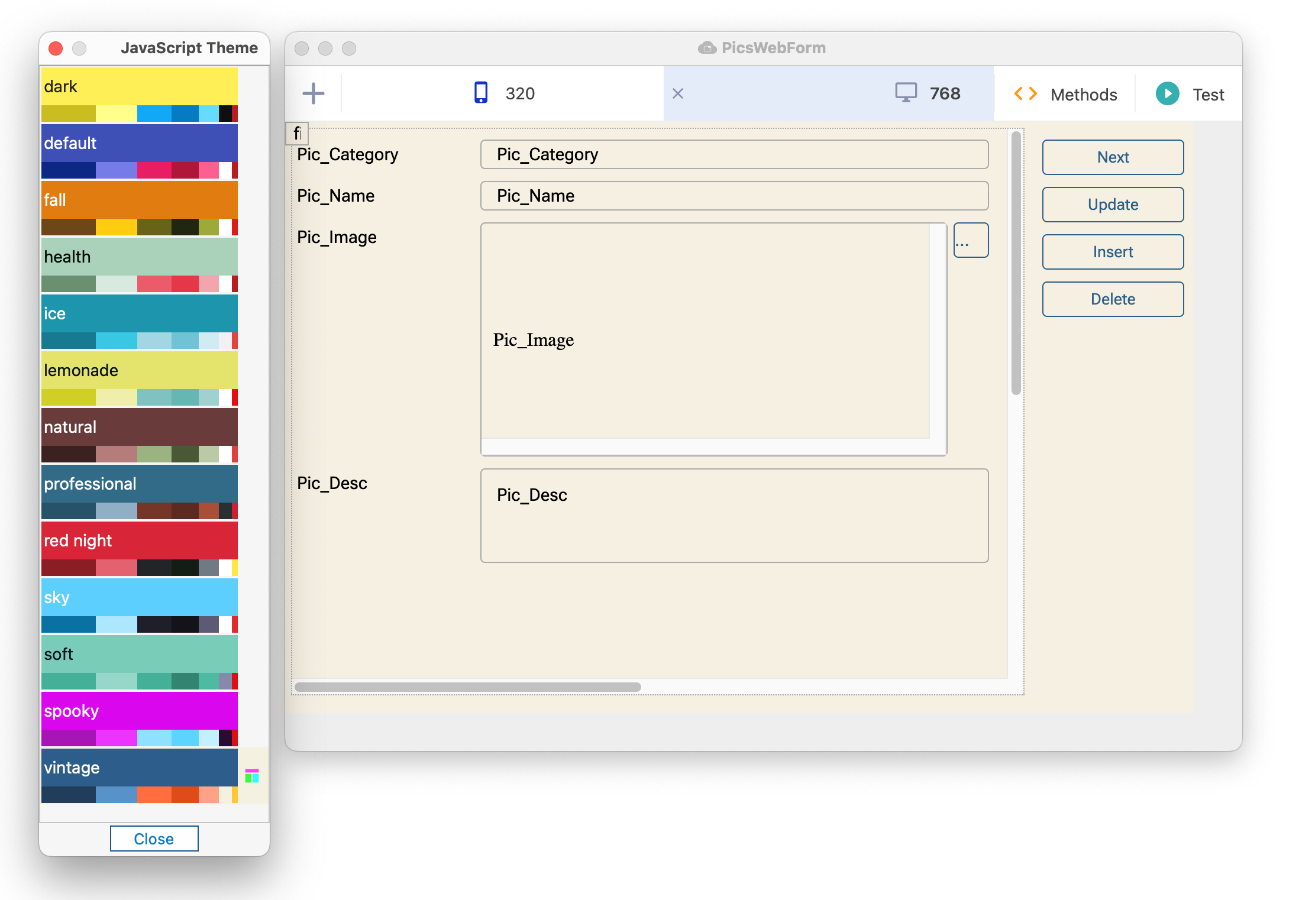
Note that the JS Theme is a global setting so the selected theme will be applied to all the remote forms in your library (or any other open libraries); you can write code in your remote form to set the JS Theme to be used on the client.
Click on the Test button (or press Ctrl/Cmnd-T) to open the Remote form.
Alternatively, you could reload or reopen the form on your mobile device to see how the form looks with a different theme; the following screen shows the mobile form with the Vintage theme.
This tutorial does not cover the process of deploying your application to the web, but hopefully it has given you an insight into how quick and easy it is to create and test remote forms in a web or mobile app using Omnis Studio.
For more information about deploying your web application, refer to the Deployment section.