Omnis Technical Note TNMC0001 November 2010
Personalizing Your iOS Application
By Jason Gissing
For Omnis Studio 5.1 and later.
Due to its publication date, this technote contains information which may no longer be accurate or applicable on one or more of the platforms it refers to. Please refer to the index page which may contain updated information.
If this is your first attempt at building an iOS app, you should read tech note TNMC0002 first.
At some point during the development of your iOS apps you are going to want to change the name and appearance away from the default Omnis app. This just requires a few simple changes to your clientbuild project before building your new, customized app.
Changing the Identifier:
Each app must have a unique Identifier. An app is identified
by its Identifier rather than its name.
Double-click on the target for which you are building to open its Info page, and navigate to the Properties pane. Here you will see the Identifier property – change this to a unique value. The convention is to use a reverse domain name format. E.g: com.omnissoftware.MyApp
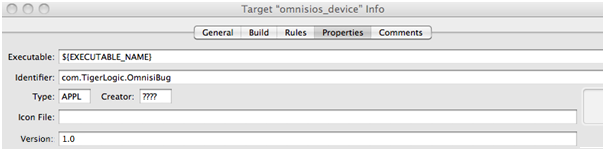
If you are updating an existing app, you may also want to increment the Version number here. This way it will be recognized as a newer version, and syncing with iTunes will update older versions of the app on your devices.
Changing the Name:
There are two points where you should change the name:
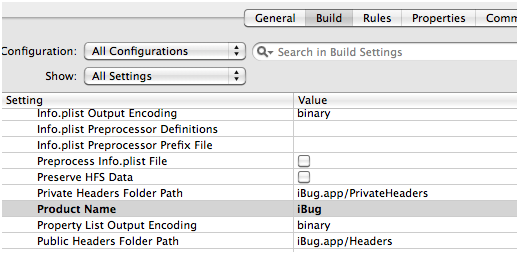
1) Product Name:
This will be the actual name of your app. Your app will be identified
by this in iTunes and internally on the device. If your app adds an entry
to the Settings, this name will identify it there.
• In the target’s Info -> Build properties, change
the Product Name value.
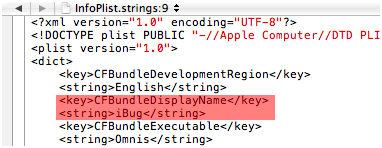
2) Display Name:
This will be the name the user will see for the app on their device, and
will be how the bundle itself is named. The executable within the bundle
will be named according to Product Name.
• Open the InfoPlist.strings file, and change the value
of CFBundleDisplayName.
Bundle Version Info:
You can change the bundle’s version information, as is seen in the
finder, by again opening InfoPlist.strings and editing:
• CFBundleGetInfoString – this is displayed as the
Version when the bundle’s Get Info is selected in the finder.
• CFBundleShortVersionString – this is displayed as
the version in the finder’s Preview pane.
Changing the Icons:
The project builds several icons into the app, used to display in different
circumstances on the different devices.
These are:
• Icon.png (57x57) – App icon displayed on iPhone
& iPod Touch
• Icon@2x.png (114x114) – App Icon displayed on iPhone4
• Icon-72.png (72x72) - App icon displayed on iPad
• Icon-Small.png (29x29) – Settings and search results
icons on iPhone & iPod Touch, Settings Icon on iPad
• Icon-Small@2x.png (58x58) - Settings and search results
icons on iPhone4
• Icon-Small-50.png (50x50) - Search results icon on iPad
These can be found in the resourcesx folder of your project.
Edit these to your liking, and update. Note that these names should not
be changed.
Open the InfoPlist.strings file and check whether it contains
a CFBundleIconFile Key and value.
If it does, delete the whole key and value, and save the file. Otherwise
this will override your Icon.png.
Changing the Loading Screens:
When your iOS app opens, it briefly shows a splash screen. To change this
image you need to alter Default.png (for iPhone/iPod Touch) and
Default-Portrait.png (for iPad).
While the app is communicating with, or waiting for a response from the
server, the omnislarge.png Icon is faded into view. Again, it’s
just a matter of editing this image to personalize this to your application.
The names of these images are hard-coded into the client, so these should
not be changed.
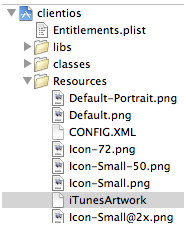
iTunes Icons:
In order to display images for your app in iTunes, your project must include
a 512x512 PNG image named iTunesArtwork.
If it already exists in your project you can just update that. Otherwise
you need to create one and add it to your project by right-clicking the
Resources folder, and Selecting Add->Existing Files... and
browse to your image. In the window that appears, select all of the targets
you wish to add the artwork for.
You must now delete any file extension from the reference name, so that
the project lists it in its Resources as iTunesArtwork.

 Facebook
 Github
 Instagram
 Linkedin
 Twitter
 Youtube
 Please logon or create a free account to download this file.
