Omnis Technical Note TNWE0023 Updated April 2010
Testing Web Client Applications with Windows UAC and IIS7
for Omnis Studio
Updated by Jason Gissing
Due to its publication date, this technote contains information which may no longer be accurate or applicable on one or more of the platforms it refers to. Please refer to the index page which may contain updated information.
Introduction
This Tech Note is an extension of TNWE0022 and explains how to set-up a Web Server on Windows Vista* as the setup process is slightly different. As with the previous discussion, It assumes that you have a working Web Client application that you have tested as far as possible using the Test Form facility available in design mode and you are now ready to test the multi-threaded aspects of your application or to make it available to a wider audience.
*This article was originally written for Windows Vista but also applies to the Windows 7 operating system.
Latest Update: Windows Vista and Internet Information Services (IIS) 7
Setting-up a Windows Vista Server involves the following tasks:
1. Install Microsoft Internet Information Services
(IIS)
To do this, go to your Start->Control Panel->Programs
and Features (Add or Remove Programs in earlier versions of Windows)
then select Turning Windows Features On and Off
In the checklist which appears, select Internet
Information Services if not already selected and press Next.
You may need to insert the Windows installation disk if prompted.
2. Create a directory for the Web Client Plug-in
Once IIS has been installed, a root folder is created where your Internet
pages will reside. For Windows, this folder is named Inetpub
and exists in the root of your installation drive (e.g. C:\Inetpub). Following
the convention set out in the Programming Manual, you should navigate
to this folder and create a sub-folder named cgi-bin
(i.e. C:\Inetpub\cgi-bin).
Dependant on whether your application will be using the omnisapi.dll
or nph-omniscgi.exe plug-in, you should copy
one or other (or both) of these files from the Omnis\clientserver\server\cgi
or isapi folders into the cgi-bin folder. You do not have to use the name
'cgi-bin', but the path to the plug-in must match that used by the script
inside your web form. (See step 4, below).
3. Make the Plug-in Folder a 'Virtual Directory'
This step makes it possible for remote clients to execute code on the
server.
Go to Control Panel->System and Maintenance->Administrative
Tools->Internet Information Services and expand the entry which
is marked COMPUTERNAME (local computer).
Expand the node marked Web Sites. Right-click
on Default Web Site and select New->Virtual
Directory... This starts the Virtual Directory Creation
Wizard.
Click on the new virtual directory in the tree, and open its Handler
Mappings. Then Add module mapping.
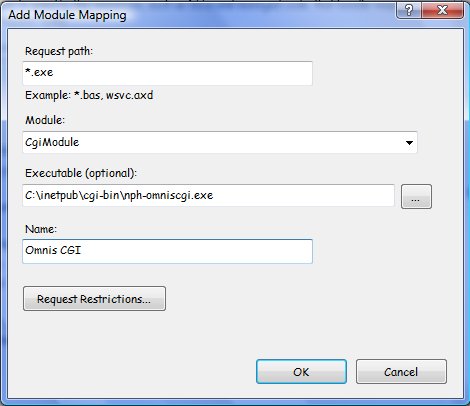
Set the Request Path as "*.exe" if you're
using the nph-omniscgi.exe, or "*.dll" if you're using the omnisapi.dll.
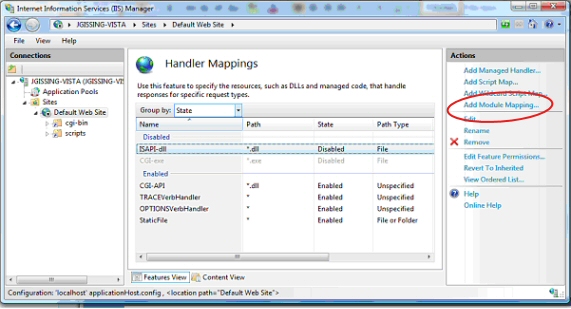
Set the Module to CGImodule
for the nph-omniscgi.exe or IsapiModule for
omnisapi.dll.
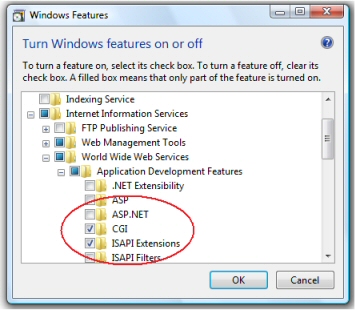
If either of these is missing from the droplist, you will need to enable
it. Go to Control Panel->Programs->Turn Windows
features on and off->Internet Information Services->World Wide Web
services->Application Development Features and check CGI
for the .exe and ISAPI extensions for the
.dll.
Set the Executable by browsing to your plugin file (.exe or .dll). Name the file as desired.
Now go up to the top level of the tree on the left of your IIS window,
and open ISAPI and CGI Restrictions
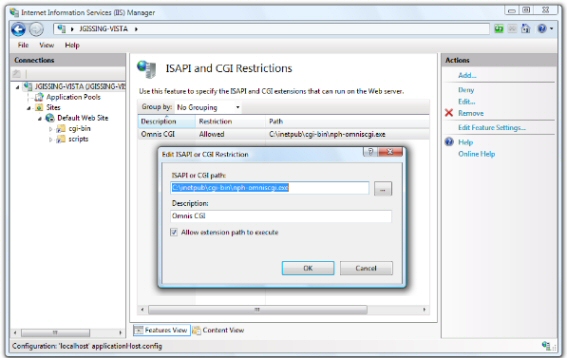
If your plugin file is not listed here, click Add, making sure to check the allow extension path to execute check box.
4. Copy in your Web Content and Change Script
Settings
During development of your Web Client application, the template HTML file
containing the Web Form is stored in the Omnis\html
folder. You should now copy the .HTM file (or files) applicable
to your application and place them inside the C:\Inetpub\wwwroot
folder (along with any other web content that you may require). You should
also copy in the omniswebclient.js javascript
file since this is required by the plug-in.
You should then edit your HTM file(s) and locate the <javascript>
tag containing the Omnis plug-in code.
In addition to the form width, form height, library and class name entries,
you should verify that the server port entry (oserver) matches the value
being used by Omnis Studio (i.e. the Omnis->Tools->Options
$serverport property).
You should modify the owebserverurl to the IP address, DHCP lookup or Domain Name of the Web Server machine. The owebserverscript entry should contain the Inetpub-relative path to the plug-in that is used by the web form.
| <script type="text/javascript"> // Omnis replaces the text between $$Start and $$End, when it fills in the template // $$Start ounicodeserver="no" owidth="600" oheight="400" oserver="6000" olibrary="WEBTEST1" oclass="rForm1" // $$End // If you wish to use this page with a web server, set the following variables to the script and URL,e.g. // owebserverurl="www.myserver.com" // owebserverscript="/cgi-bin/nph-omniscgi.exe" owebserverurl="192.168.0.5" owebserverscript="/cgi-bin/omnisapi.dll" // To enable auto-download of the Omnis Web Client Active X CAB file (providing support for Win32 Internet Explorer), // set odownload to "yes" odownload="no" // To pass parameters to the called Remote Task Instance set the following variables. omparam1name="" omparam1value="" omparam2name="" omparam2value="" omparam3name="" omparam3value="" omparam4name="" omparam4value="" omparam5name="" omparam5value="" omparam6name="" omparam6value="" omparam7name="" omparam7value="" omparam8name="" omparam8value="" omparam9name="" omparam9value="" </script> <script type="text/javascript" charset="utf-8" src="omniswebclient.js"> </script> |
| Omnis plug-in script- used by the web page containing the web form |
5. Test Connection to the Web Application
Almost there! To ensure that the Omnis Server loads your Web Client library
automatically, you may wish to move your library into the Omnis\startup
folder. The application needs to be running and listening on the serverport
in order to handle requests from Web Clients.
Either from the local or from a networked machine, open a Web browser
and navigate to the page containing the web form.
For example:
| http://192.168.0.5/rForm1.htm | - addressing the Omnis Server by its IP address, e.g. over a LAN |
| http://myserver/rForm1.htm | - addressing the Omnis Server by its DHCP lookup (registered network name) |
| http://www.mysite.com/rForm1.htm | - addressing the Omnis Server using a registered domain name |
Provided the client machine has the Web Client (client-side) plug-in installed, the Omnis remote form should be displayed and you are ready to test your application. The Web Client plug-in is provided with the Omnis installation media and is also available for download from the Omnis website.
Windows Vista and Internet Information Services (IIS) 7
Please note that when using IIS7 under a 64Bit Operating System, you
will have to enable the 32Bit application execution (WOW64) for the OmnisAPI.dll
This can be done within the IIS7 Administrator as follows:
Select the Application Pools, Advanced Settings and then toggle 'Enable32Bit
Applications'
Or, this can be set up via a script as follows:
cscript %SYSTEMDRIVE%\inetpub\adminscripts\adsutil.vbs
SET W3SVC/AppPools/Enable32bitAppOnWin64 true
Or via AppCMD as follows:
appcmd set apppool /apppool.name:MyAppPool32bit
/enable32BitAppOnWin64:true
Or by adding to the 'applicationHost.config' as follows:

 Facebook
 Github
 Instagram
 Linkedin
 Twitter
 Youtube
 Please logon or create a free account to download this file.
