The Data File Migration tool is not available in the Community Edition. Omnis datafiles should not be used for new applications.
The Omnis Data File Migration tool lets you migrate the data in your Omnis data files to PostgreSQL or SQLite, ensuring the future stability and longevity of your OmnisSQL applications, and addressing several long-term issues with the old-style data file architecture. For example, SQL statements are no longer limited to 64KB; compound Indexes may now contain columns of different types; and various SQL parsing issues including issues with GROUP BY and ORDER BY should also be resolved.
Following a one-time conversion of your Omnis data file(s) to a PostgreSQL or SQLite database using the migration tool, the Omnis DML commands* in your old library will execute against the selected database with no modifications to the original library code**.
The migration tool allows you to switch from an Omnis data file to a SQL database reasonably quickly and easily, without having to rewrite a lot of data handling code, which will make data storage more robust while giving you a route to convert your application to all SQL code.
*The commands that operate against Omnis data files and file classes have in the past been collectively referred to as the Omnis Data Manipulation Language or Omnis DML.
**In Studio 10.2 or above, emulation is enabled via two properties; $root.$prefs.$mapdmltodam and $libs.your-lib.$prefs.$dmlemulation. Omnis will retain these settings.
We would like to thank Nick Renders and Thad Bogert for their help in developing the DML emulation technology.
IMPORTANT: Backup Your Data Files
IN ALL CASES, YOU SHOULD MAKE A SECURE BACKUP OF ALL OMNIS DATA FILES BEFORE OPENING/CONVERTING THEM WITH THE DATA FILE CONVERSION TOOL.
The conversion option, called Convert Data File to RDBMS, is available under the Tools>>Add-Ons option on the main Omnis menubar or Toolbar, allows you to convert an existing single- or multi-segment Omnis data file into a PostgreSQL database or a SQLite data file.
To convert a data file, browse for or enter the path of the Omnis .DF1 file, select the database type (either PostgreSQL or SQLite), then press Go.
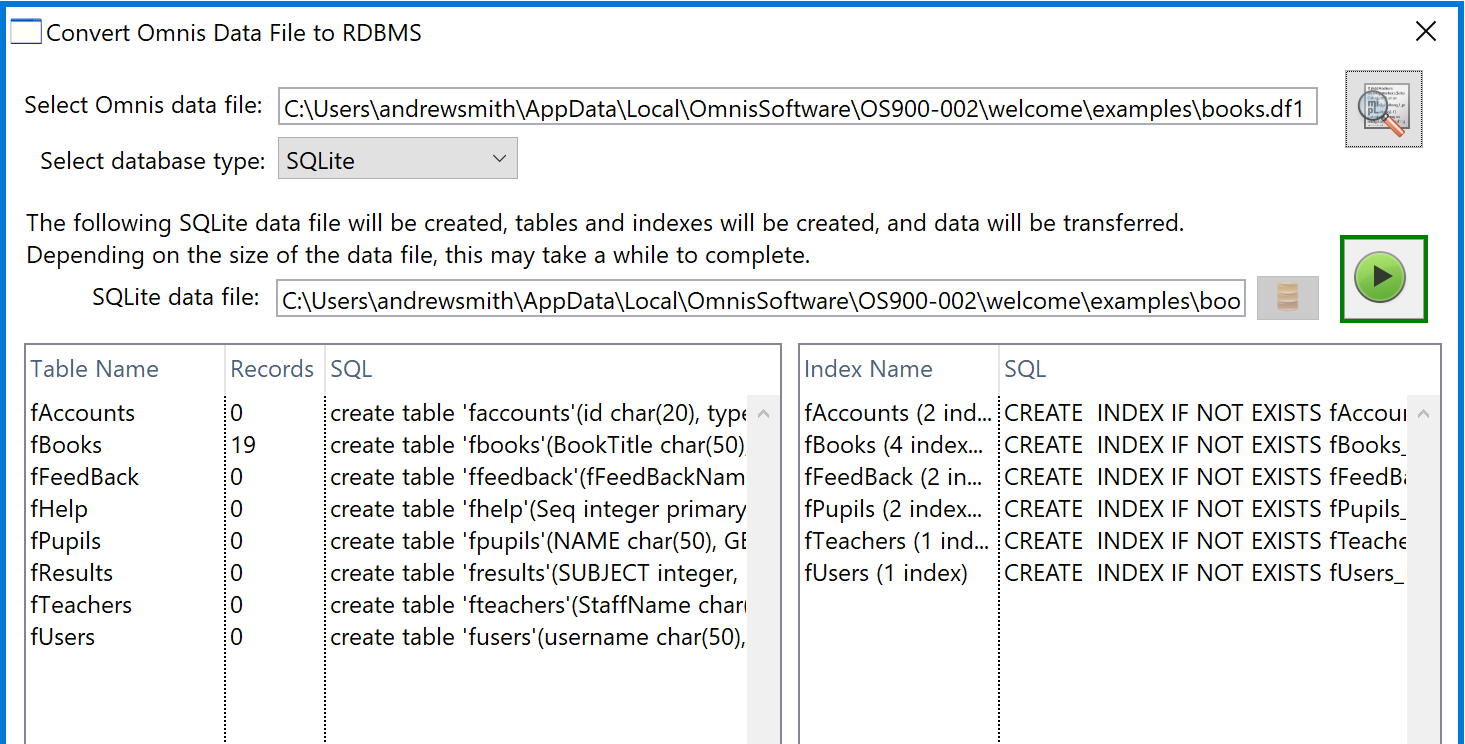
The conversion process copies all tables and indexes, and populates the tables with data copied from the Omnis data file.
Once converted, you may remove the Omnis data file (and retain it as a backup).
When converted into SQL tables, all SQL identifiers (table and column names) are converted to lower-case. Any non ISO-SQL characters, including spaces and symbols are converted to underscores. The emulator uses SQL aliases when loading values back into the corresponding File class columns.
During conversion any File connections are preserved using foreign key fields added to the table definition. For example, where File class A has connections to File classes B and C, table A will contain two additional integer columns named “fk_b” and “fk_c”.
During conversion, these columns will be populated with the Sequence column values for Files B and C.
For any Files that do not expose a Sequence column, the converter adds one. Using the above example, table B would be given a column named “b_seq”, and table C would be given a column named “c_seq”. File A’s foreign key fields will then link to these.
The Conversion library (omsqlconv.lbs) serves two functions. As well as converting old-style Omnis data files to SQLite or to PostgreSQL, the conversion library also works in the background providing various methods and dialogs to assist the DML emulator. Most DML emulation now occurs in the Omnis core and in the PostgreSQL & SQLite DAMs. Enabling DML emulation in Studio 10.2 is a two-step process.
To enable DML command emulation, it is necessary to set the $mapdmltodam Omnis preference*, for example, for SQLite:
or for PostgreSQL:
or you can set it in the Property Manager under Omnis >> Prefs.
This setting then applies to any libraries subsequently enabled for DML emulation.
You also need to enable your library for emulation by setting its $dmlemulation preference to kTrue, e.g.
or you can set it in the Property Manager under Library >> Prefs.
*Note: this behavior has changed since Studio 10.1 and now allows multiple libraries to work using the same DML emulator. Where your application uses multiple libraries, only those libraries with $dmlemulation set to kTrue will execute against the nominated database.
Note that changing the emulation mode ($mapdmltodam) while the emulator is in use will shut down the emulator, causing any open data file connections to be lost.
Likewise, $dmlemulation should not be changed whilst connections are in use. Traditional DML and emulated connections are not inter-operable.
Both of these properties are saved together with any other Omnis / Library preferences.
Once enabled, the following DML commands will be executed using the emulator, and against the specified SQL database:
Data files:
Close data file, Close lookup file, Create data file, Floating default data file, Open data file, Open lookup file, Prompt for data file, Set current data file, Set default data file, lookup().
Data management:
Build indexes, Delete data, Drop indexes, Open runtime data file browser, Rename data.
Changing data:
Cancel prepare for update, Delete, Delete with confirmation, Do not flush data, Do not wait for semaphores, Flush data, Flush data now, Prepare for edit, Prepare for insert, Prepare for insert with current values, Test for only one user, Update files, Update files if flag set, Wait for semaphores.
Files:
Clear all files, Clear main & connected, Clear main file, Clear range of fields, Clear selected files, Set main file.
Finding data:
Clear find table, Disable relational finds, Enable relational finds, Find, Find first, Find last, Load connected records, Next, Previous, Prompted find, Single file find, Test for a current record, Test for a unique index value.
Searches:
Clear search class, Reinitialize search class, Set search as calculation, Set search name, Test data with search class.
Sort fields:
Clear sort fields, Set sort field.
Lists:
Build list from file, Load from list, Replace line in list.
Others:
Begin reversible block, End reversible block, Quit all methods, Enter data, Queue OK, Queue cancel, $root.$getodbfilelist(), $cdata().$name, plus various sys() calls including sys(11), sys(82), sys(83) and sys(89).
Aside from setting the $mapdmltodam root preference and the $dmlemulation library preference, it should not be necessary to make any changes to your library code since emulated DML commands will execute against the selected database automatically.
When enabled, the Open data file and Prompt for data file commands will automatically look for a corresponding SQLite ‘.db’ file or a logon config file (‘.dfq’ or ‘.dfp’ for SQLite or PostgreSQL respectively) in place of the exisitng data file name (‘df1’).
The Create data file command will create a new SQLite data file.
When executing against a PostgreSQL database, the emulator also emulates Omnis semaphores used when locking tables prior to an insert, update or delete. A separate semaphore thread connects to the database and polls a special _semaphore table intermittently. The _semaphore table stores the lock state and update time for any replicated File classes. The _semaphore table is created automatically if it does not exist so it not detrimental to delete/update this table (for instance in the event of a deadlock).
The _semaphore table is defined with the following columns:
| _tablename (varchar 255) | _timestamp (bigint) | _locked (bool) |
For a given table, the _timestamp(epoch) value is only updated when an Update files command is executed. The semaphore thread uses this value to detect changes to the database table that may have occurred since the last Find command was executed.
The _locked column is set to true when a Prepare for… command is executed. If one or more read/write Files are already locked by another client then the Prepare for… command either waits or fails depending on whether Wait for semaphores/Do not wait for semaphores is in effect. _locked is cleared either when an Update files or Cancel prepare for update is executed.
The Test for only one user command will also remove any stray table locks if a single database user is detected.
Note that SQLite data files can only be accessed by a single (Omnis) process. For this reason, multiple access to the data file is only possible using the SQLite Data Bridge (analogous to the Omnis Data Bridge).
When accessed directly from Omnis Studio, SQLite data files are considered to be single-user access only, i.e. semaphores are not applicable.
Database connections opened by emulator are displayed in the Omnis SQL Browser and normally use the internal name specified with the corresponding Open data file / Prompt for data file / Create data file command. You can use these sessions to execute your own SQL statements e.g. via the Interactive SQL utility. Avoid blocking these sessions however since this may cause emulated DML commands to hang.
You can specify a logon configuration file when connecting to a SQLite database file. The logon configuration file for SQLite should have the .dfq file extension and may contain one or more session property assignments, e.g.
hostname=c:\Users\myUser\mydata.db
If 'hostname' is not present the library uses the pathname of the .dfq file and substitutes .db.
You need to specify a logon configuration file when connecting to PostgreSQL. The logon configuration text file (“.dfp”) may contain any relevant PGSQLDAM session property, for example:
As mentioned, the emulator automatically substitutes the ‘,dfp’ file extension when it encounters the Open data file command, but you can change your library code if preferred, e.g.
The Prompt for data file command allows you to browse for a logon configuration file. The Create data file command reads the logon configuration file and attempts to create the specified database.
The emulator will open a prompt if either hostname, username, or password is missing from the logon config file.
Should you wish to add comments to the logon config file, the emulator ignores any line that is either empty of commences with a hash(#) character, for example:
For basic logging and performance monitoring, you can add the following line to the logon config file:
For additional logging of begin/end method calls and reversible blocks; add 2. For additional timing information and SQL statement logging; add 4. Setting:
will suffice for most purposes. When enabled, logging information sent to the Omnis Trace Log so you can see output in real-time.
For low level DAM debugging, you can add the following lines to your logon config file:
You can also access the emulator’s session object via $sessions and enable/disable DAM debugging dynamically if required. In the event of technical support issues, the resulting text file can be used to diagnose faults.
In traditional DML, Single file find commands effectively move the cursor to a different point in the find table. A subsequent Next command would carry on from the new cursor position. Conversely, the emulator’s find tables are usually filtered using a SQL WHERE clause, so there are likely to be gaps in the data. For this reason, the emulator restores the cached File contents & cursor after each Single file find command. This means that subsequent Next commands operate on the find table as it was before the Single file find command was executed, and Single file find commands now operate in isolation.
Commands that check and alter the data file structure are largely redundant once a data file is ported to PostgreSQL or SQLite. Some commands allow existing tables to be altered for instance if you modify a File class after converting the data file.
Delete data – this command invokes a DROP TABLE statement against he named table.
Rename data – this command invokes an ALTER TABLE… RENAME TO… statement.
Drop indexes & Build indexes – these commands potentially invoke multiple SQL statements to DROP or CREATE INDEXes based the underlying File class’ indexed columns.
Update data dictionary, Reorganize data & Quick check – these commands do nothing.
Check data – this command compares the structure of each specified File class against its corresponding SQL table and can build a list of ALTER TABLE statements that are executed (if Perform repairs is specified). Changes detected include column name, data type, sub-type or provision for larger sub-length, changed column index state, not-null state and column description.
Open check data log & Close check data log these commands open/close a window displaying the list of SQL operations generated by a previous call to Check data. Press Execute to run the SQL commands.
Clear check data log – this command clears the list of SQL statements generated by a previous call to Check data.
Print check data log – this command writes the above list of SQL statements to the Omnis trace log.
The OmnisSQL DAM has been enhanced and now contains an internal SQLite object, giving it the ability to connect to old-style Omnis data files and to SQLite data files. The new DAM is designed to behave identically to the old-style DAM, i.e. it supports the same properties and methods. The SQL syntax and functionality supported by the new DAM is also exactly the same, i.e. there is no support for encryption, procedures, triggers or extended ISO SQL supported by SQLite. This is done to ensure backward compatibility with Omnis SQL.
Should you wish to adopt enhanced SQLite features, you will need to modify the library further so that it uses the SQLite DAM in place of the OmnisSQL DAM.
For details of the OmnisSQL Language Definition, please refer to the OmnisSQL chapter. Please note that the new OmnisSQL DAM supports legacy data files and SQLite only. To support PostgreSQL, your application will need to be modified to use the PostgreSQL DAM in place of the OmnisSQL DAM.
Once converted to SQLite, you can modify your library code to connect to the SQLite data file (.db file) in place of the old-style Omnis datafile (.df1 file), e.g.
Note that no other code changes are necessary. When the DAM encounters the ‘.db’ file-extension, it automatically connects to the SQLite data file (and you may remove the old Omnis data file).