This chapter describes the deployment of desktop apps on Windows and macOS using the Deployment Tool. For information about deploying your web and mobile applications, created using Remote forms and the JavaScript Client, see Deploying your Web & Mobile Apps.
The Deployment Tool allows you to build and customize the Omnis product tree (Runtime installer) suitable for deploying your applications on Windows and macOS desktop computers. On macOS, the tool lets you create a bundle containing your application files, while on Windows it allows you to create a full or split trees.
In addition, for Windows only, there is an external component, called RCEdit, that allows you to edit various Omnis program resources, to fully customize or ‘brand’ your product installation on Windows: see Windows Resource Editor.
You can open the Deployment Tool using the Tools >> Add-ons >> Deployment tool option on the main Omnis menu bar. The tool is system dependent, so there are minor differences between the capabilities and interface across Windows and macOS which are described below.
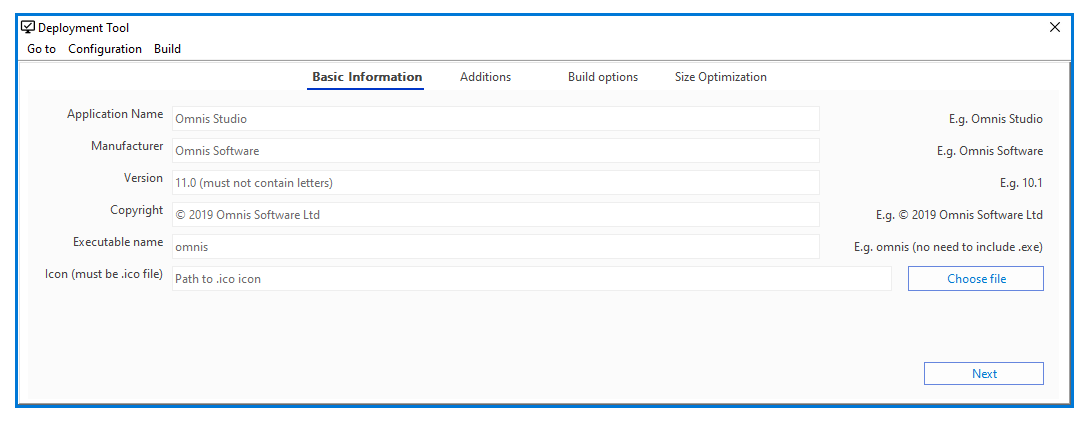
On Windows, on the Basic Information screen you can enter your Application Name, the Manufacturer, Version, Copyright notice, Executable name and the path to an .ico file to replace the Omnis icon.
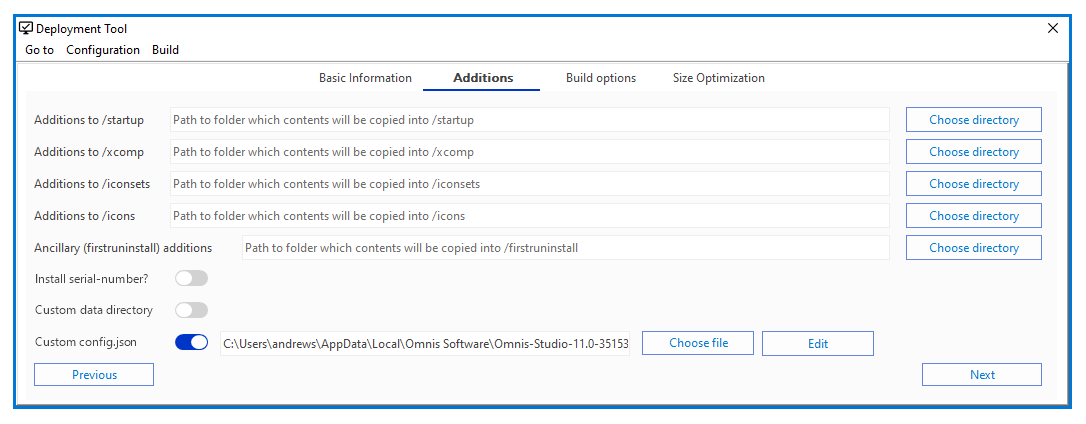
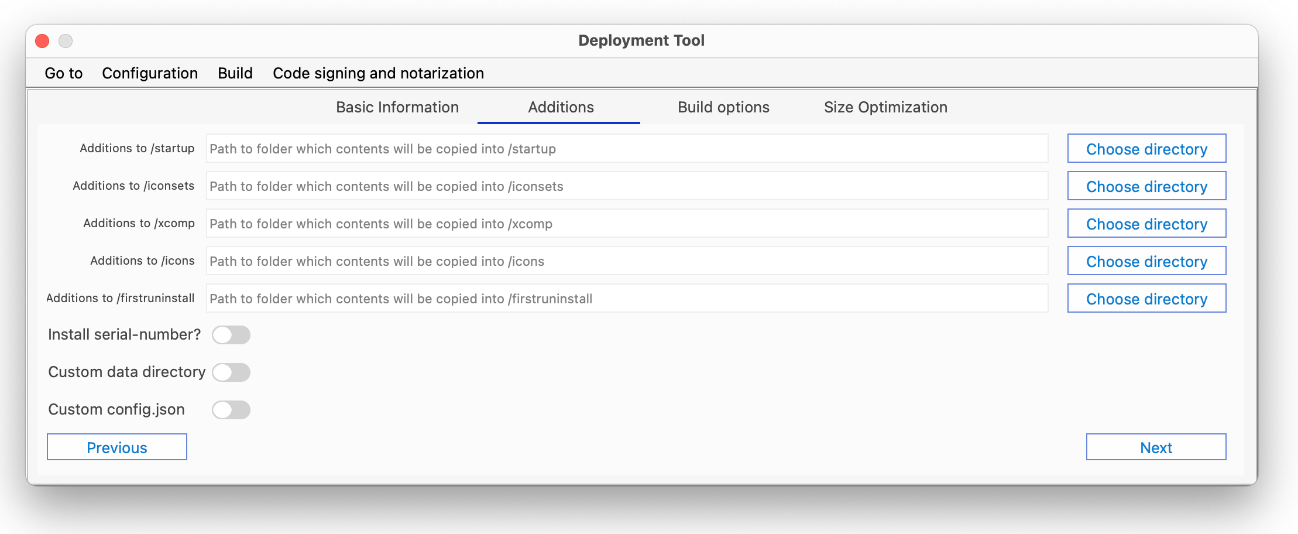
The Additions screen lets you specify the bundle’s startup folder, the xcomp folder (containing any external components), iconsets and icons folder (any icons for the library), plus the location of any files you want to add to the firstruninstall folder (see Build options).
The Install serial number option allows you to add an Omnis Runtime (client license) serial number to pre-serialize the bundle. If this option is used, a file called serial.txt will be added and deployed to the end user’s read-write folder (e.g. the AppData folder) containing the Omnis serial number: the file has a single line in the format SN=xxxxxx where xxxxxx is the Omnis Runtime serial (client license) number. (Note if you are installing the Omnis Server version and wish to pre-serialize it, you can use a serial.txt file in the Omnis root folder. If you wish to set the port number you can set it in the config.json in the server section.)
The Custom data dictionary option allows you to add a custom read/write directory. The Custom config.json option allows you to specify an Omnis configuration file containing your own settings. A customtool folder is created within the installed writable directory of Omnis containing a copy of the config.json file from the current instance of Omnis. From there you can edit the configuration file for your application to build. Alternatively, you can select an existing config.json to use for your application.
On the Build options screen you need to specify the location of the Omnis Read-only files (these are usually your Omnis Studio xx.x RT folder in your ProgramFiles), the Read-write files (usually the files in AppData). The path specified in the Build folder field is the path for the output.
You can also select the option to clear the build folder if there is any error in the build process, plus the option for 32 or 64 bit.
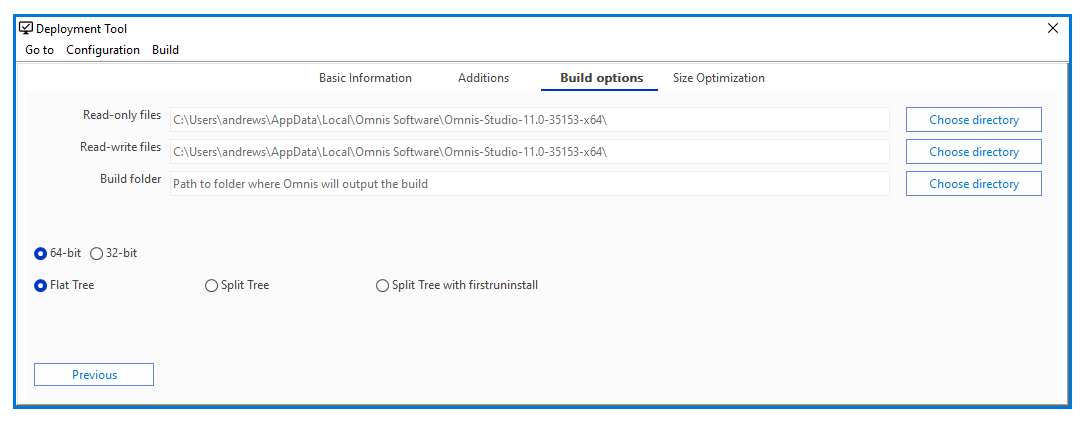
On Windows, you can also select the option to build a folder or separate folders providing a Flat tree, Split tree or a Split tree with firstruninstall, as follows:
The Flat tree option will output a folder containing both read and read/write files.
The Split tree option will output a folder containing read-only files, to go in the Program Files folder, and a read-write folder containing files for the AppData folder.
The Split Tree with firstruninstall option will output a folder containing read-only files and inside that an additional “firstruninstall” folder, containing the read-write files that Omnis will copy the first time the application will be run.
The firstruninstall option allows you install and setup your application without the need to build an installer, which may be quicker or more convenient for your deploy process or product cycle. For example, you could use 7Zip's SFX archive feature to create an executable which simply unarchives itself in such a way to make installers and the complexities they come with unnecessary.
The Size Optimization tab will give some information regarding the estimated size before the build and the estimated size saved. You can remove files or folders during a build by specifying them on this tab. When adding files or folders to be removed, you only need to specify the relative path to the file or folder inside the readonly/readwrite directory.
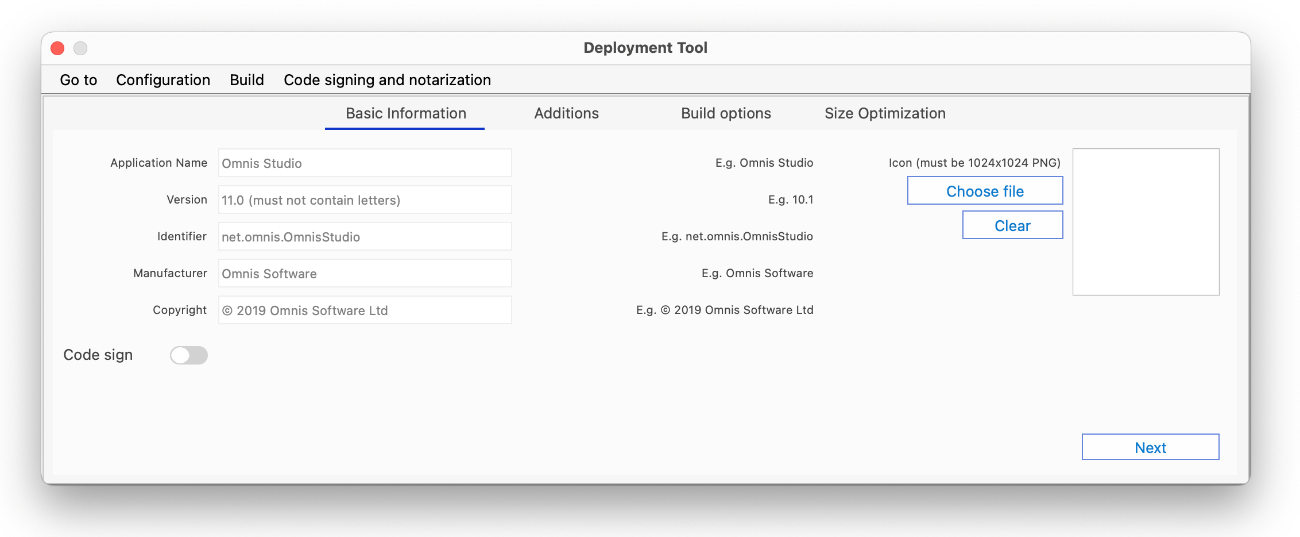
For macOS, you can change the Application Name, Version, Identifier, Manufacturer, Copyright notice and Icon in the first screen:
The second screen allows you to specify the bundle’s startup folder, iconsets (for the library), xcomp and icons folders, as well as the option to pre-serialise the bundle or add a custom read/write directory.
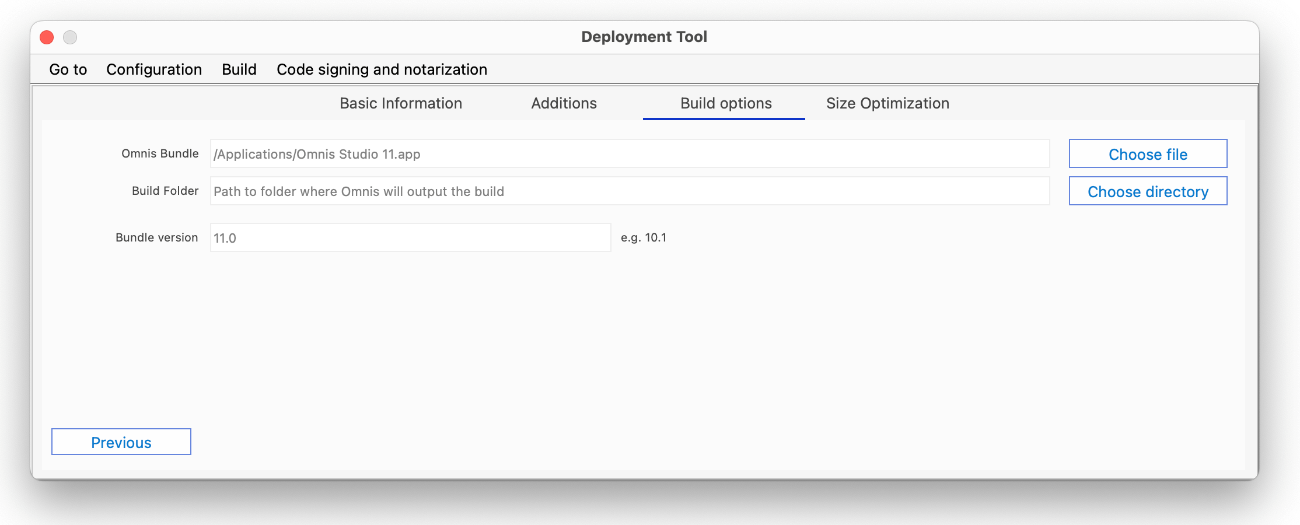
On the Build options screen you need to select the Omnis Bundle (runtime), a Build folder (the path to the folder where you want your output to go), and the version of your Bundle. The Go to menu allows you to see the build folder in the system file explorer.
You can also select the option to clear the build folder if there is any error in the build process.
The Size Optimization tab will give some information regarding the estimated size before the build and the estimated size saved. You can remove files or folders during a build by specifying them on this tab. When adding files or folders to be removed, you only need to specify the relative path to the file or folder inside the bundle.
On macOS, you can Code sign and Notarize your application using the Deployment tool, which will make deployment easier and faster. See the next section in this chapter for more information about Code Signing Omnis manually.
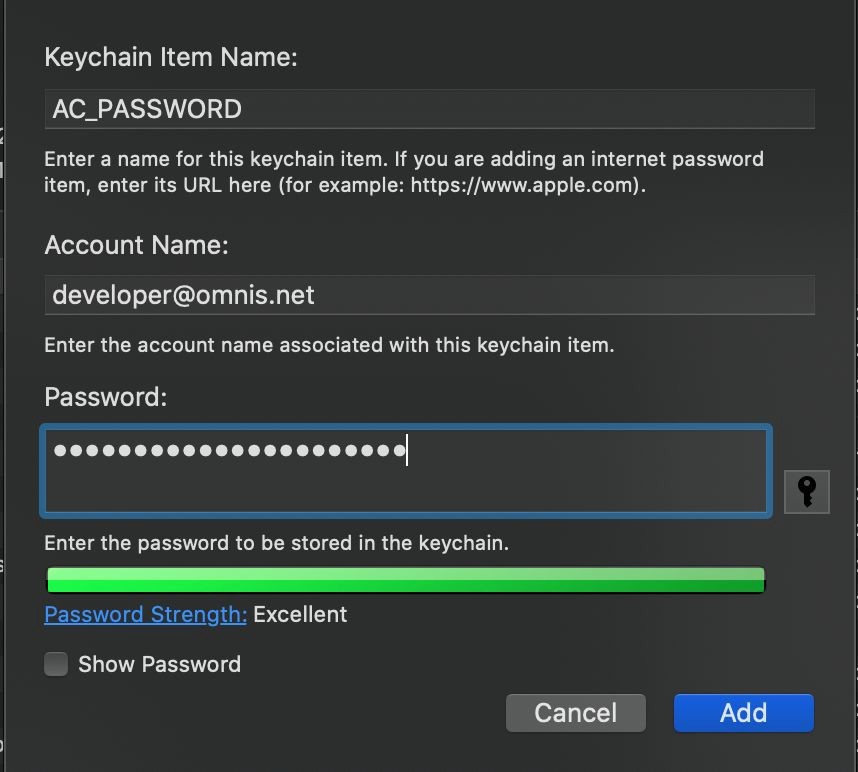
To Code sign and Notarize you need an app-specific password, and this can be obtained by logging into your Apple ID account, via https://appleid.apple.com/account/manage and selecting “Generate password…” under APP-SPECIFIC PASSWORDS. Once generated, copy your app-specific password.
Next, create a new Keychain Access password with the name AC_PASSWORD and paste the password you just copied as the password and your Apple developer email address for the account, as follows:
You will also need a developer certificate in Keychain Access that can be used to code sign and notarize. You can obtain one from your Apple developer account and you can add it to the Keychain Access by double-clicking on the certificate.
Now using the Deployment tool, you need to enable the Code sign option on the Basic Information tab to display the Notarize options.
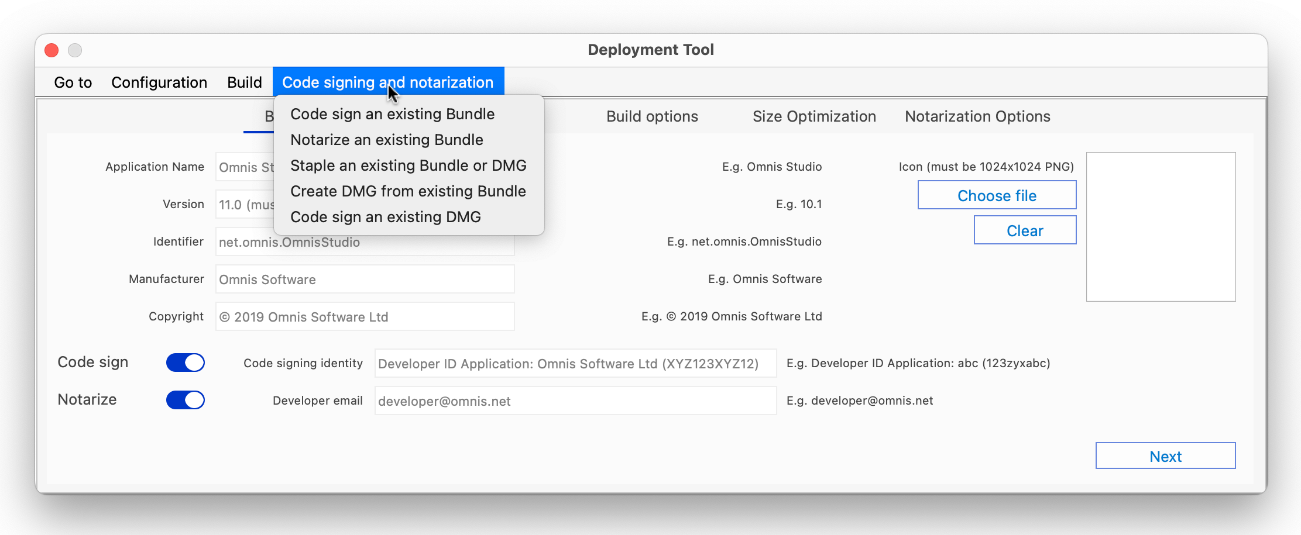
This will open options which allow you to enter the Code signing identity. Code signing is required before notarizing and the code signing identity should be the name of your certificate as it comes from Keychain Access, such as:
Developer ID Application: Omnis Software Ltd (XYZ123XYZ123)
Once you enable Code sign, you can also enable the Notarize option which displays a new entry field for your email and a new tab that handles entitlements.
Your email is used when submitting your application to Apple for notarization and you will receive an update from Apple on the status of notarization on the same email.
The “Notarization options” tab can be used to toggle application entitlements, which tell Apple more about what your application will need access to. You need to supply some defaults which reflect what you distribute, and if you need more access, you can just cheque the appropriate option.
Once you are ready to build, just can use the Build menu or the shortcut Cmd+B on macOS or Ctrl+B on Windows.
If you Code sign and Notarize as part of the build, Omnis may be unresponsive for quite a time, since a number of things need to happen: existing code signatures are removed, new code signatures are applied, a DMG is built and submitted to Apple, and so on. During this process, you need to leave Omnis open, and once the process is finished you will be prompted if it was successful or not.
Once you have successfully notarized your application, you need to stapler either the DMG or the application bundle before distributing. You can use the “Staple an existing Bundle or DMG” from the Code signing and notarization menu.
You can also check if a DMG or application bundle is successfully stapled via the terminal by executing “stapler validate [path to dmg or app]”.
In Studio 11, a number of methods have been exposed in the Deployment Tool API to allow you to manage builds in your own code, rather than via the Deployment Tool UI. Using the method $root.$modes.$getapiobject("customtool") Returns iObRef a number of API calls for the Deployment Tool have been exposed.
$setcallbackinst($cinst) takes a reference to an instance that implements $completed and $error. If the callback instance is set via this method, the deployment tool API will call either $completed or $error instead of returning the outcome to the caller. Note $error also receives a character variable as a parameter containing the error message and $completed can receive a 36-character long string on macOS if the built bundle is submitted for notarization.
$run(cConfigFilePath,cError[,cUUID]) requires the path to the deployment configuration file, a character variable to return errors to, or if on macOS, the UUID when the build is submitted for notarization. If successful, the method returns kTrue, otherwise kFalse is returned. The configuration file can be built using the GUI version of the Deployment tool.
The Deployment Tool API supports builds with in-memory data structures rather than file-based only. You can get the data structures, load and save to a config.json file programmatically.
$getBuildDataStructure() returns a row containing the main data structure for a cross-platform build.
$getEntitlementsDataStructure returns a row containing two row: the standard and extended entitlements data structures (in that order).
$loadConfig(cPathToConfig.json, rBuildDataStructure, rEntitlements, cErrorText) takes in the path to a config.json containing data structures, a row that receives the build data structures, a row that receives and entitlements rows and a character variable that receives and error text. Returns true if successful, otherwise false.
$setBuildData(rBuildData) sets the build data structure in-memory to rBuildData row, or you can use $run without passing in the path to a build config.json in order to use the in-memory data values.
$setEntitlementsData(rEntitlements) sets the entitlements data structure in-memory to rEntitlements row (note the rEntitlements row must contain two rows where the first is standard entitlements and the second is extended entitlements. Works only on macOS.
$saveConfig(cPathToFile, bOverwrite, cErrorText) saves the build data and entitlements data currently stored in the API object to a .json file in cPathToFile. If cPathToFile already exists, bOverwrite (defaults to false) will be used to determine if the file should be overwritten. cErrorText receives any errors if unsuccessful; function returns true if successful, otherwise false.
The $run function can be run without passing the path to a build config.json file, e.g. Do api.$run("",cError, cUUID) Returns bOutcome as long as the build data has been set via $setBuildData, the build can start. You can use $run by passing the path a build config.json and the build/entitlements stored in the file will be used.
The Omnis Studio application package on macOS is code signed, which provides increased security for you and your end users. A signed application can be trusted to originate from the developer who signed it, and to not have been altered in any way by any third-party, therefore guaranteeing the authenticity of an application. Signed applications within macOS can automatically be granted permissions to perform actions, such as accessing services from the network and running built-in software such as AppleScript commands.
An application can only be signed if its code portion remains unchanged. For the Omnis application, the code portion is located in the Omnis package, e.g.:
Any files that are updated by Omnis must be stored as user application data located in the user's home directory, that is, in the Application Support folder:
To do this, when Omnis starts up it will check for the existence of a folder called ‘firstruninstall’ in the macOS folder in the Omnis package. Any items which are contained in this folder are copied by default to a folder in Application Support with the same name as the Omnis package, e.g.:
The copy will not occur if the destination folder already exists, therefore avoiding any files being overwritten.
This provides a mechanism to place all data folders and their contents into the ‘firstruninstall’ folder, e.g. icons, studio, startup. Once copied into Application Support they are only updated in that location and leave the original macOS folder unchanged and its signature valid.
With the signed version of Omnis Studio, an external or JavaScript component can be added or updated in the user data folder. This allows the signed code part of Omnis to remain unaltered, so it maintains a valid code signature. For example, a standard component can be placed in the following folder:
and a JavaScript component here:
If the required folder does not exist it can be created by the user.
The user data folder is always searched first, so if a component with the same name exists in the code section of the Omnis tree the user version will be loaded in preference.
When deploying your own application, you can update the distributed files in the Omnis package to include your own libraries and components and to edit the name of the application. Those files placed in the firstruninstall folder will be treated as user data and will be copied to the Application Support folder.
By default, user data for each installation of Omnis goes into a subfolder of Application Support called “Omnis” and the name of the Omnis package is used to provide the folder for the individual installation.
So for example an installation here:
Will have a default user data location of:
To customize the subfolder, edit resource 25599, and to customise the installation folder, edit resource 25600. These resources are located in the Localizable.strings file for the language used, e.g.
Both entries are empty for default behavior.
After you update the Omnis package files, the package will need to be re-signed with your own signing identity. You cannot sign a file that has extended Finder information attributes, so these need to be removed before signing. This can be done recursively over the entire package by using the following command:
For example:
Signing you own application requires a code signing identity which can be generated by adding a development or production certificate via the Certificate section of the Apple developer member center. The machine where signing is to occur must have the certificate and private key installed. To list all valid code signing identities available on a machine, use the following command from the terminal:
Which will, for example, produce the following output with key and identity listed:
To sign the package use:
For example:
If the command completes with no errors, a similar line to the following should appear in the output:
The application is now signed and ready for deployment.
Do not subsequently alter the contents of the package as this will invalidate the signature.
You can verify the signature using the following:
Which will list items such as the signing authority, signing time, etc.
If you wish to distribute an updated Omnis application (the program file), and replace the application in an existing signed Omnis tree, then this can be achieved by doing the following:
Replace the binary in the original signed tree with the new version.
Re-sign the Omnis tree with the same signing identity which you used to sign the original tree.
Take the patched binary out of the tree for distribution.
Components can be patched without re-signing into the xcomp and jscomp folders of the user data location, e.g.:
Always ensure the tree has a valid signature by running:
On macOS if an Omnis deployment is replacing an existing installation using a simple drag and drop approach, that is, from a disk image to the Applications folder, files which already exist in the current user's Application Support folder will not be updated from the files in the firstruninstall folder of the new disk image.
If there are files which need to be patched, a mechanism needs to be found to remove the existing files from the user data location, e.g. run an update script. Therefore, Omnis now provides the use of Update Manifest Files to allow a deployment to specify the files in an existing set of user data which need to be removed so they can be replaced by newer files from the firstruninstall folder.
When Omnis starts it will read an integer deployment version number from a file called “version” in the Omnis application's macOS folder:
If this file does not exist then the deployment version number will be set to the Omnis internal build number (as returned by sys(123)).
Omnis will read the version of the user data from a hidden file (.version) in the root of the user's application data folder for the Omnis application.
If this file does not exist, the user data version is set to zero. If the user data version is lower than the deployment version, Omnis will check for updates that need to be applied.
The updates are specified in a set of files which should be placed in a folder called “manifest” within the Omnis application's macOS folder. Each file should be named for the version which specifies the changes. For example, if the new deployment is version 23071 there should be a file named 23071.
The manifest file should contain the paths of each file or folder which needs to be updated for that version. Each path should be separated by a new line.
Therefore, if file 23071 contains:
This will indicate that the Studio Browser and VCS are to be updated (removed from the user data) for version 23071.
There can be a manifest file for interim versions if updating an older version of Omnis. Therefore, if the user version is 23069, the deployment version is 23071 and the manifest folder contains 23070 and 23071 then both files will be used for updating.
If updates are applied, the hidden user data version is updated to the deployment version.
Note that the Omnis application deployment tree (code-side) still needs to be re-signed (and notarised) for each version of a deployment.
It is not recommended that individual files are updated in an existing signed tree (as this will invalidate the signature).
Resources 25599 and 25600 can now be used to specify the Omnis data folder on the Windows platform. You can edit the omnisdat.dll string table with a resource editor and modify 25599 and 25600 to be used to specify the sub-folders of the appdata directory. The Omnis data folder becomes:
If resource 25599 is not empty, resource 25600 must also not be empty.
The Windows Resource Editor, or RCEdit, allows you to edit various Windows resources, including the product version, version string, and the icon for the Omnis executable. The external component implements a number of functions (methods) which you can call from your Omnis code using Do rcedit.$<function-name>(parameters).
$setapplicationmanifest(cFile, cManifest) sets the manifest in cManifest to file path cFile. For example:
$setresourcestring(cFile, cResource, cValue) sets resource in cResource to value in cValue for file path cFile. For example:
$setproductversion(cFile, cProductVersion) sets the Windows executable resource “Product Version” to version in cProductVersion for file path cFile. For example:
$seticon(cFile, cIcon) sets the Windows executable icon in file path cFile to .ico file path in cIcon. For example:
$setversionstring(cFile, cVersion, cValue) sets the version string in cVersion to value in cValue for file path in cFile. For example:
$setfileversion(cFile, cFileVersion) - sets the Windows executable resource “File Version” to value in cFileVersion. For example: