To deploy your Omnis web or mobile application you need to host it on the Omnis App Server which is the main engine at the heart of your Omnis app deployment. You will also need a Web Server to host the HTML page(s) containing your remote form(s) and any other web pages or content. When the end user runs your application, the app connects to your Omnis library running on the Omnis App Server, via the web server, and the JavaScript remote forms you have designed are loaded in the end user’s desktop browser or the browser on their mobile device. You can deploy your JavaScript Client based application to the web or mobile devices in two ways:
Web and mobile app deployment
you can deploy your application to the web and provide your end users with a URL to the location of the app, which they can navigate to on their desktop, tablet or mobile device; the initial remote form is embedded into an HTML file which is created for you during development which you will need to edit for deployment
Standalone mobile app deployment
alternatively you can compile your app into one of Application Wrappers to provide a single standalone app for deployment to mobile devices; in effect the wrapper points to the HTML page containing the initial remote form for your app hosted on the Omnis App Server. Download the Application Wrappers.
A standalone app can operate “online” with a permanent connection to the internet and the Omnis App Server, or it can work “offline” and then reconnect to the Omnis App Server to synchronize data and content. See Creating Standalone Mobile Apps
Alternatively, a standalone app can operate entirely in “serverless” mode without any connection to the Omnis App Server. See Serverless Client
On macOS only, you can use the Omnis App Manager to test your standalone app on iOS phones and tablets before uploading them to the Apple AppStore. See Omnis App Manager
In addition to hosting your HTML page, you need to install the Omnis Web Server plug-in into your web server which handles all communication between the Omnis App Server and any connected web and mobile clients.
You can download the Omnis App Server installer from the Omnis website at: www.omnis.net/developers/resources/download/. Having installed the Omnis App Server you will need to serialize it according to the number and type of clients you expect to serve. There are a number of different server deployment licenses for running web and mobile apps in the JavaScript Client, or you may have a server license included in the Community Edition. Please contact your local sales office for details about these Omnis App Server deployment licenses. In addition, you will need to purchase a different development license and deployment server license to create and deploy standalone mobile apps running in serverless client mode.
In order to enforce licensing for JavaScript Client based apps, the UUID of each client is logged with the Omnis App Server. Prior to Studio 8.1.6, the UUID was stored in a cookie in the client computer which required any clients to have cookies to be enabled for this licensing mechanism to work. However, the method for storing the client UUID has changed in version 8.1.6: the UUIDs are now stored in the ‘localStorage’ on each client which is now used to manage client licenses on the Omnis App Server. Therefore, clients no longer have to have cookies enabled for App Server Licensing to be enforced.
The server side of your web or mobile app comprises the Omnis App Server that runs your Omnis library, a standard Web Server, and your database server(s). All these parts would either run on the same machine, or more typically would be on the same LAN or subnet, communicating via TCP/IP. The web server and the Omnis App Server can be hosted on a Windows, macOS, or Linux computer server.
The web server would store your entire website, including any HTML pages containing your JavaScript remote forms and any other web pages as required, such as landing pages.
The Omnis library contains the GUI and data class definitions, business rules, and application logic, while the database server would be an industry-standard database server, such as Oracle, MySQL, PostgreSQL, Sybase, DB2, or any JDBC or ODBC compliant database such as MS SQL Server.
The Omnis App Server is the main engine that runs your web and mobile applications. It is a multi-threaded server that runs your Omnis application, executing all the business logic, accessing your server database(s), and handling all the client interactions to-and-from your web and mobile clients. Web and mobile client access to the Omnis App Server is restricted to a specified number of users and is determined by the server license, which you must purchase separately from your locale sales office.
Omnis creates an HTML page when you test your JavaScript remote form (when you press Ctrl-T or use the Test Form option) that contains details of the JavaScript Client object, your remote form class, the location of your web server (or your computer when testing), and so on. You can use this HTML file for deploying your web application, but you will need to edit it, or copy the relevant lines of code containing the JavaScript Client object to your own HTML pages.
The test HTML file has the same name as your remote form plus the .htm extension, and is located in the html folder under the main Omnis folder. For example, under Windows the HTML template is located in your AppData\Local folder, such as:
You can edit the test HTML in a standard web page design tool or a text editor, such as Notepad under Windows.
In the template HTML file, there is a <div> that contains the JavaScript Client called ‘omnisobject1’. It contains various parameters that provide details about your application that are sent to the Omnis App Server when the client connects. The parameter names are in lowercase and prefixed with ‘data-‘, to comply with HTML5.
The code for omnisobject1 from the ‘jsctempl.htm’ file is as follows (for existing users, the equivalent old parameter names are included in parenthesis):
For example, the HTML page containing the Omnis quiz has the following <div> tag containing the JavaScript Client object and its parameters:
You can add another Omnis object to the same HTML page, but it must have a unique id, such as “omnisobject2”, and you can set its own server, library, and form parameters.
data-webserverurl
The data-webserverurl property identifies the HTTP URL of either the local IP address of your computer during development or the address of the Web Server and location of the web server plug-in.
When testing with the development version of Omnis, the data-webserverurl is set to “_PS_” which will be replaced with the address of the computer from which the HTML page is being served, that is, your development computer. For example, if the test HTML page is at http://127.0.0.1:5000/jschtml/test.htm, then _PS_ will be replaced with http://127.0.0.1:5000. For testing, data-omnisserverandport will be empty.
For deployment, when using a Web Server, the data-webserverurl parameter should be set to the location of the Omnis web server plug-in, such as http://www.myhost.com/scripts/omnisapi.dll, .which handles all the communication between the server and the client.
data-omnisserverandport
For development and testing data-omnisserverandport can be empty. For deployment, data-omnisserverandport tells the Omnis web server plug-in how to connect to the Omnis App Server. If the Omnis App Server is on the same machine as the web server, then data-omnisserverandport can be the port number of the Omnis App Server, e.g. it could be "5000" if the Omnis App Server is at port 5000 on the same machine as the web server. If the Omnis App Server is on a different server from the web server, then the data-omnisserverandport parameter must be “IP-Address:Port-number” of the Omnis App Server, e.g. it could be "111.222.000.111:5000" if the Omnis App Server is at port 5000 on a machine with IP address 111.222.000.111.
data-omnislibrary and data-omnisclass
The data-omnislibrary parameter identifies the library containing your remote form, and data-omnisclass is the remote form class displayed by the omnisform object.
data-commstimeout
The data-commstimeout parameter allows you to give the end user the option to timeout a request or carry on waiting. The default value of zero means that no timeout is applied, and the client will continue to wait for a response. To apply a timeout, you need to enter an integer representing the timeout in seconds. When the client sends a message to the server it must respond within this timeout period, otherwise the user will be prompted to either continue waiting for a response, or abort the request.
The Version and Build number of Omnis Studio is included in the HTML page. The "%%version%%" placeholder will be replaced with the Omnis Studio version number when the Test Form option is used. For example, the following is added to the beginning of the html:
The "%%build%%" placeholder will be replaced with the Omnis Studio build number, e.g. 110034477 in the above example.
The client should handle a wifi connection going away while processing a request at the server, so when the connection comes back, the client should respond properly. Otherwise, you have the option to provide a timeout, as above.
You can specify up to nine additional parameters (named data-param1, data-param2, ..) which can be passed into the row variable parameter pParams of the $construct() method of the remote task assigned to the remote form.
In addition to the pre-defined parameters, you can include your own custom parameters if you wish to pass extra values to the task or form $construct method. Custom parameter names should be prefixed with “data-“ and should be lowercase. The parameter will be added to the construct row variable which you can interrogate in your task or form $construct method.
The position or alignment of the “omnisobject1” itself within your HTML page is where the Omnis JavaScript Client remote form will be displayed in a web browser. For mobile clients you have less control since the remote form will usually fill the entire mobile screen. By default, the JavaScript Client is displayed in the top left corner of the client browser (set using style="position:absolute;top:0px;left:0px"), but for web clients you can reposition the JavaScript Client object to appear anywhere in your HTML page using alternative style or positioning parameters.
By replacing the default style parameter in the div tag on the JavaScript Client object with style=”width:900px; margin:auto” will center the remote form in the browser, assuming your remote form is 900 pixels wide. Note that you cannot use the align property on the omnisobject to reposition it, therefore align="center" will not center the omnisobject.
The above technique for centering the omnisobject will be fine for web-based applications but it may not work for all mobile devices, therefore you can use the following method to center the omnisobject for all devices. You have to place two extra divs around the div containing the omnisobject and change the style parameter inside the omnisobject div, as follows:
The Omnis html folder contains a number of other folders, including CSS, formscripts, icons, images, and scripts, which contain the CSS style sheets, JavaScript files, icons, and other images, which are required to run the Omnis JavaScript Client: these folders and their contents must be copied to the equivalent location in your web server relative to the HTML page containing your remote form(s).
You need to copy any icon sets used by your JavaScript Client application, including any of your own icon sets as well as the Omnis supplied icon sets, from your development tree to two places:
The 'html/icons' folder of the Omnis App Server (so Omnis can generate relative paths for the icon URLs).
The 'icons' folder at the same location as the .htm file containing the remote form for your app on your Web Server (these are the actual resource files that the client will request).
Any custom icon sets you have used should be named in the $iconsets property of your library. The location of these icon sets in your development tree could be in one of the following locations
For example, if you have used the ‘studio’ icon set, you might copy this from:
to:
The icon used for the test HTML page (displayed in the top-left of the browser tab) is the image file called 'favicon.ico' located in the html/images folder. The image file in the development version of Omnis is the Omnis logo, but for deployment you can replace this image with your own fav icon file.
You can change the appearance and positioning of the working message displayed in the JavaScript Client when some processing is occurring. The working message is a transparent overlay with a circular spinner which is laid over the main JavaScript Client area. You can restyle the working message overlay by extending the 'standardOmnisOverlay' class in the user.css file found in the html\css folder in your Omnis development tree. This follows the same structure as the Custom Loading Indicator.
In order to deploy your Omnis web or mobile application, you need to download and install the Omnis App Server which will run your Omnis application (library) file. The Omnis App Server is available for Windows (32-bit & 64-bit), macOS, and Linux servers. There is a Tech note on the Omnis website about setting up the Omnis Server which contains all the latest settings, etc:
TNJS0003: Setting Up The Omnis App Server
On Windows, you can set up the Omnis App Server to run as a Service which is described in this Tech note:
You should read these tech notes for the latest information about setting up the Omnis App Server, including information about the latest version of IIS and Apache appropriate to deploying Omnis web and mobile apps.
The server does not need to be located on the same machine as your web server. For testing and debugging you can use the Omnis development version, but for deployment you must use the Omnis App Server.
You need to place any libraries containing your application in the ‘Startup’ folder within the Omnis App Server tree, so that Omnis automatically opens them when it starts up.
When Omnis is running as a Service, the prompt for a serial number is not shown on startup, plus serialization errors are sent to the Windows Application event log.
There is a JSON based configuration file in the Studio folder called ‘config.json’ which is used to configure the Omnis App Server, including setting up properties for the server itself and logging, as well as the settings for Web Services support. The config file also includes a section to enable the Java Class cache to be cleared, and other configurable items in Omnis.
The configuration of the Omnis App Server can be set up during installation or by selecting the Server Configuration option in the File menu in the Omnis App Server. Alternatively, you can configure or change the settings of the Omnis App Server by editing config.json using any compatible text editor, but the file must conform to JSON syntax.
The first part of the config.json file for the Server has the following layout:
{
"server": {
“disableInRuntime": false,
"port": "",
"stacks": 5,
"timeslice": 20,
"webServiceURL": "",
"webServiceConnection": "",
"webServiceLogging": "off",
"webServiceLogMaxRecords": 100,
"webServiceStrictWSDL": true,
"headlessAcceptConsoleCommands": false,
"headlessDatabaseLocation": "",
"service": "homnis",
"start": false,
"retryBind": true,
"showBindRetryMessage": true,
"bindAttempts": 0,
"runtimeOpensTraceLogOnSocketBindError": true,
"RESTfulURL": "",
"RESTfulConnection": "",
"autoChunkRESTfulURLs": [
"http://localhost:8080/omnisrestservlet"
],
"getpdfFolders": [
""
],
"overridePushURL": "",
"timeOffsetMinutes": 0,
"timeoutReads": true,
"readTimeout": 20
},
where
port, stacks, timeslice
configure the Omnis App Server executable
disableInRuntime
when set to true (default is false) prevents the Omnis Server listening on its own port: this can be used to prevent firewall prompts when the Omnis Server is not required
webService…
these parameters configure WSDL/SOAP based web services
RESTful…
these parameters configure REST based web services
start
if true means Omnis automatically executes Start server at startup
retryBind
Set retryBind to false if you do not want Omnis to retry binding to the server port after its first attempt; retryBind defaults to true if it is omitted
showBindRetryMessage
If retryBind is true (or omitted), showBindRetryMessage controls whether or not a working message is displayed while retrying the bind to the server port
bindAttempts
If retryBind is true (or omitted), a positive value of bindAttempts overrides the default number of attempts to bind to the port at 1 second intervals
timeOffsetMinutes
allows you to add an offset to the date-time setting on the Omnis App Server. Omnis adds the value of this setting to the current system date-time when generating the value for #D and #T. If the entry is not present, it defaults to zero, meaning no offset is applied
The Omnis App Server has a logging mechanism to support RESTful web services, if applicable. There is an external component that performs logging, located in the logcomp folder of the Studio tree, with just one component, logToFile. NOTE: you can use logToFile in the Development version of Omnis Studio to log server activity including REST calls which can be useful while testing & debugging your app.
You can configure server logging by adding a member to the config.json configuration file, with the following layout:
{
"server": {
"//": "See Server Configuration section above",
},
"log": {
"datatolog": [
"restrequestheaders",
"restrequestcontent",
"restresponseheaders",
"restresponsecontent",
"tracelog",
"seqnlog",
"soapfault",
"soaprequesturi",
"soaprequest",
"soapresponse",
"cors",
"headlessmessage",
"headlesserror",
"systemevent"
],
"logcomp": "logToFile",
"logToFile": {
"stdout": false,
"folder": "logs",
"rollingcount": 10,
"daily": true
},
"overrideWebServicesLog": true,
"windowssystemdragdrop": false
},
where
logcomp
is the name of the logging component to use, that is, "logToFile" which referencese the logtofile.dll component in the logcomp folder of the Studio tree.
datatolog
is an array that identifies the data to be written to the log - one or more ofthe values listed in the array above
- tracelog means that data written to the trace log is also written to the new log
- seqnlog means sequence log entries that record method execution are written to the new log instead of the old sequence log file
overrideWebServicesLog
allows you to just send SOAP web service log entries to the new log; true means just send log entries to the new log, false means send them to both the old web services log and the new log.
windowssystemdragdrop
enables system drag and drop behavior available in versions before Studio 10.2
logToFile
is a member with the same name as the value of logcomp. This contains configuration specific to the logging component.
- folder is the name of the folder where logs will be placed; this can be a single folder name relative to the Omnis data folder, or it can be a full path name, which must not end in a path separator character
- rollingcount is the number of log files that will be maintained, can be up to 1024. The log component uses a new log file every hour (and a new one at startup). The log component deletes the oldest file or files so that the number of log files does not exceed this count
- daily allows you to enable daily log file (true) or the defauly hourly log files (false).
- stdout for the MPS, if set to true, logging from all processes in the MPS (main and child) will go directly to standard output, serialised between all of the processes using a shared mutex
The "folder" item in the “logToFile” section can be a folder name (relative to Omnis folder), or a full path name, which must not end in a path separator character, and the end folder name will be created if it does not already exist. In previous versions, you could only specify a folder relative to the Omnis folder, but now a full path can be used which can be outside the main Omnis folder. For example:
would send the log to the specified folder, while
would still be read as relative to the main Omnis folder (note no starting or ending path separator).
You must use / as the path separator on macOS and Linux, whereas, you can use / or \ on Windows.
The maximum for the “rollingcount” item in the “logToFile” can be an integer up to 1024. The logtofile component uses a new log file every hour, so the new max value would allow logs to be stored for up to six weeks, at which point the oldest logs would be deleted.
If there is an error initialising logging, the logtofile component also writes it to standard output when running on Linux.
If set to true, Omnis creates a new log file for each day. Omnis re-uses the log file for a day if it is already present at startup. The rollingcount applies as for hourly logs. The item defaults to false, which means hourly logging is used.
Each log record has the following layout:
where
thread
identifies the thread logging the entry,
when
is the date and time of the entry,
type
is the type of the entry (one of the datatolog values), and
length
is the length in bytes of the data following the initial JSON header.
This is followed by a final CRLF. Log files can typically be read in a text editor, but be aware that they can contain binary data if the content of RESTful requests or responses is binary.
You can set the Omnis App Server port using the command Calculate $prefs.$serverport as 5912.
The Omnis App Server allows multiple client requests to be processed concurrently, allowing smoother allocation of available processor time and avoiding any lengthy delays on the client: a client request might be a request from a client to execute an event, or a request from the client to call a server-side method. To handle these multiple client requests, the Omnis App Server can be made to run in multi-threaded mode. By default, the Omnis App Server runs in single-threaded mode, handling client requests in a strictly first-come, first-serve basis; in this case, client requests are queued, with each request being handled only when the previous request has completed. You can however handle multiple client requests concurrently using the Omnis Multi-threaded Server, which you can enable by executing the Start server command on the Omnis App Server: see below.
The Multi-threaded Server maintains a pool of method stacks that can process web and mobile client requests simultaneously. The pooling mechanism allows a balance to be struck between performance and server resources - the number of method stacks in the pool is configurable via the $serverstacks Omnis preference, and also available in the Omnis App Server Configuration dialog.
The standard single-threaded Omnis App Server has only a single method stack to process methods. Broadly speaking, once a method call has been pushed onto the method stack no other method call can begin to execute until the first call has completed. For the majority of web and mobile client applications this is fine for processing events, particularly if some processing is performed on the client and your web server receives relatively few hits or requests for data. By contrast, the Omnis Multi-threaded Server contains a pool of method stacks which are available to process multiple client requests, and this is appropriate for more data intensive web applications where lengthy calls to a server database are required, or for web applications that receive higher volumes of traffic. When a request to execute a method is received from a web or mobile client, that method call is pushed onto any unused stack or, if there are no unused stacks, the message is queued until one becomes available. Each method stack runs in its own thread, which means that if a method stack is stalled (for example, it is waiting for the database server) the other stacks will continue to execute.
Potentially, the Multi-threaded Server may have to cope with a very large number of simultaneous clients, each with their own remote form and remote task instances. Typically though, a small proportion of clients will require the use of the server at any one time. In fact, multi-threading does not increase the server processor time available, it just allows the available processor time to be allocated in a smoother way. The method stack pool mechanism allows a balance to be struck between performance and server resources - the number of method stacks in the pool is configurable with the $root.$prefs.$serverstacks property, which is set to 5 by default.
As method stacks are allocated dynamically, it is very likely that a remote client will not get the same method stack every time it executes a method on the server. Each method stack contains its own state which, apart from during an individual method call, does not belong to any particular client. This state includes the Current Record Buffers (CRBs) for all files and variables (apart from class variables) and such modes as the current list. A client cannot rely on any properties or values of this state being preserved across different method calls. The only things belonging to the client are its instance and task variables. So a client must do such things as setting the main file and current list each time one of its methods is executed, and should not rely on such things as the values of memory-only fields being maintained across method calls. As a special case, the class variables for the remote task and remote form classes are shared amongst all clients so can be used to hold shared data (see below for the warnings about the care needed when using shared variables).
When the Multi-threaded Server starts up, it opens the libraries, data files and SQL session pools required by the clients (see below for the description of a SQL session pool). You need to issue the Start server command to cause the method stacks and associated threads to be created. The Start server command can specify an optional stack initialization method; when specified, this method is pushed onto every client method stack and allowed to execute (so if $serverstacks is 5 it will execute five times), so it can be used to initialize the state of the method stacks. The Start server command generates a fatal error if, due to lack of resources or some other reason, it is unable to complete successfully.
When you want to stop the server, you should issue the Stop server command, but quitting the Studio program achieves the same result.
When the server is active, Omnis continues to be responsive to events on the server and could, for example, display a window with 'Start server' and 'Stop server' buttons. It is not recommended that the server program performs any substantial tasks while it is deployed and in use listening for client requests.
Any runtime errors generated by client methods are reported in the trace log (using a similar mechanism as errors during library conversion), but you can override this default behavior by making sure each client method stack has an error handler. You can use the stack initialization method call for the Start server command to define an error handler for each method stack.
Note that you cannot debug methods running in a remote form or task instance, after you have called the Start server command in a development version of Omnis.
If you are accessing a server database in your web application, and using the Multi-threaded Server, you must use the Object DAMs (introduced in Omnis Studio 3.0) which are capable of multi-threading. Using the Object DAMs, you can connect directly to Oracle, MySQL, PostgreSQL, DB2, and Sybase, as well as most ODBC- and JDBC-compliant databases such as MS SQL Server.
The Object DAMs are implemented as external components and use object variables based on the Object DAMs, and interact with a DAM using the methods of the object. Using this approach, you create object variables of a particular DAM class. There is a group of common methods that apply to all DAM objects and a set of DAM specific methods based on the type of object. Various chapters in the Omnis Programming manual provide more information about accessing your data using the DAMs.
There are some Omnis commands that you can use to control the Multi-threaded Server.
The Start server command is used to create the client method stacks and associated threads. It takes an optional stack initialization method as a parameter. The command clears the flag if it is used in a copy of Omnis which is not capable of supporting multi-threading or your serial number does not allow clients to connect. A fatal error is generated if for some other reason it is not possible to create the stacks and threads.
The Stop server command stops the server from responding to client requests. Once the server has been started you should stop it before quitting Omnis, before using Omnis for anything apart from serving client requests (e.g. running a standard LAN-based Omnis application), or before opening or closing any Omnis data files or libraries.
The Stop server command disposes of all remote task and form instances. The resources used by the client stacks and threads are not released, but they will be reused by the next Start server command.
These commands are used to denote a section of code which needs to execute in single threaded mode without allowing other client methods to execute. For example:
Here cList is a class variable which is shared amongst the clients and the critical block is used to prevent other clients from accessing the list whilst it is being built. Generally class variables should only be used when the shared functionality is essential and only with care:
Simple atomic operations such as the first line of the above example are safe, but when a method call is involved it may be interrupted by other threads and cause problems. Class variables should not be used as bind variables or as the return list for SQL operations.
The Yield to other threads command is a hint that the executing thread is waiting for other threads and is prepared to yield its processor time. It can be used when waiting for semaphores (since with the Multi-threaded Server another client stack could be holding the semaphore), as follows:
The following commands are not available for methods running on the Multi-threaded Server. They usually generate a 'Command not available when executing a client method' fatal error but some (such as the Debugger… group) simply do nothing:
Any other command which would cause a dialog to be displayed on the server is not available for methods running on the Multi-threaded Server. In addition, there is a lot of notation, such as the notation for opening and closing libraries and data files, that will not work in a method running on the Multi-threaded Server.
Suppose the Multi-threaded Server has N method stacks, and therefore N threads capable of processing methods on behalf of clients. This means that at any one time, there can be at most N SQL sessions in use. However, the Multi-threaded server may have many more than N current users. If you are using SQL, you need a potentially large number of sessions to the database server. There is nothing wrong with this in itself, and there are occasions when you might want to use database access permissions, to control the tables and columns accessible to different users. If this is the case, you require a separate session for each user. However, if all users have the same access permissions, you really only need N SQL sessions. This can significantly reduce the resource usage of the server. SQL Session Pools provide a way to do this.
A SQL Session Pool is a set of multi-threaded DAM sessions, which can be shared by clients. Typically, you would create a session pool with one session for each method stack. Details of how to use SQL Session Pools can be found in the Omnis Programming manual.
Load sharing allows a pool of Omnis App Server processes, running on one or more machines, to serve clients. Once a client connects to an Omnis App Server process, all subsequent requests for that client need to be handled by the same Omnis App Server process, since the process contains the instance data for the client. Therefore, load sharing provides a mechanism that assigns a new client connection to an Omnis App Server process. Note that Load Sharing is not available in the Community Edition.
The data-omnisserverandport parameter in an HTML page normally has the syntax:
To use load sharing, you prefix this property with a name for the pool of Omnis App Server processes and a comma, for example “Omnis,6000”, or “Omnis,194.131.70.197:6000”. In this case, the address information in the property no longer addresses an Omnis App Server. Instead, it addresses a new module, a load sharing process.
When a new connection arrives at the Omnis web server plug-in, the plug-in inspects the syntax of the data-omnisserverandport parameter. If it is prefixed by a pool name, the plug-in connects to the load sharing process, and sends it a message that asks for the address of a server process in the pool. The load sharing process typically returns the address and port number of the least busy process in the pool. The plug-in then connects to this process, and sends the web or mobile client connection to it. When the plug-in responds to the client, it includes the address of the Omnis App Server process in the response.
When the client sends subsequent messages to the web server for this web or mobile client connection, it sends the address passed in the connect response instead of the data-omnisserverandport parameter. Thus the only additional overhead imposed by load sharing occurs during connection setup.
So how does Omnis know (1.) which Omnis App Server processes exist, and (2.) which Omnis App Server process is the least busy? The load sharing process (LSP) has a .ini file, which contains the pool names for the pools for which it is responsible, and for each pool, the addresses of the Omnis App Server processes in the pool. Periodically, the load sharing process polls each Omnis App Server process, and asks it for the percentage of web or mobile client connections currently in use (using the serial number as the maximum), and information about how much time the server has spent processing requests. The load sharing process combines this information to determine which process is the least busy.
You can configure the time interval between polls of each Omnis App Server process via the .ini file. Once every 10 or 20 seconds is usually frequent enough.
To enable the load sharing process you need place the LSP program on your web server, or a machine connected to your web server. It is a single executable called Omnislsp.exe (Windows) or omnislsp (Linux and macOS). A configuration file (omnislsp.ini) must be made to accompany the Omnislsp program, and this takes the following format:
The commands for the lsp are:
omnislsp –start
(with the omnislsp.ini in the same directory as the program)
The Port entry in the .ini file identifies the TCP/IP port number on which the LSP listens for requests from the Omnis web server plug-in.
The QuietMode entry in the .ini file indicates if the LSP generates OK messages, or messages to the console, to report its status. When set to zero, it will generate messages. When set to one, it will not.
The LogLineThreshold entry in the .ini file indicates when the text log generated by the LSP will be reduced in size. If the LSP writes a line to the log, and the file contains LogLineThreshold lines, it will reduce the file size to LogLineThreshold/2 lines, maintaining the most recently written lines, before writing the line to the log. The log is in the same directory as the omnislsp program.
The BucketSize entry specifies how the LSP breaks up the server processes into groups, based on how busy they are. It is a value in milliseconds. The LSP divides the processes into 10 buckets, based on the average time to process a request obtained from the information it gathers by polling the server processes periodically. The buckets are numbered 1-10, where 1 contains the least busy servers, and 10 the most busy servers. A server is in the smallest numbered bucket, for which its average time to process a request is less than or equal to (bucket number)*BucketSize. If a server is so busy that this calculation does not allocate it to a bucket, it belongs to bucket 10. You may need to experiment with possible settings for BucketSize, in order to determine the optimum setting for your application.
Each pool has its own section in the .ini file. The PollTimer entry indicates the frequency in seconds at which the LSP polls the server processes in the pool for information. The ServerN entries identify the TCP/IP address and port of each server process in the pool.
You also need to edit the 'data-omnisserverandport' parameter in your HTML file containing the JavaScript Client plug-in, for example:
where Omnis is the name of a pool of Omnis App Server processes and 6001 is the port number of the LSP.
On the LSP servers
The Omnis App Servers may be stopped and restarted without the need to stop the LSP.
Load Sharing Mechanism
The load sharing process periodically polls the processes in a pool of Omnis App Server processes. Each server returns the current number of connections to the server, the maximum number of concurrent connections allowed to the server (specified by the serial number), the number of requests since the last poll, and the total elapsed time in milliseconds taken to process the requests. The load sharing process organizes the servers into buckets, based on the results of the information returned from polling the servers.
When a connection request arrives at the load sharing process, it allocates a server to the request as follows. It traverses the buckets, starting with that for the least busy servers, looking for a server that has some free connections. Within a bucket, it looks for the server with the smallest percentage of connections in use, using the results of the last poll. If there is more than one server with the same smallest percentage of connections in use, the process allocates the connection to the server to which it least recently allocated a connection. At this point, the load sharing process also updates the connection statistics from the last poll, to reflect the new connection. The traversal stops when a free process has been found. If all servers are fully utilized, the LSP allocates the connection to a server at random; in this case, it is likely that the server will reject the request, and return a suitable error to the client.
The omnislsp process can be installed as a service which starts-up automatically when Windows loads. For this purpose, two additional parameters are supported:
omnislsp –install Creates and starts the “Omnis Load Sharing Process” service.
omnislsp –uninstall Stops and removes the service.
The startup-type for the new service is set to “Automatic” and the service uses the omnislsp executable and .ini file at their current locations. When omnislsp runs as a service, dialog boxes are disabled and messages are written to the application event log instead.
You can enable debugging in the LSP using the DebugMode setting in the [Setup] section of ini configuration file. If DebugMode=1, more information will be logged, such as when the LSP fails to connect to the Omnis App Server, in the following format:
Tue Sep 13 20:38:19 2023 [ DEBUG ] [ 127.0.0.1:7001 ] Failed connecting to OMNIS server.
Furthermore, any debug messages will have [ DEBUG ] in the message.
For the development version, Omnis will retry the bind 5 times, once a second, and then report an error via the trace log; this behavior is the same as previous versions. The Omnis App Server will retry indefinitely once a second.
When running as a Service, after a few bind attempts, Omnis outputs a message to the system event log (if the event log is being used for Studio), “Failed to bind web client socket - will retry indefinitely”. If the bind is eventually successful, Omnis outputs a second message, “Successful bind of web client socket”.
Note that you can stop the service while the indefinite retries are occurring, but you cannot use the tray to bring Omnis to the front (or do anything else with the Studio service) as the web client bind occurs quite early in the initialization of Studio.
The Omnis App Server displays a working message while the retries are occurring; this allows the end-user to cancel the retry loop.
You can manage what is displayed in the end user’s browser when the Omnis Server responds with a Server error or Disconnected message. You can create a client-executed remote form method named $ondisconnected which will be called when there is an error on the server or the client is disconnected.
The method has a single parameter which provides the error text. This is only populated if it was triggered by a server error, rather than a disconnect due to Remote Task timeout etc. If you wish to prevent the default behavior, you must return kTrue from this method.
The form which initiated the server request will be queried for the method first. If it is not found, or it does not return kTrue, any parent forms (if it is a subform) will be tried.
In addition to the Omnis App Server, you need to install and configure a standard web server, such as Microsoft IIS, Apache, or Tomcat: you should download the web server software from the appropriate vendor. You need to install the appropriate Omnis Web Server plug-in in the correct location on your web server, for example, in the /cgi-bin, /scripts, or /webapps folder. A web server plug-in is available for Apache on Windows, macOS and Linux, plus IIS and Tomcat under Windows.
Typically, a web server will have a place to store all executable code accessible via HTTP over the Internet. This is often the /cgi-bin or /scripts folder, but it can be any folder configured to allow execution. You need to place the Omnis Web Server plug-in, such as the omnisapi.dll (IIS) or mod_omnis.so (Apache), in this folder and ensure that the web server is set up correctly to enable it to be executed. The location of the plug-in should be specified in the data-webserverurl parameter of your HTML files containing your remote forms.
For information about installing the Omnis Web Server Plug-ins, please refer to the Tech note: TNJS0003 Setting Up The Omnis App Server
NOTE: In previous versions of Omnis Studio (prior to Studio 10.x) we included a JavaServlet plug-in, but this is no longer provided in the Omnis tree due to a change in licensing for Java: see the Readme for more details about Java Legacy Integration or contact Omnis Tech Support for more information. The information here is provided if you need to use the JavaServlet, but otherwise should be ignored.
The Java Servlet web server plug-in allows you to run your Omnis web applications with any web server that supports version 2.3 of the Servlet API. Web servers that comply with Java Servlet API 2.3 include the Apache TomCat and Jetty web servers, but there are several others. For more information about Java Servlets, see: https://www.oracle.com/java/technologies/
The Java Servlet allows Omnis remote forms to connect to an Omnis App Server via a Java web server. In this respect, the Servlet is the Java equivalent of the ISAPI, CGI or the regular Apache plug-in available in Omnis Studio.
The Java Servlet is called RdtaServlet and can be found in the Omnis Studio installed tree in the clientserver\server\omnisservlet folder. Inside the Servlet folder, the servlet files are in the following folder structure:
To install the servlet on your web server, such as the Apache Tomcat server, you should place the whole servlet folder in the Webapps folder within the Tomcat installation. If you wish, you can rename the servlet folder.
You will need to restart the webserver in order for the servlet to be loaded.
The data-webserverurl parameter in your HTML containing your remote form must have the correct format to access a web server with the Java Servlet.
data-webserverurl
this must be the URL to the tomcat webserver appended with the name and path of the servlet, such as "http://www.mydomain.com/servlet/%servletname%"
Note if you have renamed the servlet folder you should use the new name in the data-webserverurl parameter instead of ‘servlet’;
The default value for %servletname% is 'rdtaservlet'. You can modify this or add others by modifying the web.xml file. The following xml can be added to the <web-app> element in the document to add a new servlet alias name. For example
If your web site is hosted by a third-party, such as an ISP, they will need to place the Omnis Web Server Plug-in in their cgi-bin folder, and furthermore they need to provide you with a direct connection to the Internet. Your ISP may want to test the web server plug-in, usually the case for any files you place in their cgi-bin folder. Alternatively, you can rent a whole server in the cloud, in which case you will have more control over the setup of the server and you can place the Omnis files in the correct location.
If your Omnis web application uses a web site hosted by an ISP you will need to adjust your port settings in the Omnis App Server and HTML files. In this case you can use DomainName:Port or IPAddress:Port in your port setting.
It is regarded as essential to use an SSL certificate for all web and mobile applications, to protect communications between clients and the application server, and indeed most browsers will mark any web pages (applications) that do not use SSL as unsafe.
You can use secure sockets (HTTPS) if you have installed an SSL certificate on your web server. The JavaScript Client will use a secure connection to connect the client to the web server if you prefix the URL or IP_address in the data-webserverurl parameter with “https://”, for example:
In addition, remote tasks have the $issecure property that lets you turn secure mode on and off dynamically, by assigning to the property at runtime in your application.
Secure socket connections do not support the "address:port" format for the data-webserverurl parameter of a JavaScript Client object.
You can configure the Web Server plug-in via a separate configuration file, allowing greater security and control over user access to your Omnis web or mobile application. It is not necessary to configure the web server plug-in in most circumstances, but this functionality provides added flexibility and security, as follows:
Access and Security
Using the web server plug-in configuration file you can restrict access to an Omnis App Server
Configure Server parameters
The configuration file allows you to override parameters for the Omnis App Server, or in effect, provide default parameters if the oserver parameter is blank in your cgi parameters in your html; in this case the value would be taken from the configuration file.
Post content to Remote tasks
the configuration file allows you to pass HTTP Post content to the Omnis remote task.
The parameters specified in your configuration file can provide default connections for clients, simplifying the post command required to connect to the Omnis App Server. The configuration file should be placed in the same directory as your Web Server plug-in.
The custom functionality in the Omnis Web Server plug-in is built into the plug-ins supplied with the Omnis App Server installation, but to activate the functionality you have to rename plug-in itself.
If you are using mod_omnis.so under Linux or Windows, you need to change the value of the location in your http.conf or equivalent apache configuration script to /omnis_apacheini, for example:
<location /omnis_apacheini>
SetHandler omnis-apache
Rename the nph-omniscgi.exe to nph-omniscgiini.exe for Windows, or rename nph-omniscgi to nph-omniscgiini for Linux.
For Windows IIS based servers, rename omnisapi.dll to omnisapiini.dll.
If you are using the Web Services enabled Web Server plug-in, rename rdtaserver.dll to rdtaserverini.dll.
The configuration file should be named omnissrv.ini and be placed in the same directory as your Web Server plug-in, for both Windows and Linux.
The format of the configuration file mirrors that of a Windows .ini file and is defined as follows:
Section names are contained in square brackets e.g. [SectionName].
A section ends when another section begins or at End Of File (EOF).
Comments are lines beginning with a semicolon (‘;’).
All text following a comment is ignored until the line is terminated.
Keys are of the form keyname=value where keyname is a unique identifier within the section and value is the value of the specified key.
Section names, key names and key values must not contain white space.
Section names and key names are case sensitive.
The functionality in the Web Server plug-in is controlled using specific named sections in the configuration file. The omnissrv.ini file can contain the AllowConnectionsTo section which controls access to the Omnis App Server. The .ini file can also include either a DefaultConnection or OverrideConnection section (but not both), which either provide default parameters for the Omnis App Server or override parameters posted to the Omnis App Server from the http web server.
You can control access to your Omnis App Server by including the [AllowConnectionsTo] section in the configuration file. This section contains a list of key names of the form address<n> where n is a sequentially numbered character starting at 1. When this section is present, connections to Omnis App Servers are limited to those defined in the specified key values. In the event that the oserver parameter is defined as a port number, only the port number is required.
For example, in the following AllowConnectionsTo section connections are limited to Omnis App Servers running on the local machine on port 5920 and the remote machine 192.168.0.2 on port 5920.
[AllowConnectionsTo]
address1=5920
Note that the local IP address in the configuration file cannot be resolved. Imagine the server plug-in and the Omnis App Server are on the same machine, with an IP address of 192.168.0.3. If the incoming request was of the form data- OmnisServer=5920, the configuration file has to match this form. So if you want to allow only connections to port 5920, you would have to add this line to the [AllowConnectionsTo] section: address1=5920. If you use the expanded form of the address, i.e. address=192.168.0.3:5920, the server plug-in would deny the request. In the event of a denial of service the plug-in returns a HTTP 403 error with the following message ‘Access to the resource has been denied’.
You can provide default connection parameters in the [DefaultConnection] section of the configuration file. This section provides a means of adding missing values into an HTTP post, or in effect, providing a complete set of default parameters if none are provided in the HTTP post. When they are present in the HTTP request, the values in DefaultConnection are ignored and the values are taken from the original request. The DefaultConnection section can contain the following keys:
OmnisServer
OmnisClass
OmnisLibrary
PostDataParamName
Any number of additional parameter pairs in the form Parameter Name=value
The OmnisServer, OmnisClass and OmnisLibrary mirror the operation of the identically named remote form parameters. The value of the PostDataParamName key specifies a variable name for all the content of the HTTP post. All other keys are assumed to be parameters. They are passed to the Omnis remote task and appear as columns in the row variable. The column name is the key name and the value matches the value of the key. One thing to note, if the parameter is present in the original request and the configuration file also contains a definition for the parameter, the value is always taken from the request even if the parameter has no associated value. For example:
[DefaultConnection]
OmnisServer=192.168.0.1:5920
OmnisClass=remoteTask
OmnisLibrary=TEST
param1=value1
param2=value2
In the context of the above DefaultConnection section, consider the following URL which attempts to connect to Omnis:
The OmnisClass and param1 values are taken from the URL while the other values are taken from the DefaultConnection section. In this case, no OmnisServer and OmnisLibrary parameters are provided in the query string, so those values are taken from the configuration file. Therefore the plug-in will amend the query string to:
Note PostData is empty as the content-type is application/x-www-form-urlencoded, so in this case the data is not passed to Omnis.
You can override the server parameters passed to the Omnis App Server by an HTTP post by including a [OverrideConnection] section in your configuration file. In this case, all the values in the request are ignored, and the Omnis App Server uses values from the configuration file. The OverrideConnection section may contain the following keys with associated values:
OmnisServer
OmnisClass
OmnisLibrary
PostDataParamName
Any number of additional Parameter Name=value
These keys function exactly as described in the DefaultConnection section. An example OverrideConnection section is as follows:
[OverrideConnection]
OmnisServer=192.168.0.1:5920
OmnisClass=rtTest
OmnisLibrary=TEST
param1=value1
param2=value2
In the context of the above OverrideConnection section, consider the following URL which attempts to connect to Omnis:
In this case, the values in OmnisClass and param1 submitted in the post are ignored, and all the values for the post are taken from the DefaultConnection section in the configuration file. Therefore the query string is amended to:
Note PostData is empty as the content-type is application/x-www-form-urlencoded, so in this case the data is not passed to Omnis.
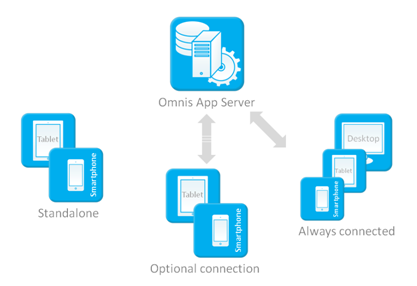
In addition to using the JavaScript Client in the web browser on any computer or mobile device, you can embed your JavaScript Client based remote forms into a Standalone app or “wrapper”, which you can deploy to end users as a self-contained app which they can install onto a mobile device. To create a standalone app, we provide a JavaScript Wrapper Application for each supported mobile platform, which currently includes Android and iOS. The wrapper applications create a thin layer around a simple Web Viewer which can load the initial JavaScript remote form for your mobile application.
The wrapper applications allow you to deploy mobile apps that end users can run either in Offline or “serverless mode”, without any connection to the Omnis App Server, or in Online mode which would allow end users to connect to the Omnis App Server to synchronize their data and update the application content.
Offline or Serverless mode
end users can run your app in standalone or “offline” mode without ever connecting to the Omnis App Server or a database server. The Application Files (remote form definitions, scripts, etc) are bundled with the wrapper app to create a single, clickable application file; this allows complete “offline” operation, or a one-off connection can be made to the Omnis App Server to install the applications files and from there on a connection to the Omnis App Server would not be needed
Optional connection
end users have the option to switch to “online” to synchronize the database and app content via the Omnis App Server; this mode would suit end users who have an intermittent connection, but often need to synchronize their data with a central location
The projects and source code for the wrapper applications are available to download from the Omnis website: https://omnis.net/developers/resources/download/jswrapper.jsp
The ZIP files contain template configuration files, together with the project and source files so you can build your standalone app or customize the wrappers if required.
There is a separate manual called ‘Building The [Android / iOS ] Wrapper’ available on the Omnis website about using and customizing the wrapper applications for mobile app deployment: this manual contains all the latest information for each of the supported mobile platforms and will be updated regularly to keep abreast of any changes in the build process.
The wrapper applications can be configured to run a single JavaScript remote form as the entry point to the app, which can be configured in a configuration file called config.xml.
The config.xml file contains the URL for the page containing your JavaScript remote form and depending on the platform, may contain a number of other parameters specific to your platform. The config.xml is standardized for all platforms, and is based on the following structure:
The config.xml contains the following properties (note that some may not be included on a particular platform):
AppTitle
whether or not the app displays a title bar at the top. Note that hiding the title on Android 3 will hide the ActionBar which will remove access the testing menu
AppStandardMenu
whether or not the standard menu is displayed at the top.
AppTimeout
the time in milliseconds after which the app will close after being sent to the background.
For all platforms:
MenuIncludeSettings
whether the “Settings” menu option is available in the app.
MenuIncludeOffline
whether the runtime menu option is available to switch to offline mode.
MenuIncludeAbout
whether the “About” menu option is available in the app.
The following settings control the scaling of the app (remote form) on the device:
SettingsFloatControls
when SettingsScaleForm is "0" (false), the client uses the $edgefloat property of each JavaScript Client control on the form. When applying the screen size, the client uses $edgefloat to float the edges of controls (note that the component values are not supported, just the edge-related values). If the form is wider or taller than the screen, floating only occurs if the relevant SettingsAllowHScroll or SettingsAllowVScroll parameter is false. The amount by which the controls float is the difference between the actual screen width or height and the designed width or height of the form for the closest matching layout breakpoint. The value of $edgefloat is stored for each layout brealpoint
SettingsScaleForm
If you set this to "1" (true), the client scales the form to fit the available screen space. The scaling factor is the screen width or height divided by the value of the closest matching layout breakpoint. For these purposes, the actual screen size excludes the operating system areas such as the status bar
SettingsAllowHScroll and SettingsAllowVScroll
set these to "1" if you want to allow horizontal or vertical scrolling of the form respectively, or "0" if not
SettingsMaintainAspectRatio
If you set this to "1", scaling maintains the aspect ratio of the form. When turned on, and depending on SettingsAllowHScroll and SettingsAllowVScroll, it may reduce the scaling factor in one direction, to make the form fit, and center the form vertically or horizontally as required
SettingsOnlineMode
whether the app starts in Online mode.
The following settings relate to the Omnis App Server:
ServerOmnisWebUrl
URL to the Omnis App Server or Web Server. If using the Omnis App Server it should be http://<ipaddress>:<omnis port>. If using a web server it should be a URL to the root of your Web server. http://myserver.com
ServerOnlineFormName
route to the form’s .htm file from ServerOmnisWebUrl. So if you’re using the built in Omnis server, it will be of the form /jschtml/myform.htm. If you are using a web server, it will be the remainder of the URL to get to the form, e.g. /omnisapps/myform. (Do not add the .htm extension!)
Only ServerOmnisWebUrl & ServerOnlineFormName are needed for Online forms. The other Server… properties are for Offline mode.
ServerOmnisServer
The Omnis App Server <IP Address>:<Port>.
ServerOmnisPlugin
If you are using a web server plug-in to talk to Omnis, the route to this from ServerOmnisWebUrl. E.g. /cgi-bin/omnisapi.dll
ServerOfflineFormName
Name of the offline form. (Do not add .htm extension!)
ServerAppScafName
Name of the App Scaf. This will be the same as your library name.
The remaining parameters refer to test mode.
TestModeEnabled
whether the app will start in test mode (Ctrl-M on form from Studio to test on device)
TestModeServerAndPort
the <ipaddress>:<port> of the Omnis Studio Dev version you wish to use test mode with.
You can also change these parameters by pressing the menu button on the mobile device, and using the menu options to change them. The app remembers the last setting made via the menu, so the config.xml lets you set the initial values in the wrapper application.
When you deploy your app and the end user downloads it, the app must request permissions to access various areas of the device, for example, the app must request access to the device Contacts, Camera, or Location (GPS) if this functionality is required in your app.
It is considered bad practice and potentially confusing for the end user to include unnecessary permissions for your app, especially if you are distributing your app through one of the online app stores. When downloading/installing your app, the user can see which permissions your app has requested access to, so any unnecessary permission requests may give the user the impression that your app is malicious and they may not download and use your app.
During development, you can open a JavaScript remote form in a wrapper application using the Test Form Mobile (Ctrl-M) option, assuming a wrapper application is setup and enabled (otherwise you can still test your mobile forms in a desktop browser on your development computer before you setup the wrapper app). This option appears beneath the ‘Test Form’ option in the remote form context menu. The Test Form Mobile option is only displayed in the relevant menus when both:
A wrapper application is enabled for test form (see the menu of the Android app, and the system settings for the iOS app)
A wrapper application is connected to the Omnis App Server, using the test form parameters.
The $designshowmobiletitle property determines whether or not the title of a wrapper application is visible when you use the Test Form Mobile (Ctrl-M) option. For deployment, config.xml allows you to configure whether or not the title is displayed in the wrapper application.
PLEASE NOTE: you will require a new alternative Development license to enable the $serverlessclient property in a remote form: the property will remain grayed out without this alternative license. (Also note that previous versions of the Serverless Client provided local database support using UltraLite and a MobiLink server from Sybase but this setup is no longer supported.)
You can switch a remote form to operate in “Serverless Client” mode in which case your mobile app can operate entirely without a connection to the Omnis App Server. In order for a remote form to be available in Serverless or offline mode, you must set its $serverlessclient property to kTrue.
Any mobile app containing remote forms in serverless client mode and you can switch between “offline” and “online” modes, if required. Separate forms can be used for the same app in offline/online modes to provide different functionality.
The Serverless Client also includes Local Database support, utilizing a SQLite database, and even provides the ability for your offline form to synchronize an end user’s local database with an online database. This means that a user could switch to offline mode while in areas of no or patchy network coverage to continue working, and then switch back to online mode when back in the office.
The Serverless Client has provision for a local client-side database. This can be used as a local database for the standalone mode for your app, or it can be used to synchronize with an online “Consolidated Database” (CDB). In the latter case, the local database is used for storing tables held in the server-side database and for caching SQL transactions performed whilst the Omnis App Server is not available.
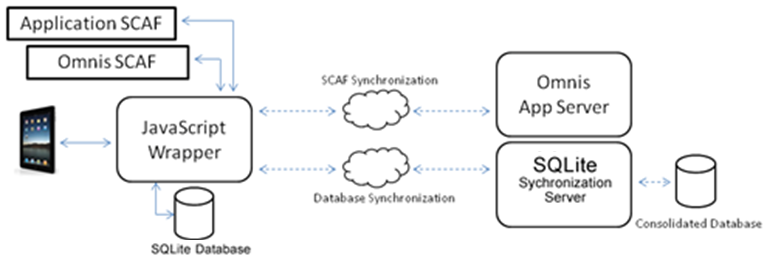
The client-side database can be SQLite and the synchronization of the local database with a “consolidated database” administered by the SQLite Synchronization Server provided by Omnis Software.
You can download the ‘SQLite Synchronization Server’ manual from the Omnis website: www.omnis.net/download
All methods running in a Remote form in serverless client mode must be set to ‘Execute on Client’ (right click the method name in the method editor and select ‘Execute on Client’). From Studio 10.0.1 onwards the default execution type for new methods added to a serverless client remote form is client-executed.
The $construct() and $destruct() methods in a remote form cannot be executed as client methods, therefore you can create methods with the names $init() and $term() which perform a similar function that can be executed on the client. The $init() and $term() methods can be used in standalone apps running inside the JavaScript Client wrapper application in which all methods must be executed on the client.
The $init() method is called after the form and the client script files have been loaded. This allows you to do any final initialization of the remote form. The $term() method is called when a remote form instance destructs.
You can use $cinst.$layouttype in client methods, including $init(), to get the current layout breakpoint of the remote form on the client (you can use $cinst.$screensize for the old $screensize based forms).
The Application Wrappers send a unique device ID when connecting to the Omnis App Server. Omnis checks whether there is already a remote task instance with the same device ID and form name in the current library, and if it finds one, it will close it before opening a new task instance. This means that wrappers will not free the remote task connection when they timeout (as you cannot trap this event), but when the app is re-opened, it will close the old task before opening a new one.
The Serverless Client Application File (SCAF) is a SQLite database that contains all of the resources necessary for a mobile application to run locally in the wrapper in standalone mode. These resources include JavaScript scripts, CSS files, image files and Omnis remote forms. There are two SCAF files needed for each wrapper application:
Omnis SCAF (omnis.db)
files needed to run the JavaScript Client
Application SCAF (<library_name>.db)
contains all your application files
Omnis Studio will generate these SCAF files automatically in the ‘/html/sc’ folder under the main Omnis folder. These files need to be placed on the Omnis App Server in the same location for end users (mobile clients) to access if necessary (see below).
Whenever you save a remote form which has $serverlessclient set to kTrue, it will update the application files in your Omnis folder. A message is displayed while Omnis exports all the necessary files.
If you need to rename your library, rename the library file itself in the file browser; you cannot rename it by changing the $name property as it will revert to the original name when the library is re-opened. If you change the $defaultname library property, the new name is used in the SCAF which is then rebuilt the next time the library is opened.
When you make changes to CSS files or scripts you must update the SCAF to ensure your app is built using an up-to-date SCAF. You can update the SCAF in the Studio Browser by clicking on the ‘Omnis Studio’ node and selecting the ‘Update Omnis SCAF’ option. For example, the SCAF needs to be updated after the ‘user.css’ has been changed to ensure the omnis.scaf contains the updated style sheet. Quitting and restarting Omnis Studio also updates the SCAF.
When the wrapper application is executed for the first time in offline mode it will check if any SCAF files are bundled with the application (see the wrapper building section for info on how to do this). If these files exist, they are copied into the application space on the device and used in the wrapper. Note that bundling SCAF files with the application will increase the size of the application bundle.
If SCAF files are not distributed with the application the application will attempt to connect to the Omnis App Server on startup and download the latest versions of the SCAF files.
For the application to know which application SCAF to use the option: <APPSCAF>name</APPSCAF> (where name is the name of the Omnis library)
is used in the config.xml file within the wrapper application.
Once the app has been installed onto a device, it will add an entry to the ‘Settings’ app of the device, with the same name as your app.
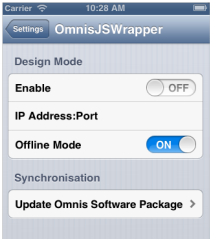
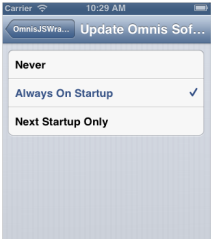
The wrapper configuration sub menu “Update Omnis Software Package” contains options for updating the SCAF files. The available options are:
Never
the SCAF will never be updated
Always On Startup
will attempt to connect to the Omnis App Server and update the SCAF files every time the application is run
Next Startup Only
will attempt this update only on the next execution of the wrapper application
It is also possible for the end-user to update the SCAF from inside the app by swiping down the screen to open the runtime menu and selecting the appropriate menu item.
The JavaScript wrapper application contains embedded support for SQLite and provides client-executed methods with access to a local private SQL database. The database can currently only be used by Serverless Client applications in offline mode, inside the wrapper application on Android and iOS.
All interactions between the JavaScript Client and the wrapper will be asynchronous, so the database API also takes this into account.
The JavaScript Client-executed method code generator restricts the $definefromsqlclass() method for use with either a query or a schema class name as the first argument although it is still possible to pass a subset of column names required using parameter two onwards. This will allow for example:
and the code generator will expand this into JavaScript to define the list or row with the columns from the schema.
When creating rows to be used for bind variables, it is important that the data types of the columns in the row match those in the database.
Client methods only provide a ‘var’ data type when creating variables, which will generally be interpreted as Character type. As such, it is safest to manually add columns to your row, using the function:
e.g.:
A Serverless Client application gains access to the embedded database using a SQL Object, which in this case is a property of the current remote form called $sqlobject:
For example:
All requests to the SQL object are asynchronous (except $getlasterrortext and $getlasterrorcode), and call a client-executed completion method ($sqldone) in the current remote form instance upon completion. Each request returns an identifier when called and the same identifier is passed as a parameter to the completion method, allowing the request to be identified. Thus, multiple requests may be in progress “simultaneously”, although they will only execute serially in the wrapper.
Note that you do not need to provide a $sqldone() method although if you do not, errors may be ignored. On success, the returned unique identifier is positive. A negative value indicates an error code.
In the following sections, oSQL is a Var containing the SQL object returned by $cinst.$sqlobject.
Returns the error text of the last operation. “OK” implies success.
Returns the error code of the last operation. 0 implies success.
Executes a statement with a result set (typically select or select distinct) and fetches the initial set of rows.
cSQL
is the statement. This may be hand-coded, or the result of $select/$selectdistinct for a schema or query class. cSQL can contain bind variable place-holders in the form @[column_name], where column_name is the name of a column in lBindVars.
lBindVars
is a row variable referenced by one or more bind variable markers in the SQL text.
iFetchCap
is the number of rows to initially fetch (this can be kFetchAll to fetch all rows in the result set).
For all object methods, note that lBindVars may contain columns not referenced by the SQL text. Only those columns referred to by name in the bind place holders will be read.
On completion, $sqldone() is called with the following parameters:
The request id (as returned by $selectfetch)
A list containing zero or more rows from the initial result set.
At this point it is your responsibility to copy or populate the appropriate form controls to display the data.
Example1:
Example2:
Fetches more rows from the result set generated by the last $selectfetch() executed.
selectfetchid is the id returned by $selectfetch() and passed to $fetch(); a new ID is returned.
iFetchCap is the number of rows to fetch.
In this case, the id returned by the call to $fetch() is a new ID. On completion, $sqldone() is called with the following parameters:
The request id (as returned by $selectfetch)
A list containing zero or more further rows from the result set.
Inserts one or more rows into a database table.
cSQL is the insert statement. This may be hand-coded, or the result of $insert for a schema class. cSQL can contain bind variable place-holders in the form @[$column_name], where column_name is the name of a column in listorrow.
listorrow is the list or row containing the data to insert.
On completion, $sqldone() is called with the following parameters:
The request id (as returned from $insert()).
Example:
Deletes zero or more rows from a database table.
cSQL is the delete statement. This may be hand-coded, or the result of $delete() for a schema class. cSQL can contain bind variable place-holders in the form @[column_name], where column_name is the name of a column in row.
row contains the values referenced by the bind variable place-holders.
On completion, $sqldone() is called with the following parameters:
The request id (as returned from $delete()).
Updates zero or more rows of a database table.
cSQL is the update statement. This may be hand-coded, or the result of $update for a schema class. cSQL can contain bind variable place-holders in the form @[$column_name], where column_name is the name of a column in newRow or oldRow. If the bind variable is used in the SET clause, it will come from the newRow variable, if it is used in the WHERE clause, it will come from the oldRow variable.
newRow is the row containing the values referenced by the bind variable place-holders of the new values, i.e. those specified in the SET clause.
oldRow is the row containing the values referenced by the bind variable place-holders of the old values, i.e. those specified in the WHERE clause.
On completion, $sqldone() is called with the following parameters:
The request id (as returned from $update()).
Executes a SQL statement that does not return a result set, intended for use with DDL administrative commands such as CREATE, DROP and ALTER.
cSQL is the SQL statement to be executed. Note that bind variable place holders are not supported.
On completion, $sqldone() is called with the following parameters:
The request id (as returned from $execute()).
The following methods may be used to obtain database meta-data:
Retrieves table names defined in the local database.
On completion, $sqldone() is called with the following parameters:
The request id (as returned from $selecttables()).
Single-column list containing the TableName of each table in the local database.
Retrieves column names and type information for the specified table.
On completion, $sqldone() is called with the following parameters:
The request id (as returned from $selectcolumns ()).
A list describing the table column definitions, defined with the following columns:
ColumnName - name of the table column.
SqlType - name corresponding to the column’s SQL data type.
ColumnSize - the size of a variable-length data type, e.g. for CHAR and BINARY.
Precision - the numeric precision for a NUMERIC column. Zero for others.
Scale - the numeric scale for a NUMERIC column. Zero for others.
Default - the default value that was assigned to the column when the table was created.
Retrieves column index information for the specified table.
On completion, $sqldone() is called with the following parameters:
The request id (as returned from $selectindexes ()).
A list describing the table column definitions, defined with the following columns:
IndexName - name of the index.
ColumnNames - comma-separated list of column names used by the index.
PrimaryKey - kTrue if the index was created with the PRIMARY KEY clause.
Unique - kTrue if the index was created with the UNIQUE clause.
The $sqldone method is the client-executed completion method for SQL objects. When you add the $sqldone method to a remote form Omnis adds pre-defined or boilerplate code, as well as the required parameter variables, and sets the method to execute on the client automatically. This saves you having to add the same code every time you want to create the $sqldone method – you can then add to or amend the code as you wish. The code added to $sqldone is:
The code first checks if there was an error, then creates a Switch statement to handle the results based on the request in pRequestId. If you do not want to use this code, just select the lines of code and delete them.
The SQLite offline storage and synchronization process uses a SQLite database on the remote client device. More specifically, SQLite synchronization relies on SQLite databases on the server and on each client device to store user tables as well as synchronization status info. The SQLite Synchronization Server uses these tables to pass data to/from each synchronization client and to forward synchronization requests on to the Consolidated Database (CDB). The SQLite Synchronization process is described in the ‘SQLite Synchronization Server’ manual which you can download from the Omnis website: www.omnis.net/download
To use the SQLite database object, the mobile device application is linked with the dbSQLite library. The SQLite initialization parameters are as follows:
The SQLite module currently recognizes the following parameters:
Username – The synchronization user name (defined at the synchronization server).
Password – The synchronization user password (defined at the synchronization server).
HostString – RESTful connection URL to Omnis Sync Server.
Timeout – The timeout in seconds for synchronization operations.
On completion, $sqldone() is called with the following parameters:
The request id (as returned from $syncinit()).
Example:
The HostString parameter is a RESTful connection URL to Omnis Sync Server. For a direct connection to the built-in Omnis server, the HostString should be of the form:
If you are connecting through a web server, you need to add the omnisrest… server plugin to your web server (in the same way as the other server plugins), and connect through that. The HostString should then be of the form:
Where <XXX> is either:
<Omnis $serverport> (if Omnis is on the same machine as the web server)
<Omnis server ip-address>_<Omnis $serverport>
<Server Pool>,<Omnis server ip-address>_<Omnis $serverport>
This method invokes a request for uplink synchronization followed by downlink synchronization. Only tables previously configured for uplink (or normal) synchronization will upload IUD requests to the SyncServer. Likewise only tables configured for downlink or (normal) synchronization will receive IUD requests.
Please refer to the ‘SQLite Synchronization Server’ manual for information on the design, implementation and usage of the synchronization server. You can download this manual from the Omnis website: www.omnis.net/documentation
If the remote client application does not require database support, the application can instead be linked with the dbNoSQL library. This library provides stub definitions for the database API calls required by the wrapper application. Note that in this mode however, any calls to the SQL object will fail.
The wrapper encapsulates a WebView which hosts the JavaScript Client application. The wrapper initializes using the supplied config.xml file which also informs the wrapper of the HTML page to load for the application.
The wrapper can be configured to connect to the Omnis IDE as a client for testing purposes. This is achieved via the Test Mobile Form menu option in the Studio IDE. The wrapper also provides device-independent access to features such as GPS, the camera and audio interface using the Device Control (see the JavaScript Components chapter for details about accessing device features).

To support Serverless operation, the WebView runs local scripts that contain client executed methods.
Before you compile the app, you will need to customize the config.xml file.
When the client operates in online mode it uses the URL parameter from the config file to load the remote form and the wrapper behaves like a standard JavaScript application. If the client is to run offline however, the other config parameters are used to allow the wrapper to (optionally) update its local copy of the application, or to run the forms locally.
The iOS wrapper project has two targets, both with differing local database support, and one with support for Push Notifications. These are:
OmnisJSWrapper – includes embedded SQLite database which is used for local database support, plus Synchronization with a back-end server using the SyncServer.
OmnisJSWrapper – as above but with Push Notifications.
The iOS application wrapper uses the UICKeyChainStore wrapper, created by kishikawakatsumi and governed by the MIT license: more info is available here:
https://github.com/kishikawakatsumi/UICKeyChainStore
If you distribute your Omnis app using the iOS wrapper you will need to comply with the terms of this license and include the MIT requirements in your own software license.
Push Notifications are supported in the Android and iOS JavaScript Wrappers (version 2.0+) which means you can send messages to any clients that have your mobile app installed (even if it is not running). In this respect, the ability to send push notifications provides a powerful and interactive feature that proactively encourages end users to open and use your mobile app.
A notification or message pushed to a client could include an important news item, a message to users about a new entry into the database, or anything else you want your end users to know about. You can include a payload of data to send with the notification, which will be passed to your Remote Form, allowing you to provide a response or outcome to the user clicking on the notification. The following is a notification on an Android phone.
Support for notifications is provided via the Cloud Messaging or Push Notification Service on the respective platform, which must be enabled in your mobile app project when it is built using the latest JavaScript Wrapper SDK. To setup notifications in your app on Android and iOS, you will need to use Firebase from Google.
In order to manage notifications, it is possible to create groups of devices, and send notifications to particular groups, or individual devices. All functionality can be achieved in your Omnis code (using the notation), or using an admin tool, called Push Notifications, under the Tools menu on the Omnis menubar. Note the tool is an Omnis library located in the Startup folder which must be present for Push Notifications to work in your mobile apps, including your Omnis code, and for the Omnis App Server configuration to be setup.
For further information about setting up Push Notifications in your mobile apps, see the Push Notifications document on the JS Wrapper Download page.
The Omnis App Manager is an iOS app that allows you to connect to and test your Omnis mobile applications, and manage multiple such configurations – it also allows you to test your iOS apps without having to go through the submission process with Apple which you will need to do when you want to deploy your completed iOS app. Therefore, the Omnis App Manager should be used primarily for testing, and when you are ready to deploy your Omnis application, you can download the JavaScript Wrappers from the Omnis website, and build a completed stand-alone app.
Specifically, you can use the App Manager to test functionality in the JS Device control before compiling your complete app using the wrappers. You should note that the App Manager does not support Push Notifications, so you will need to compile your app using the wrappers to test notifications.
You can download the Omnis App Manager from the Apple Appstore using the following shortcut: https://bit.ly/omnis-app-manager
There is no app manager for Android since you can easily build the Android wrapper on any platform and sideload the app to devices to test it, without having to go through the App Review process.
To set up the App Manager to test your mobile app, open the app manager, and click on the + icon to add a new configuration. To test an app you can just fill out the first three fields, as follows:
Name
a suitable display name for the app.
Host Server
the IP address of your development computer or Omnis Server, including the port number, e.g. 9814. The server address should be something like: http://192.168.1.100:9814. The port number is stored in the $serverport property under the Prefs option in the Studio Browser. If you are using a web server, this should be the address of your web server.
Online Form URL
the location and name of your test form, such as /jschtml/<remote-form-name>.htm. Note that you need to have tested your remote form in order to open the test HTML page which is created automatically when you open a remote form in design mode. If you are using a web server, this should be the path to your form's .htm file on your web server, relative to 'Host Server' above.
When the app information is complete tap on Save. To open the app (form), tap on the app name. Your remote form will open in the app manager allowing you to test its functionality, for example, you could test actions in the Device control.
The remainder of the settings in the app configuration are for setting up a standalone application running in offline mode as follows:
Offline Form Name
the name of the remote form used for offline mode (the $serverlessclient property of the form is set to kTrue), minus the .htm extension, e.g. jsOffline.
App SCAF Name
the name of the SCAF file for the application, generally a lower-case version of the library name, e.g. myapp.
Web Server Plugin
if you are using a web server plug-in to talk to Omnis, this is the name and location of the plug-in from the server named in the ‘Host Server’ field, e.g. /cgi-bin/omnisapi.dll.
Omnis Server
This is only necessary if you are using a web server with the Omnis web server plug-in, and can be either: 1) the Omnis port number (if Omnis is running on the same computer as the web server), or 2) <ip-address>:<port>, e.g. 192.168.1.100:9814.
Omnis Studio Version
the version number of Omnis Studio, e.g. 10.2
Start Offline
enable to start your app offline
Disable UTC Data Conversion
disables the automatic conversion of datetimes to UTC from local time when they are sent to the server.
Next are the database settings.
Local Database Name
this is the name of the local SQLite database to be used, including the .db extension, e.g. local.db. Multiple configurations with the same name here will share the same local database.
The Behaviour settings.
Disable Swipe To App List
this option disables the ability to swipe from the edge of the screen to open the apps list.
You can create multiple configurations in the app manager to test your Omnis mobile applications, but in order to test an app it needs to be open and running either in your development copy of Omnis or on the Omnis Server.
There is a “headless” version of the Omnis App Server on Linux that allows you to run your JavaScript Client-based web and mobile applications in a headless environment. The headless server is available for Linux only.
A so-called headless Omnis Server installed under Linux does not have a window-based interface, but can be controlled remotely from the command line in a Terminal window on the Linux machine, or you can configure the headless server using an Admin Tool which is accessible using an HTML page located in the HTML folder in the main Studio folder (the admin tool library is located in the Startup folder of the Headless Omnis Server tree).
The ‘headlessAcceptConsoleCommands’ item in the ‘server’ section of config.json controls whether or not the headless server provides a basic command line interface when used in a terminal window. The default setting for ‘headlessAcceptConsoleCommands’ is false. If set to True all Console Commands are recorded which means that 100% of CPU is used when the Headless server is run as a service: you will need to enable this option in config.json to accept all Console Commands.
The function isheadless() returns true when running in the headless server.
sys(231) returns zero in headless server.
sys(233) returns empty in headless server; it returns the title of the main Omnis application window in the full server.
You can start the JVM at startup by setting the ‘startjvm’ in the ‘java’ section of config.json to true: it cannot be started by any other mechanism on the headless server.
If your Omnis code creates new classes using notation, there is a mechanism to initialise new objects using template files, located in the ‘componenttemplates’ folder in the ‘Studio’ folder. The folders are: componenttemplates/window, componenttemplates/remoteform, componenttemplates/report containing the template files to create window, remote form, and report instances, respectively. Each template file name is complibrary_compcontrol.json, with spaces converted to _ (underscore): it is a copy of an object.json file where only the properties and multivalueproperties members are used. complibrary and compcontrol are the component library and control name.
There are various restrictions or differences from full Omnis Server, as follows:
Printing images to PDF in the headless server is restricted to PNG images (or true-color shared pictures) only.
There is no port support.
You should use the ‘start’ entry in the ‘server’ section of config.json to start the multi-threaded server
The Test if running in background command always sets flag to true in the headless server.
Several commands and notation methods generate an error if executed in the headless server e.g. open window, $open for a window, etc.
Picture conversion functions are not supported: pictconvto, pictconvfrom, pictconvtypes, pictformat, pictsize (a runtime error is generated).
Standard messages generated by the server (OK messages and errors) are sent to the server log file, or could be routed to the Terminal if appropriate
In order to print JPEGs from an application running on the Headless Linux Server, the ImageMagick package has to be installed.
The Headless Server logs a message when an external or external component cannot be loaded. This is a message of type headlesserror, and includes the system error text reporting the missing dependency that caused the component not to open.
Download the Headless Omnis Server installer for Linux from: https://www.omnis.net/developers/resources/download/index.jsp
This install assumes you are running as Root or using sudo.
Update your version of Linux using the commands below that correspond to your distribution of linux:
Once updated, you will need to install the dependencies that Omnis requires to run, which are as follows:
Once these are installed you can start the installer:
Follow through the installer as you would a normal install of Omnis Studio making sure your serial number is correct or the install will fail.
You can serialize the Headless Omnis Server using the OMNIS_SERIAL environment variable. If the Headless Server checks for serial.txt and there is no serial number saved in the omnis.cfg, it reads the serial number from the OMNIS_SERIAL environment variable before failing.
For Centos 7 and Redhat the service will not automatically start after a reboot, therefore you will need to manually add Omnis (or whatever you called your service) to the service autostart list using the following lines:
You can now configure the Headless server using the Admin tool, as below.
To summarize the steps for each platform:
Required commands for Omnis to run on Centos:
The Headless Server should work out of the box on SUSE, but we would recommend an update just in case:
There is an Admin Tool (OSAdmin) that you can use to configure the Headless Omnis Server: the Admin tool is implemented as a remote form and can be loaded in a web browser by opening the web page called ‘osadmin.htm’, which is located in the ‘html’ folder of the Omnis Server tree (not the SDK). However, before you can open this page to configure your headless server, you will need to set edit the osadmin.htm file to specify the location of your headless server. You need to edit the “data-webserverurl” parameter (enter either URL, IP address or Service name, and Port number, e.g. http://192.1.1.68:5000), then move the file to a location that allows you to open the file in a web browser and has network access to the headless server (the Headless Omnis Server installer should prompt you to set these options, but you may also like to change them manually).
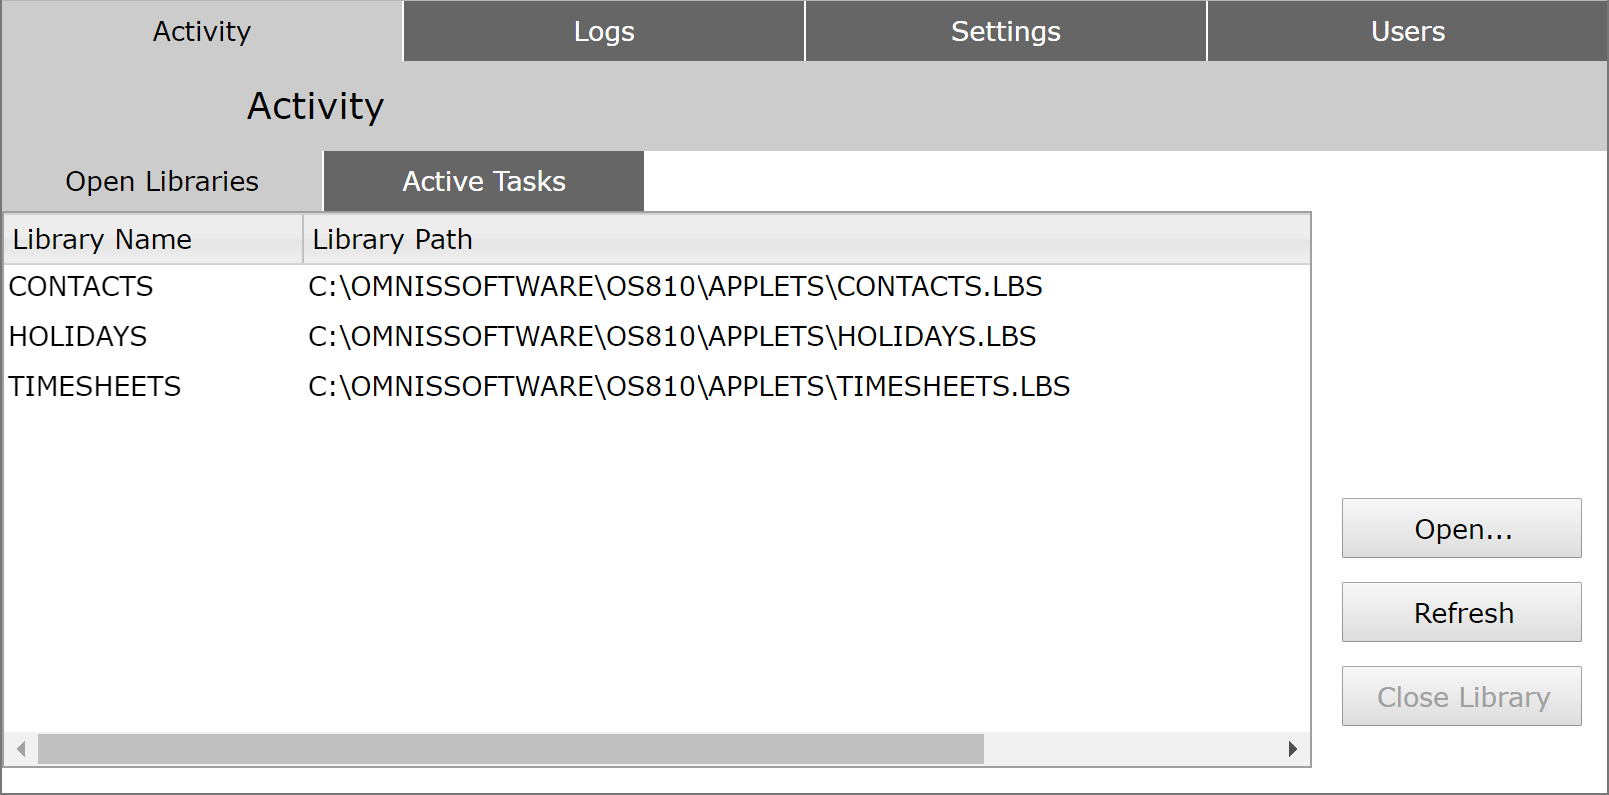
The Headless Server Admin tool has a number of tabs that let you view or configure the server Activity, Logs, Settings, and Users. When you first open the admin tool in your browser, you are requested to login: use the default username: omnis, password: 0mn1s (first character is zero). After logging in, you can change the password for the default user, or create other users.
The configuration and settings for your Headless Server are stored in a SQLite database. The location of this database is specified in the "headlessDatabaseLocation" item in the “server” section of the Omnis Configuration file (config.json).
The Activity tab lets you see all Open Libraries on the server. You can use the Refresh button to refresh the list.
The Open button lets you open a library on the server; note the construct method will be run if present. You can click on a library in the list and close it using the Close Library button; note that closing a library will suspend all clients connected to that library.
The Active Tasks tab shows all current, active task instances or client connections on the server; you can select a task or connection and view its details. You can kill or close a task instance or connection using the Kill Task button; note that killing a task or connection will suspend the operation of the application for the connected client.
The Logs tab lets you view the logs for the Server:
Server
provides a log of the headless server activity (the location of the logs can be set under the main Settings tab)
Monitor
provides a log of all the active client connecttions (task instances)
Service
provides a log of all the errors or messages generated by the server including any messages in the trace log or information about any web service requests.
Under the Service tab, the Configure button lets you set up what messages are recorded in the log, including the attribute "folder" of "logToFile" which is the name of the path relative to the Omnis Server tree where the service logs are generated. These settings are added to the config.json for the server, under the “log” member:
"log": {
"logcomp": "logToFile",
"datatolog": [
"restrequestheaders",
"restrequestcontent",
"restresponseheaders",
"restresponsecontent",
"tracelog",
"seqnlog",
"soapfault",
"soaprequesturi",
"soaprequest",
"soapresponse",
"cors",
"headlessdebug",
"headlesserror",
"headlessmessage",
"systemevent"
],
"overrideWebServicesLog": true,
"logToFile": {
"stdout": false,
"folder": "logs",
"rollingcount": 10
},
"windowssystemdragdrop": true
Under the Settings tab you can specify the location of the Server and Monitor logs, plus the timer period and size of the logs. You can also set up the Server Port, number of Server Stacks, and the Timeslice for the Headless server (and specified in the config.json file), and you can restart the service from here.
The default service name of the Headless server is “homnis” which is specified in the “server” member of the config.json file:
You can upload libraries from the developer version to the startup folder of the Omnis Server, as well as move .htm files to the root of your web server (/var/www/html); plus you can remove files. Under the Settings section you can set the path to webroot and the web server handler, which default to /var/www/html and /omnis_apache respectively.
If you are running a different web server or web root directory, you need to modify these settings before uploading. For example, if you are using the Omnis built-in web server, you need to set the webroot path to '[path to Omnis read/write directory]/html' and the handler to '_PS_'.
Furthermore, osadmin will change the htm uploaded to use the specified web handler and the server port Omnis is currently bound to, therefore changing an htm before uploading it could break this functionality, so do not edit the htm file in this case.
The Users tab lets you update users or create new ones. The default omnis user can be changed here. When checked, the Re-start Option will allow a user to restart the server.
Under normal operation, the multi-threaded Omnis Server does not take full advantage of multi-core processors, because it uses a time-slicing model that single threads the execution of Omnis code in all situations, other than when some sort of external call (e.g. a DAM call) is in progress. The concept of the MultiProcess Server (MPS) for the Linux Headless server has been designed to eliminate this short-coming and deliver significant performance improvements in your applications, by using a multiprocess rather than multithreaded server model.
When using the MPS in the Omnis Linux Headless Server:
There is a single main server process that receives requests from clients.
There is a separate child process for each client, represented by a single remote task.
The main server process passes the request to a child process which executes the request. The child process then passes its response back to the main process, which then sends the response to the client.
Each child process is created using a forking system; however, the server is implemented so that when a child process becomes free (because its remote task destructs), it can be added to a pool of free child processes, ready to be associated with a new remote task. This greatly improves performance.
One of the main features of the MPS is that it can be plugged into an existing server configuration, and it will still work with the load sharing process; in other words, it still has exactly the same interface via its server port.
Another major advantage of using the MPS is that since execution is isolated to a single client per process, any problem in the child process (a crash perhaps), will only result in a single client receiving an error, and the server will continue running.
To use the MultiProcess Server (MPS), you need to add some entries to the “server” section of the configuration file (config.json) for the Linux Headless Server. The entries are:
multiProcess
When multiProcess is true, the Linux Headless Server will start up in multiprocess mode; in this case, the entries “start” (Start server flag), “stacks” and “timeslice” in the server section of config.json are ignored as they are not relevant to the MPS.
maxChildProcesses
is the maximum number of child processes; default is 0 (zero), which means there is no maximum number of child processes
maxFreeChildProcesses
is the maximum number of free child processes (not associated with a remote task); default is 5
The new options are written to the “server” section of config.json like this:
The settings for maxChildProcesses and maxFreeChildProcesses depend on the size of the application, and the power and memory of the system, therefore a degree of system tuning will be required. Another factor to consider is the serial number. If the serial number only allows 100 users, then only 100 child processes can be created; however, if the serial number is a MAXW number, then 32000 users (the max number allowed) is probably too many for a single Omnis instance – in this case, you would want to prevent that many Omnis client connections coming to the single server, using load balancing.
When there is a free child process, a new client will connect a bit faster, as a free process is ready to go, so it is worth allowing these to build up to a sensible number.
In addition, you may want to handle timeouts for client connections. The headless server in all its variants (single-threaded, multi-threaded and multi-process) supports the following entries in the “server” section of config.json that provide some control over reading requests from a client:
These entries indicate if the server will timeout a connection from a client if the complete request is not received in “readTimeout” seconds.
Child processes never write to the files omnis.cfg and config.json.
The MPS starts up just like the normal headless server. As such, it opens libraries in the startup folder, and constructs their startup tasks. There are however some rules that need to be followed, because of the way the forking process works:
No DAM connections can be left open after the startup task constructors have run.
No files opened by FileOps or other externals should be left open after the startup task constructors have run. This is because their file descriptors will be shared by each child process, because of how the forking process works.
A child process can only write to a library that it has opened or created itself (this is opened with exclusive access by the child process). If the child process attempts to save a class to a library it did not open or create, Omnis ignores the error and returns success rather than an error code.
A child process can only close a library that it has opened or created itself.
osadmin cannot open and close libraries in the MPS.
Internally, when the forking occurs, the child process closes and re-opens the file descriptor (read-only, shared) for all open library files, since the otherwise shared file descriptor with the main process has a common shared file offset. Additionally, byte range locking calls in the child become no-ops.
As part of startup of the MPS, Omnis caches all class data from all open startup libraries in memory. This allows the class data to be immediately available to a child process after it is created using the forking process. As stated earlier, you cannot write to the startup libraries. Therefore, you should not modify classes belonging to these libraries in a child process, since the child process will typically be used for many remote task instances during its lifetime. However, this is not enforced.
You cannot use the following commands in the MPS:
Start server and Stop server.
Set timer method and Clear timer method.
All of the above generate the error 125446 (cannot use this command, function, or notation, in the multi-process server).
You cannot use the command Quit Omnis in a child process of the MPS. Attempting this generates the error 125437 (cannot use this command, function, or notation, when running in a child process in the multi-process server).
Finally, the commands Begin critical block and End critical block have no effect in the MPS. This is because each child process handles a single remote task.
There are two sys() functions to support the MPS:
sys(243) returns true if and only if Omnis is running in MPS mode.
sys(242) returns the child process ID, a character string that uniquely identifies the child process that is currently running. When the method is not running in the MPS, or not running in a child process, this has the value “0”.
sys(242) can be used to identify the child process that is to process a request from a client: see the section “Using The Same Child Process” later in this document.
When the MPS creates a new child process via the forking process, the child process runs the $processinit() custom method (if present) in the startup task of each open startup library. You can use $processinit() to carry out any initialization required to set up the environment in which all remote tasks handled by the child process will run.
Each child process has its own SQL database connections. You could use $processinit(), for example, to create a server pool containing a single database connection, that you can then use for all remote tasks that the child process handles.
The MPS does not support the $maxusers property of a remote task.
Due to its multi-process architecture, the MPS does not support notation such as $iremotetasks.$sendall(), because if you execute this in a child process, it will only apply to the currently executing remote task.
To overcome this, Omnis includes (for all platforms, and all variants of server: single-threaded, multi-threaded and MPS) the following notation that allows you to “broadcast” a message to all remote tasks, including those running in another child process in the MPS.
There is a method of the $iremotetasks group of remote task instances called $broadcast() that can be used to send or “broadcast” a message via a public method to all task instances; its syntax is:
$broadcast()
$iremotetasks.$broadcast(cMethod, vListOrRow [, bWait=kTrue])
Calls the public method cMethod in all open remote task instances, passing vListOrRow as a parameter to each call. If bWait is kTrue returns a list of return values, containing a line for each remote task that executed the method.
cMethod does not need to exist in all remote tasks; if it does not exist, Omnis ignores the remote task.
When using bWait with value kTrue, all remote tasks must return the same data type. If the returned type is row, then the return value list is defined to have all of the columns of the row (so all remote tasks must use the same definition for their returned row), otherwise the return value list has a single column with the returned data type as its type.
Omnis data files cannot be opened in the MPS. Attempting to open one causes the error 101437 (Cannot use data files (either because the serial number does not allow data files or because Omnis is running as a multi-process server or because Omnis was invoked with --runscript)).
Icon data files such as omnispic.df1 can still be used. As for libraries, the child process closes and re-opens (read-only, shared) the file descriptor for all open picture data files when it initializes itself after it has been created by the forking process.
When a new message arrives from a client, the main process inspects it. If the message is for an existing remote task, the main process sends it to the child process handling that remote task; to do this, the main process maintains a table that maps remote task connection id to child process. If the message requires a new remote task, then the main process either sends it to a free child process, or creates a new child process via the forking process (if configuration allows), and sends the request to the new child; if the configuration does not allow (the maxChildProcesses limit has been reached), the main process queues the request internally until a child process becomes available. This latter queueing behavior works best in a server handling RESTful, ultra-thin or SOAP web service requests, since these requests are usually processed relatively quickly; when the server is handling JavaScript client remote forms, it is best to allow essentially unlimited child processes, so a client can connect immediately.
Child processes send an event to the main process when their remote task destructs. The main process can then decide whether to tell the child process to exit (because the maximum number of free child processes has been reached), or add the child process to the pool of free child processes.
Management of the server user count is handled using a shared memory semaphore. The main process initializes the semaphore with a count equal to the server user count. When a child process creates a remote task, and therefore needs a license, it waits on the semaphore. For a RESTful request, it waits indefinitely, and for other requests it tries to wait, and if the semaphore does not have availability, it rejects the request. This behavior is then equivalent to that of the multi-threaded and single-threaded servers, in that RESTful requests are queued waiting for a license, and other requests are rejected immediately if a license is not available.
When a child process deletes a remote task, it frees the license by posting the semaphore.
If a child process crashes while it is holding a license, the license will not be freed by the child. However, the main Omnis process attempts to restore the license semaphore count by posting to the semaphore appropriately, based on the server user count and the number of child processes currently assigned to a remote task.
It is possible to use the MPS in conjunction with the Load Sharing Process, although this only really makes sense when each Omnis server accessed via the load sharing process is running on a separate machine, since the MPS is essentially providing a load sharing mechanism. The main process maintains the load sharing statistics and responds to the load sharing statistics request message.
Due to the dynamic nature of the Omnis environment, remote debugging is supported in the MPS only in the context of a single child process, explicitly created to execute clients that are to be remotely debugged – this is called a Remote Debug Child.
The following sections describe key points regarding how to remotely debug Omnis code running in the MPS.
If the member pauseAtStartupUntilDebuggerClientStartsExecution in the remote debug configuration is true, you can debug the startup tasks of the remotely debuggable code in the MPS. This code runs in the main process.
Start the MPS, use a Windows or macOS copy of Omnis to connect a remote debug client to the MPS, and debug the startup code.
After MPS startup completes, the remote debug connection closes.
After MPS startup, assuming remote debugging is enabled, the MPS creates the remote debug child, and the remote debug child then becomes the instance of Omnis visible to remote debug clients. Therefore, using the remote debug client on a macOS or Windows copy of Omnis, you can connect to the MPS remote debug child, and debug that directly.
If the member pauseAtStartupUntilDebuggerClientStartsExecution in the remote debug configuration is true, the remote debug child pauses, waiting for a remote debug client to connect, before running any $processinit() methods. In this case, the remote debug client has a hyperlink “Run Process Init” rather than “Run Startup”.
For JavaScript remote form clients, specify ?omnisRemoteDebug=1 on the URL used to open the Omnis remote form.
For ultra-thin clients, include omnisRemoteDebug=1 in the query string used to invoke the ultra-thin request.
For RESTful clients, include the header omnisremotedebug in the request.
In all of the above cases, the request that requires the remote debug child will be queued if necessary, waiting for that child to become available.
The MPS allows you to cache data for ultra-thin and RESTful requests, to improve performance, using a query string parameter or HTTP header respectively, to specify the process ID (sys(242)) of the child process that is to ideally process the request.
When a request arrives that identifies a specific child process, the main process sends it to that child if the child still exists, otherwise it sends it to any available child.
For ultra-thin, the query string parameter is named ProcessID.
For RESTful, the HTTP header is named omnisprocessid. When using RESTful in conjunction with a process ID, you must always immediately respond to all requests, i.e. you cannot defer the response until later by assigning kFalse to $restfulapiwillclose.
The old-style web service logging to a data file is not supported for the MPS. Instead, you can configure the datatolog for the logToFile logcomp to include web services.
If you configure logging to go to standard output, by setting stdout to true in the logToFile object in config.json, logging from all processes in the MPS (main and child) will go directly to standard output, serialised between all of the processes using a shared mutex.
If you configure logging to go to a file in the logs folder, all child processes send their log data to the main process, which then writes the log data to file.
All versions of Omnis on all platforms use --version as the switch to report the Omnis version and build number, rather than -version.
The Linux Headless Server has a number of command line switches. Pass the switch --help to display them all.
| Command | Action |
|---|---|
| homnis --help | Print the help information and then exit |
| homnis --version | Print version and build number and then exit |
| homnis <sw> | Start the server using the start server and multi-process settings in config.json |
| homnis <sw> --st | Start the single threaded server ignoring the start server and multi-process settings in config.json |
| homnis <sw>--mt | Start the multi-threaded server ignoring the start server and multi-process settings in config.json |
| homnis <sw>--mp | Start the multi-process server ignoring the start server and multi-process settings in config.json |
| homnis <sw> --runscript=path <args> | Open the supplied library identified by <path>, construct its startup task, and pass the remaining command line arguments <args> to the $runscript method in the startup task |
<sw> can be any combination of the following:
| Switch | Meaning |
|---|---|
| --jscomments | Includes comments in client-executed JavaScript generated by homnis |
| --debugport=n | Overrides the configured remote debugging port |
| --pausestartup | Forces homnis to wait for a remote debugging client to connect before running startup (and $processinit if relevant) |
| --debugscript | Starts the remote debug server at startup when invoked with –runscript |
| Any other user parameters that can be accessed from Omnis code using sys(202) |
This mode allows you to use headless Omnis to run a script, that is, use headless Omnis to run some Omnis code within a shell script. For example, you could use the HTTP Worker Object in some Omnis code to invoke requests against an Omnis server. Used in conjunction with bash (or other shell) this can be quite powerful.
For example, you can write a script such as:
and execute it using
This will create 10 instances of the run script homnis process, wait for them to complete, and report how long execution took.
In more detail, the path passed via the runscript argument is the path of an Omnis library, the startup task of which must contain a method named $runscript. This method receives as parameters the remaining parameters on the homnis command line, so for example you could pass a URL or an iteration count, or both. When homnis starts up in run script mode, it opens just this single library (ignoring startup libraries) and executes the method $runscript in the context of its startup task. The script library is responsible for calling Quit Omnis when it has finished. This allows it to start workers which may not complete until after $runscript has returned.
When homnis is running a script:
It does not write to configuration files omnis.cfg and config.json.
It does not accept command input from stdin.
It only logs to stdout if logging is configured
It will only open the script library passed as a parameter
It will not open Omnis data files
You can use the printf() function to output a string from a script: printf(string[, newline=kTrue]) writes the string to standard output followed by a newline character if required (Ignored on Windows. Executes on macOS and Linux only).
It is possible that a loaded external component will not be in a good state after the forking process, probably due to problems with data structures in use by external libraries it is using (typically data structures containing some sort of operating system handle or file descriptor).
To cater for this, an external component with this kind of issue needs to return the flag EXT_FLAG_RELOAD_AFTER_FORK in the flags returned by ECM_CONNECT. This means that the main process unloads the component (calling ECM_DISCONNECT) after startup completes. Each child process then reloads the component (calling ECM_CONNECT again) as part of its initialization. As a result, each child process has a clean copy of the component.