The Tree List Component:
An Introduction
By David Swain
Polymath Business Systems
One of the common mistakes made
by Omnis Studio programmers is to confuse a List Display Field (List
Box, Headed List Box, Data Grid, etc.) with the List Variable it
represents. This leads to all sorts of programming errors, causing
great amounts of frustration and wasted time. It is a difficult
habit to break, but eventually most Omnis Studio programmers figure
out that the display characteristics and formatting provided by
the field have no effect on the contents of the associated list
variable.
But once the Omnis Studio programmer learns this important lesson,
there is then the Tree List component to master - and the whole
learning process has to be done in reverse! There is no Omnis variable
type designed to contain the hierarchical content represented by
a Tree List field. Yes, we can use a list variable to hold an expanded
version of that content and we can also use a list variable as a
transfer mechanism for adding children to a specific Tree List node.
But the Tree List field itself contains the real hierarchical
list value - and it stands on its own. That field has no dataname,
which should be a strong signal of this fact.
So let's begin at the beginning and see what this Tree List component
is all about...
The Static Tree List
To remove the use of any variables from our early discussion of
the Tree List component, let's first examine the use of a Tree List
field that contains only default lines. That is, we will
add our content to the Tree List hierarchy directly using the treedefaultlines
property in the Property Manager rather than using any "fancier"
technique at this point. We can easily set this field up to perform
some simple operations and help us to become familiar with the fields
many features.
So to begin our exploration, let's create a new Window class and
place a Tree List field onto it from the Standard Fields section
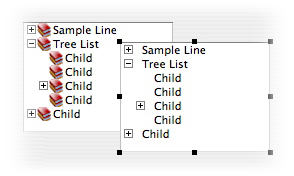
of the Component Store window. This field looks like any other field
we might place on a window, with the exception of the sample tree
list image it displays. This image is useful here to discuss some
basic hierarchical tree list terminology.
First, a tree list is used to contain a hierarchical collection
of data elements in a way that allows the user to hide or expose
sections of the hierarchy as needed. Each element in this hierarchy
is called a node. Each node has certain properties (many
detailed below), some of which relate to the content of the node
and some of which govern the nodes display features.
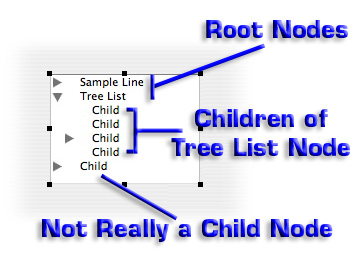
Elements within the hierarchy are associated through parent-child
relationships, which is one characteristic that distinguishes a
tree list from a simple list. Each node can potentially have multiple
"children" and most nodes have a "parent". Those
nodes that do not have parents are called root nodes. These
form the "base" for the tree (to use the "tree"
analogy) and their names are aligned furthest to the left in our
Tree List display field (at least for left-to-right writing systems
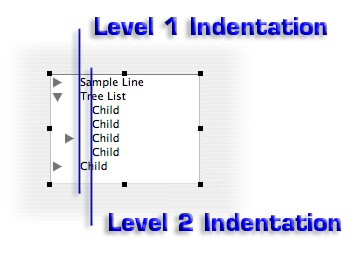
and the non-Unicode version of Omnis Studio). Child nodes are displayed
indented below their respective parent nodes. The amount of indentation
from the left edge of the field is determined by the level
within the hierarchy at which a child node resides.
Nodes that do not have any children are sometimes called leaf
nodes. In this article we will treat such nodes as the "outer
edge" of the hierarchy, but we will see in a subsequent article
how child nodes can be added dynamically to such nodes if our application
requires it.
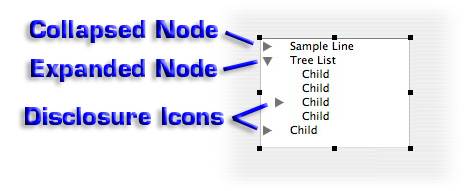
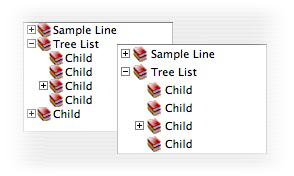
The triangles on the left of this image are disclosure
or expand-collapse icons. Different icons are standard
on different platforms and for different purposes, but their function
is the same. These are embedded controls that allow the user to
expand or collapse the display of a branch of the hierarchy. This
feature is, perhaps, the greatest convenience provided by the Tree
List field.
We can explore a little more about Tree List fields by examining
some of its many properties.
Basic Tree List Properties
A Tree List field contains the normal properties for an Omnis Studio
Window class field. Height and width, horizontal
and vertical position, name, visible, active,
enabled, tooltip, userinfo, text properties,
basic appearance properties, etc. Nothing new here.
A Tree List field also contains some of the basic properties for
a list display field. These include horizontal and vertical scroll
bars, number of design columns, an optional header (with optional
bold text), column names (we will discuss multiple column tree lists
in another article, but a single column name can be used to put
text into the list header for a basic tree list), multiple line
selection, etc. So the "list" nature of a Tree List field
is well supported.
But there are also special properties that are specifically intended
for a Tree List field. These are primarily found under the Appearance
tab in the Property Manager. For example, there are a number of
choices for the disclosure icons we can use. This is controlled
using the $expandcollapseicon property. We simply supply
this property with the number of a multistate icon set. Here are
some examples applied to the default Tree List field image display:
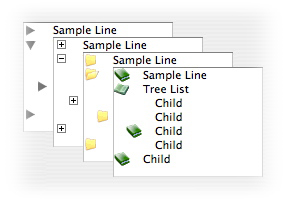
In addition to (or instead of) the disclosure icons, we can specify
node icons. These can vary from one node to another to
indicate specific information about each node. We set this using
the $iconid property of an individual node. We can also
specify a default node icon (to be used when we do not
assign one to a given node) by setting the $defaultnodeicon
property of the Tree List field. Node icons (or the space they would
occupy if none is assigned) can be hidden or shown by appropriately
setting the $shownodeicons property of the field. If this
is set to kFalse, there is less of a gap between the node
name and its disclosure icon than we saw in the examples above:
Notice that those node icons look a bit cramped. We can give them
more vertical breathing room by using the $treelinehtextra
property and more horizontal space by increasing the value of the
$treeindentlevel property. And if the position of the disclosure
icons seems a bit off, we can also adjust the value of the $treeleftmargin
property. The exact settings we ultimately choose for these properties
will depend on the font size we use for the field as well as the
size of the icons.
While this may appear to be simple window dressing to some developers,
these icons are intended to be used to impart information to the
user. But there are more fundamental things for us to understand
before having that discussion...
Adding Default Tree List Lines
So far we have only changed the display of a default design image
of our Tree List field. If we instantiate our window without further
work, we will see absolutely nothing within the fields borders.
So we need to add some content to explore further. Since we intend
to work with a static tree list for now, this means working with
the treedefaultlines property of our Tree List field, found
under the General tab of the Property Manager. Clicking in the property
value box for treedefaultlines shows it to be a dropdown list. But
if we click the dropdown disclosure arrow, we are presented with
the following interface (which I display here with some content
already in place):
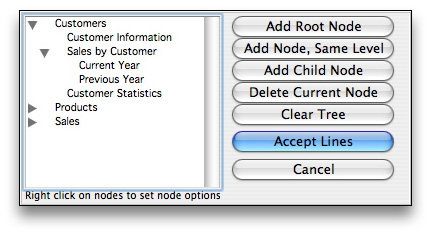
This dialog offers us a number of tools for managing
the default lines of our Tree List field. The second through the
fourth pushbuttons assume that we have clicked on (and, therefore,
highlighted) a node in the list on the left. The action of each
of these buttons is performed relative to the selected node. The
first pushbutton adds a new root node at the bottom of the list,
no matter which node is currently selected. Child and sibling (same
level) nodes are also added to the bottom of their respective groups.
It does not appear that a means of dragging nodes to different positions
has been provided with this interface, so a little planning goes
a long way in arranging the default hierarchy we desire.
When we add a new node to the hierarchy, we are prompted
to type in a label for that node. This becomes the value of the
name property for that node. If we need to rename one of
our default nodes in this design mode, we simply click the node
once to select it and then click again (two separate clicks, not
a double-click) to edit the text. But there are other node properties
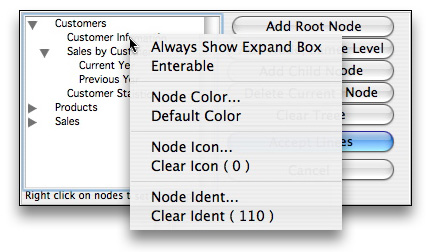
we can set while we're here. If we context-click on a node, a context
menu appears with even more options:
Let's look at some of these options in detail...
Basic Node Properties
Each node in an Omnis Studio Tree List has a variety of properties.
We will examine the most basic of these here, but will cover additional
node properties in a later article (as we discuss techniques that
require them).
The most basic property that we assign to a Tree List node is its
name. This is the actual text that is displayed for the
node. When we want to access this property using Omnis Notation,
we use the $name property. The data type for the value
of this property is a character string.
As with other notational items in Omnis Studio, each node also
has a $ident property. But unlike most Omnis items, we
have the option - and the responsibility - to assign this
property its value for each node. Omnis Studio does not do this
for us. This property requires a long integer value. Character
strings and decimal values will not work here, but negative values
are allowed. The context menu shown above offers us a Node Ident...
option for setting this value for our default nodes. It also displays
the current $ident value for the selected node with the
Clear Ident option. Here I have set this value to 110
for the selected node.
But Omnis Studio also maintains a unique sequential numeric ID
value for each node as well. This is called the $seedid
property. It is assigned to each node as it is added to a Tree List
instance. It also is a long integer value. Default lines are numbered
from the top during instantiation in the order they would appear
in a fully expanded tree. Numbering begins with 1 and
continues in increments of 1. Each new node subsequently
added to the tree is given the next sequential value - no matter
where in the tree it is added. So except for static nodes, there
is no guarantee that a given node will have the same $seedid
value from one instance to the next. For this reason, the $seedid
property is generally for internal use only.
By default, the text for each node is given the text color assigned
to the field. However, each node has its own $textcolor
property so that we can assign different colors to different nodes
if we wish. This property is stored as a long integer and
takes on a value of kColorDefault (-2147483599) if a specific
text color value has not been assigned to the node. The context
menu shown above gives us the opportunity to set a Node Color...
and displays the current setting for the selected node.
We can also view and set the value of the $nodeicon property
for the selected node using this context menu. By default, the value
of this property is 0 - even if the field itself has
been assigned a non-zero $defaultnodeicon value.
And the node context menu allows us to set the $enterable
and $showexpandalways property values for the selected
node using the top two options. We will discuss these in more detail
in a subsequent article. For now, these are both Boolean
properties and they each default to kFalse. Note that any
node that contains children automatically shows the disclosure
icon, so it is not necessary to set $showexpandalways to
kTrue for such nodes.
Each node knows its parent. It has a $nodeparent property
that contains a reference to the node containing it as a child.
If we test the value of this property and find that it is NULL,
then we know we are dealing with a root node. The value of this
property is automatically set based on the location of the node
within the tree.
Another way to test whether a node is a root node is to examine
its $level property value. Root nodes have a $level
property value of 1. The value of this property increases
the more a node is nested within the Tree List. This property can
be useful for making sense of the $ident property value
when we build Tree List contents dynamically and where different
levels contain data derived from different tables in the database
or have some other meaning that is tied to that level. We will discuss
this in detail in a subsequent article.
Basic Tree List Events
As with basic properties, a Tree List field also inherits the basic
events for a field. In fact, it also inherits the basic events for
a list display field as well. But there is a bit of a difference
in how we use those events and their parameters. To finish this
first Tree List article, let's examine how we might use the simple
evClick and evDoubleClick events for a Tree List
field.
The static Tree List content I built for this demo might be used
as a navigation tree through a simple application. There are root
nodes for Customers, Products and Sales,
with child node hierarchies that point to various windows (perhaps
managed using a single Subwindow field) from the library.
We might use this to construct an interface similar to the one used
in iTunes, for example. All we have to do is to detect
which line of our list was clicked or double-clicked.
But this is a bit different than for other kinds of list display
fields. Sure, the click and double-click events return even parameters
pLineNumber and pRow, but neither of these is
populated for clicks on a Tree List field. And no, we can't access
$ident, $name or even $seedid of the
clicked line using pRow. There is no line number or row reference
to tap into because a Tree List just isn't organized that way -
but it still inherits these vestigial event parameters from its
list display field cousins.
Instead, we need to use the $currentnode() method of the
field itself, understanding that the node most recently clicked
upon becomes the current node. Note that this is not a
property, but a method that returns a reference to the current node
of our Tree List field. Since this method returns a notational reference
to the current node when it is executed, we can follow the closing
parenthesis that resolves the method with the notation for a node
property to yield the value of that property for the current node.
For example, if we want to know the $ident value of the
current node, we could use:
treelistRef.$currentnode().$ident
In all of the examples in this and any subsequent article on this
subject, treelistRef is an Item reference variable
that points to the Tree List field on our window.
Suppose we want to open a specific window in a Subwindow field
if the user double-clicks on a node. But some nodes are simply parents
and do not point to a specific window. In those cases, double-clicking
on the node acts as an alternate to clicking on the disclosure icon,
automatically expanding or collapsing that branch of the hierarchical
display. If the user double-clicks such a node, we do not want that
node to remain the current one, while we don't mind if a node that
switches windows remains highlighted.
To indicate that a node contains children, I gave a $ident
value that is a multiple of 100 to each such node. This makes such
a node easy to distinguish during event processing. Here is some
code we might put into the $event method of the Tree List
field to handle this situation:
On evDoubleClick

                Process event and continue

                If mod($cobj.$currentnode().$ident,100)=0

                  Do $cobj.$setcurrentnode()

                  Do $cobj.$redraw()

                Else

                  ; set window class for subwindow field

                End If
There is a lot more we can do here, but it will have to wait until
next time...
Next Time
I hope this has been a helpful introduction to the standard Tree
List field. In the next issue of Omnis Tech News, we will dig a
little deeper into this subject and explore how we can transfer
node information to and from a Tree List using a list variable.
There are also more properties, methods and events to discuss. |
 Please logon or create a free account to download this file.