External Objects
By David Swain
Polymath Business Systems
So far, we have discussed every
type of Object that we can create in an Omnis application except
one: the External Object. This is an Object that we create using
a special type of external component that is designed as a nonvisual
component. The externals that we can use with this facility will
be found in the Xcomp folder inside our Omnis Studio installation.
But not every Xcomp can be used in this way. Most Xcomp files only
contain GUI component objects that we place on our Windows, Remote
Forms and Reports. But some special Xcomp files also contain a nonvisual
Object component that we can use as the base class for an Object
variable or as the superclass for an Object Class.
There are relatively few of these special Xcomps.
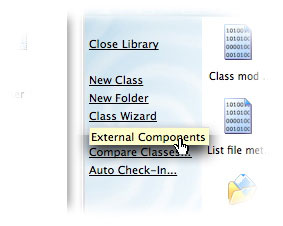
One way to discover them is to browse through the external components
available for use with our libraries. We can do this by opening
the External Components link in the Omnis Studio Library Browser.
Perhaps this is a good time for us to explore external components
briefly, since we're here.
Exploring External Components
Omnis Studio ships with a large number of external components.
But just because an external component is contained within the Xcomp
folder does not mean that Omnis Studio is ready to use it. The component
must first be loaded into Omnis Studio since it is not part of the
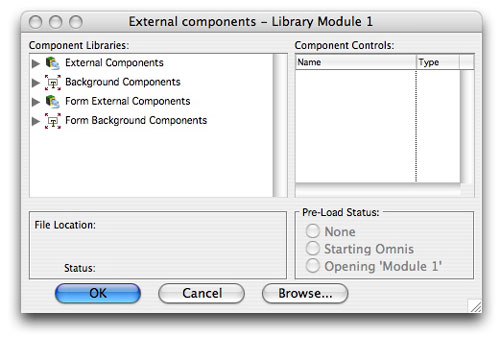
core code of Omnis. The easiest way to do this is to set the preload
status of a component in the External Components dialog that appears
when we click the link illustrated above. That dialog should look
something like this:
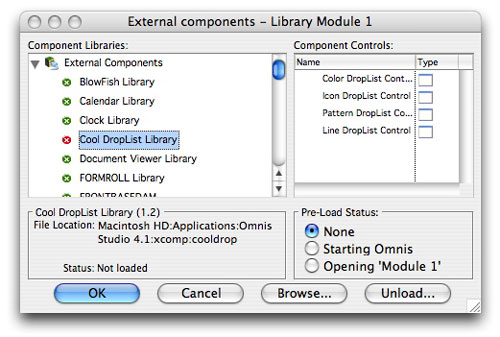
Windows users will see more groups in the list on the left, but
all platforms offer the External Components group shown
at the top of the tree list on the left side of this dialog. That
is the one in which we are interested for now. If we expand that
node of the tree list, we will see a list of the foreground Window,
Report and Object Xcomps currently installed with our copy
of Omnis Studio:
We can browse for external component libraries located elsewhere
on our system, but it is best to keep those we need in the Xcomp
folder.
Component Libraries that are currently loaded are shown
with a green dot in the Component Libraries list. Those
that are not loaded display with a red dot in
this list. If we choose a Component Library from this list, we can
set it to preload when either Omnis starts up or when we open the
current library by clicking the appropriate radio button in the
Pre-Load Status group. If we change the Pre-Load Status
of a component library, the color of the dot shown with its name
in the Component Libraries list will not change immediately. We
must first submit our status changes by clicking the OK button,
which closes the dialog - so we won't see this specific result until
the next time we open this dialog. But we will be able to use
newly introduced Xcomps without restarting Omnis Studio
and without closing and re-opening our library.
The items displayed in this list are called component "libraries"
for a reason. As we browse through this list selecting different
libraries, we notice that many of them contain more than one component.
We can see a list of the Component Controls in a selected library
in the list on the right side of this dialog. This list shows us
the names of the components along with icons that indicate which
type of component each line represents. Components that we find
in the External Components group of the Component Libraries list
can contain three types of components: Window foreground components,
Report foreground components and Object components. Remote Form
components are found in a separate group called Form External Components
in the Component Libraries list. Background components for Remote
Forms and other class types are also found in their own separate
groups. In this article, we are mostly concerned with Object components,
which are displayed here with an icon that looks like a cube with
a plug in it in the Component Controls list.
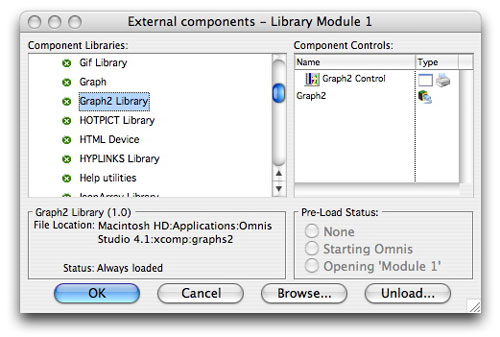
Here we see the controls for the Graph2 component library. Notice
that there are two separate controls: one that can be used
on either a Window or a Report Class layout and one that is for
use as an Object. The icons that indicate the type(s) of a control
should be easily recognized by an experienced Omnis Studio developer.
Once an external component is loaded into Omnis, it can then be
selected for various purposes within our library. For example, we
can locate any GUI component in the Component Store window and drag
it to the layout for any appropriate class in design mode. But we
use our nonvisual Object components in different ways.
Using an External Object
There are two basic ways we can use an Object component. We can
select an Object component as the subtype for an Object
variable (or specify it later using the $new() method applied
to the external component itself) or we can use an Object component
as the superclass for an Object Class. There are various reasons
why we might choose one of these techniques over the other.
For the moment, we will use the second technique. This technique
gives us the opportunity to explore the properties and methods that
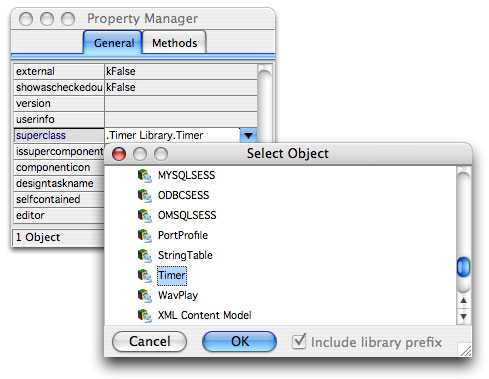
an Object contains. So let's create a new Object Class and give
it the name timerObject. Using the Property Manager, we
will then assign the Timer Xcomp as the superclass for
our Object Class. When we click on the property value in the Property
Manager, a dialog appears that allows us to make this choice from
a list. Notice that only Xcomps of the Object type are displayed
for selection. Think of this as being the Component Store for Object
Xcomps:
We can now open the timerObject class and explore what Omnis Studio
has given us for our efforts so far. This Object Class inherits
methods and properties from the external component. When we open
an Object Class, we see its methods in the Method Editor:
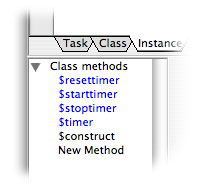
Inherited items appear in blue by default in Omnis Studio. But
if we wish to, we can change the color for this and other color
coded items by modifying the Omnis Studio Preference properties
($root.$prefs) in the Property Manager or using Notation:
Inheritance is a feature of object orientation that we
can use to advantage in Omnis Studio. When an instance of our Object
is spawned, it receives the methods and properties of the current
version of its superclass. If this Xcomp is updated (as the Timer
was for Omnis Studio version 4.1), our subclass is also automatically
updated.
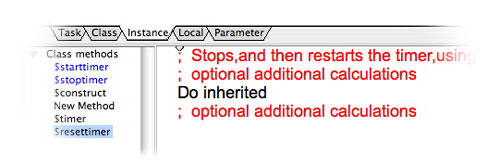
But there may be situations where we want to replace an inherited
method with one of our own - retaining the method name, but replacing
the code. We can do this by overriding that method. In
the case of the Timer, the method named $timer is the method
that is called when the timer reaches zero in its countdown. It
is currently empty, so we must override it to give the
Timer Object a method to perform. We do that using an item in the
context menu for that method as shown here:
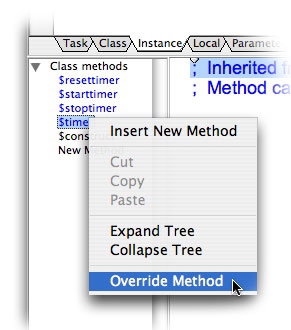
This is an example of overriding an inherited, but empty, placeholder
method. But we may have a need to override a method that actually
does something as well. For example, perhaps we want to add a few
steps to the $resettimer method in our Timer Object to
reset some other variables as well. Once we have overridden the
method and have put our own code into it, we can invoke the inherited
method at any point within our code by injecting the Do inherited
command:
The Method Editor allows us to see the names of inherited methods,
but the Interface Manager allows us to see quite a bit more. We
access the Interface Manager from the View menu of the Method Editor.
Here we see two views of this tool: the Methods view and the Properties
view:
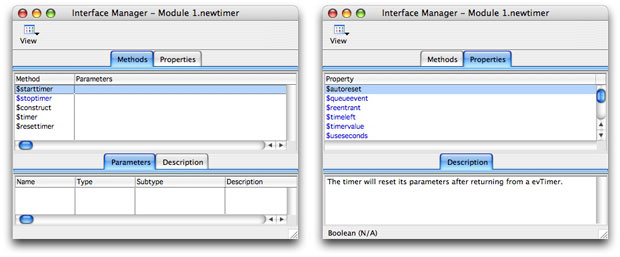
We can examine any parameters available to the selected method
in the Methods view or we can read its description. For non-inherited
methods, including overridden ones, we can even add our own descriptions.
The Properties view allows us to read any description of the selected
property. The astute developer who has used the Timer Object in
the past will notice two new properties here: $queueevent
and $timeleft. These were added to this Object component
in Studio 4.1. My demonstration library was originally written for
a much earlier version of Omnis Studio, but through the magic of
inheritance, these new properties automatically appeared when I
opened this Object Class.
Even if we don't intend to use an external Object as the superclass
for an Object Class, this is a useful exercise because it lets us
examine the programming interface to the Object. But how else might
we use it?
Instead, we can simply inherit the functionality of the Xcomp directly
into an Object variable. The simplest way to do this is
to set the Xcomp as the subtype of the Object variable
in the Variable Definition Pane of the Method Editor.
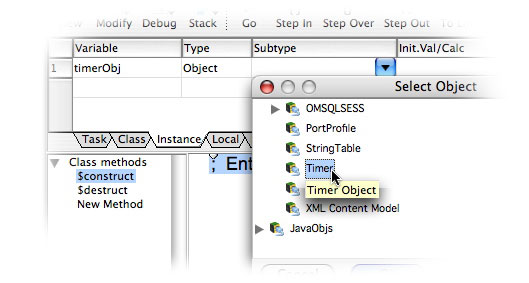
An Object variable defined in this way inherits all the
methods and properties we saw in the Object Class above. In fact,
we could choose to use an Object Class that was subclassed from
the Xcomp instead of the Xcomp itself in the Object variable
definition. We would do this in the case of the Timer Object to
make it easier to override the $timer method.
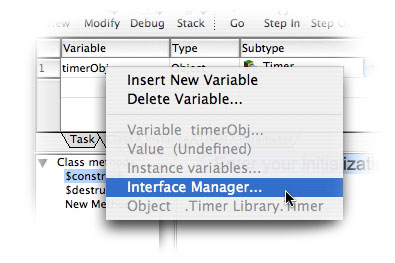
If we need to examine the methods and properties of an Object
variable in greater detail, we can open the Interface Manager from
the Variable Context Menu anywhere in the Method Editor we see the
name of this variable:
If we prefer, we can use the $new() method to instantiate
an Object variable for an Xcomp. Since most Xcomps do not
contain a $construct method, there is not much reason to
do so, but it is certainly allowed. The syntax for this is as follows
(either line is correct):

Note that we must give the name of the Component Library followed
by $objects and then the name of the Control within that
Library.
And finally, we could use an Object reference variable
instead of an Object variable. Remember that this variable
(or the instance that it points to) must be populated using
the $newref() method applied to the Xcomp as with the $new()
method shown above.

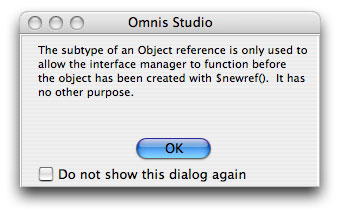
And in Omnis Studio version 4.1, we are allowed to specify a subtype
for an Object reference variable, as shown here:
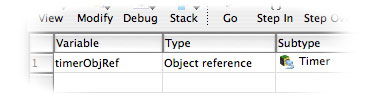
The only function for this subtype is to allow us to use
the Interface Manager to view methods and properties for this Object
while we work. We still must populate the Object reference
variable using $newref() as shown above. Omnis Studio is
kind enough to give us this warning to that effect:
But beyond these setup operations, we use Object Externals just
as we do any other Object Instance. The scope we choose for our
variable determines where we can access the Object. We use Notation
to invoke its methods and to get and set values for its properties.
We can even add our own instance, class and local
variables within the Object if we create an Object Class as a subclass
of the Xcomp. The great thing is: We can create as many instances
of a given Xcomp as we need!
Next Time
The next few issues of Omnis Tech News will most likely cover new
and improved features in Omnis Studio version 4.2, which I expect
will ship between now and then. After that flurry of activity, we
will come back to Objects and examine a special group of Xcomps:
the Omnis Studio DAMs.
|
 Please logon or create a free account to download this file.