Tech News Back Issues Issue: 121003
Introduction to the Omnis Web Client: Part 23, Web Marketing - The Master of Puppets theory!
By Dr Caroline Wilkins
iB2B Systems Ltd
(Note the Web Client is now obsolete but you may find useful some of the techniques discussed here regarding web form design and web applications: you should now use the JavaScript Client to create web & mobile apps.)
In a couple of previous technical newsletter articles, we have discussed search engine promotion. Whilst this is an important part of a web marketing strategy, it is by no means the only part. Following my session on Web Marketing at EurOmnis 2003, I would like to share my "Master of Puppets" theory of web marketing.
In order to maximize and target the traffic to a website, one must consider the routes by which a user might arrive at a website and the means by which they might be encouraged to do so. These routes may be thought of as puppet strings that you, as the web marketer, can tweak and stimulate in order to achieve the volume and demographic that will best serve your business model.
Visitors to a website may be roughly divided according to the following routes:
- Direct - Visitors who have typed the URL of your site into their browser rather than following links
- Search Engine - Visitors who have found your site through a search engine
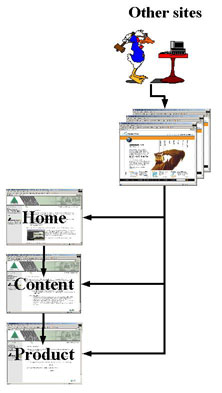
- Other sites - Visitors who have followed a link from a 3rd party site to yours
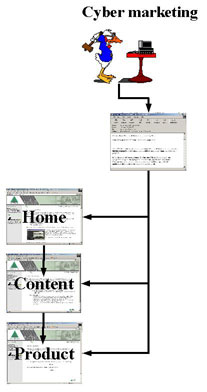
- Cyber marketing - A general category for web based links to your site, other than search engine and 3rd party sites.
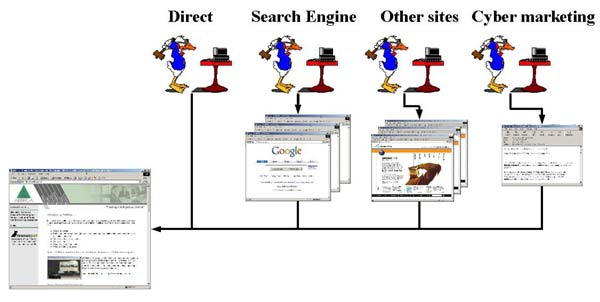
In the diagram above, all the traffic is directed to the home page of a web site. In practice, a visitor may go to any part of a website, via any of the routes above. For the purposes of this discussion, a web site may be divided into 3 main sections: the home page, content and products. The content may be things like technical articles, news items, downloads such as demo or shareware. "Products" may equally mean "Services" or "Concept". A commercial website is normally designed to sell a product, a service or a concept and, to some extent, they can be treated similarly in the context of web promotion.
This means that the route diagram becomes a little more complex:
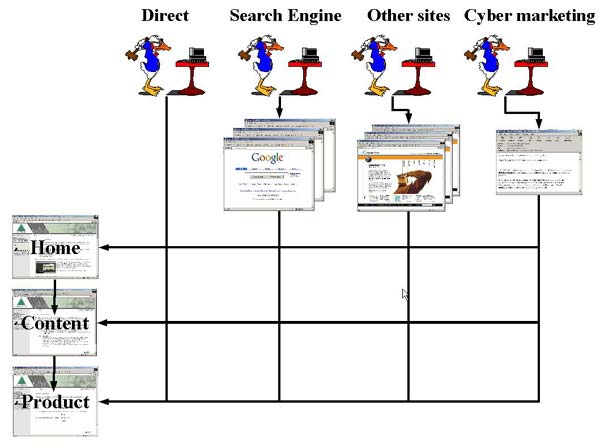
We see that visitors to a website may be drawn to the site via these 4 main routes and to various locations within the website. If the overall objective of the site is to promote and sell a product, then it becomes clear that it is important for users to be able to find their way from their entry point to your site to your products. This is a strong argument for having clear, consistent navigation on every page of your website. You never quite know where visitors will be arriving within your site and you want to be sure that they can find their way to whatever it is you would like to sell them, be it product, service or a concept.
Having identified these various routes into the website, let us consider some marketing methods by which a user might be encouraged to visit.
Direct
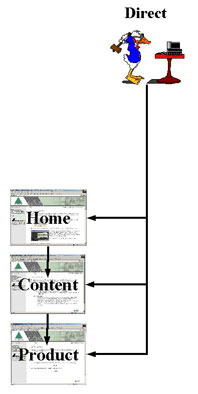 |
Direct visitors to your website will either be return visitors who have stored a bookmark or remembered a URL, or they will be people who have been subject to some real life (RL) marketing. Here are some examples of ways in which this sort of visitor might be attracted to your website:
Whichever of these routes a user takes, the importance of a simple and memorable URL is obvious. It also becomes clear how powerful your website's URL can be when printed on various media that can be handed to people. All of these things become tokens that may bring visitors to your site. |
Search Engines
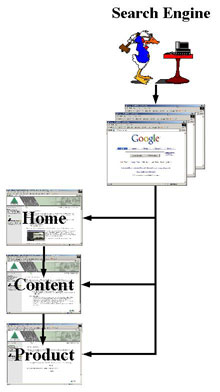 |
In previous technical newsletter articles, I have discussed search engine registration: http://www.omnis.net/technews/071703 In summary, search engine marketing involves:
|
Other Sites
 |
There are various ways of engineering links from 3rd party sites to your own. These include, amongst many others:
|
Cyber Marketing
 |
Cyber marketing can take many forms. It is a constantly expanding area that can often be overwhelming to the consumer. Escaping blatant advertisements becomes almost impossible. It is worth considering how the various cyber marketing techniques make you feel as a consumer before employing them to attract people to your own site.
|
Strategy
Hopefully, the above will have given you some ideas about how to promote your website and attract visitors to it. It should illustrate the different routes that users can take to get to your site and within your site. These are the strings that are available to you, the puppet master. In order to maximize the return on your investment within your web marketing strategy, you should consider which techniques are likely to attract the most valuable of your customers and in what volume. This is a very business specific issue and will become key to the future success of your site. It will enable you to deploy your marketing resources profitably.
Some of the techniques described above require time and effort on your part. Others simply require cash. When designing your strategy, consider whether you have time, money or the desire to employ a third party to do some of these things on your behalf.
The web marketing strategy that you decide upon should be reviewed regularly, as web culture and technology changes and as you gather more information about what techniques are most effective in your market place.
Resizing Fields When the User Resizes the Window
By David Swain
Polymath Business Systems
An interesting problem was posed recently in our class in Auckland, New Zealand by the convenor of the class, Annette Parminter. It was easy enough to solve with the combined minds of the attendees, but the solution made use of enough features of Omnis Studio that I thought it would make an interesting article.
Annette's problem was that she needed to resize the objects on a window (notably the text entry fields) as a result of the user dragging the window to a new size. This means that each field's position, size and fontsize (and perhaps other property values) need to be adjusted. As with many things in Omnis Studio, there could be a variety of possible solutions for this. Here is what we determined:
Detecting the Event
The event that is of interest to us is the evResized event of the window instance. A quick experiment demonstrated that this event is only reported when the user releases the mouse button having dragged to window to a new size. That is, the event is not reported while the window is being dragged to a new size, but only after it has attained its new size. The "past tense" nature of the event name also hints at this. So we can't dynamically resize anything until the user's action is completed (unlike the behavior of the Slider control which reports new $val and pNewVal values while the slider is being dragged). Omnis Studio only displays a "wire frame" of the new window size while the user still holds the mouse button down. This is good news in that our field resizing technique does not have to be repeatedly executed, which could bog down slower processors on complex windows.
The evResized event is reported to the $event method of the window instance itself and it is not accompanied by any event parameters other than the standard pEventCode parameter, but we can always read the new size of the window using $cinst.$width and $cinst.$height. The trick is to convert this information into a form we can use to resize the components on the window by the same amount.
A Matter of Proportion
We decided to use a ratio of the current size and the original size (as determined from the associated window class or from the instance itself as it is first spawned). For simplicity, readability and speed, we chose to create two instance variables named baseWidth and baseHeight and gave them initial values derived from $cclass.$width and $cclass.$height respectively. (We could have used $cinst.$width and $cinst.$height as well in this case since they come directly from the class properties when the window instance is first spawned.) Dividing the current width by baseWidth would give us the proportional amount by which the width differs from the original at any time. The same goes for the height.
We further decided not to force the same aspect ratio (width-to-height ratio) onto the resized window, but to allow the user to be the judge of what was appropriate. While it would not be too difficult to determine (for example) the larger of the two ratios and impose that on the dimension with the smaller proportional change, we left that for another time.
We then decided that the height ratio should dictate any change in font size as font size is essentially a vertical measurement with the tools Omnis Studio currently gives us. In order to change this property, though, we can't use a field style that overrides $fontsize.
Armed with these decisions and the above background information, we set out to solve the problem.
A Basic Solution
As a first cut, we decided to attempt a series of $sendall messages to the group of objects on our test window to proportionally change the $width, $height, $left, $top and $fontsize of each one. The $width and $left values would be resized using $cinst.$width/baseWidth and the $height, $top and $fontsize would get their new size using $cinst.$height/baseHeight. The resulting code is put into the $event method for the window class and looks like this:
On evResized

	    Do $cinst.$objs.$sendall($ref.$width.$assign(

	           $cclass.$objs.[$ref.$ident].$width*$cinst.$width/baseWidth))

	    Do $cinst.$objs.$sendall($ref.$height.$assign(

	           $cclass.$objs.[$ref.$ident].$height*$cinst.$height/baseHeight))

	    Do $cinst.$objs.$sendall($ref.$left.$assign(

	           $cclass.$objs.[$ref.$ident].$left*$cinst.$width/baseWidth))

	    Do $cinst.$objs.$sendall($ref.$top.$assign(

	           $cclass.$objs.[$ref.$ident].$top*$cinst.$height/baseHeight))

	    Do $cinst.$objs.$sendall($ref.$fontsize.$assign(

	           $cclass.$objs.[$ref.$ident].$fontsize*$cinst.$height/baseHeight))
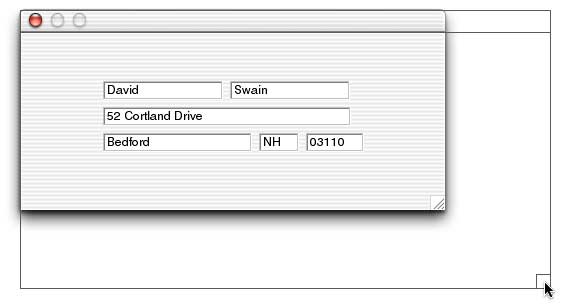
We used the $ident property value of each object to bridge to the corresponding object in the design class so that we could determine the base value of that property for that field. We then changed the value of that property by the appropriate ratio. Essentially, we scaled the window one foreground object at a time - but really fast! On a small window with few objects, the fact that all the widths were changed, then all the heights and so on was not noticeable. All fields appeared in their new size at the same time as far as the human eye could tell. Although using a larger window with more fields on a slower computer might yield a few redraw issues, we were pleased with the outcome. Here is a "before and after" of a simple window made larger:
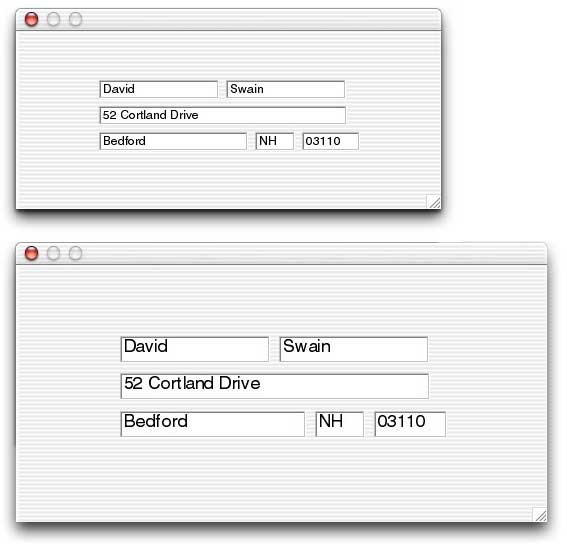
We could create a similar set of command lines to deal with the background objects. Furthermore, we could combine all of these messages into a single $sendall by simply combining them into a single expression using arithmetic or logical operators:
On evResized

    Do $cinst.$objs.$sendall($ref.$width.$assign(

           $cclass.$objs.[$ref.$ident].$width*$cinst.$width/baseWidth)|

        $ref.$height.$assign($cclass.$objs.[$ref.$ident].$height*$cinst.$height/baseHeight)|

        $ref.$left.$assign($cclass.$objs.[$ref.$ident].$left*$cinst.$width/baseWidth)|

        $ref.$top.$assign($cclass.$objs.[$ref.$ident].$top*$cinst.$height/baseHeight)|

        $ref.$fontsize.$assign(

           $cclass.$objs.[$ref.$ident].$fontsize*$cinst.$height/baseHeight))
Of course, this is a bit unreadable, but it executes just fine. It also has the advantage that all aspects of each field are modified before going to the next field.
If we only have Entry fields on our window, this solution needs no further enhancement. But what if we also have a Headed List Box on the window and we want its columns to be proportionally resized as well. This would be difficult to do with a $sendall method. The same goes for any number of other component types with specialized resizing requirements. To deal with such cases, we decided to let each object manage its own resizing with a $resize custom method.
Custom $resize Method
To encapsulate the unique resizing requirements of each field, we gave each one a custom method named $resize. This method contains all the commands needed to resize that one field. While a bit verbose (as many fields will contain the same command lines), this gives us more control over the process for each field. (We will still handle our background objects - Label and Text objects specifically - using the first technique, since they can't contain methods.) Furthermore, appropriate notation strings within these command lines can reflexively refer to the field that contains the method using $cfield.
We can then invoke the various $resize methods with a single $sendall message, sending the width and height ratios as parameters (so that arithmetic only has to be performed once for each object - which could be streamlined even more by using additional local variables for the ratios and calculating each value only once per resize):
On evResized

    Do $cinst.$objs.$sendall($ref.$resize($cinst.$width/baseWidth,$cinst.$height/baseHeight))
Each of our $resize methods would then require two parameters: widthRatio and heightRatio - which we would make of Number floating dp data type for greatest accuracy (even though the expressions in which they are used will be automatically rounded to the nearest integer value). The code for actually performing the resizing operation might look like this:
Calculate $cfield.$width as $cclass.$objs.[$cfield.$ident].$width*widthRatio

        Calculate $cfield.$height as $cclass.$objs.[$cfield.$ident].$height*heightRatio

        Calculate $cfield.$left as $cclass.$objs.[$cfield.$ident].$left*widthRatio

        Calculate $cfield.$top as $cclass.$objs.[$cfield.$ident].$top*heightRatio

        Calculate $cfield.$fontsize as $cclass.$objs.[$cfield.$ident].$fontsize*heightRatio
This code is entirely generic and applies equally well to any field that contains these five properties. We can then add to this additional lines for special properties of certain field types.
Once we have determined exactly how we want a specific type of field to resize itself, we can put its specialized $resize method into the default field of that type in the "design objects" collection for window objects in our Component Library. That way each new field of that type that we place on a window in the future will already contain this code! This is great for building new windows where we might require such a field-resizing feature, but what if we want to alter the technique slightly after building dozens of such windows? A little more planning might be in order...
Other Options
To minimize code redundancy and to make improvements easier to update, we can put this resizing code into a single location - an Object class. While we didn't get this far in the class, it's only fair that I tell you a little about using a Helper object to centralize this operation.
First, we could create an Object class and name it resizeObject. For now this class will contain only one method named $resize. We will fill in the code for this method shortly.
We will instantiate this class as an Object variable of Instance scope in our window. We will then name that variable fieldHelper. We could then invoke fieldHelper for each field object on the window in the window's $event method like this:
On evResized

    Do $cinst.$objs.$sendall(fieldHelper.$resize(

           $cinst.$width/baseWidth,$cinst.$height/baseHeight,$ref))
This is an excellent example of how the $sendall method sends a message for each member of the group on which it acts rather than to each member. Here the message is being sent to the fieldHelper object instance repeatedly to execute its $resize method for each window object. We pass it the width and height ratios resulting from the window resize and a reference to the current member of the group of objects on our window. The $resize method inside the resizeObject class contains three parameter variable definitions: widthRatio and heightRatio (of Number floating dp type) and targetObject (of Item reference type). We then use these in the code of our $resize method as follows:
Calculate targetObject.$width as $topwind.$class().$objs.[targetObject.$ident].$width*widthRatio

        Calculate targetObject.$height as $topwind.$class().$objs.[targetObject.$ident].$height*heightRatio

        Calculate targetObject.$left as $topwind.$class().$objs.[targetObject.$ident].$left*widthRatio

        Calculate targetObject.$top as $topwind.$class().$objs.[targetObject.$ident].$top*heightRatio

        Calculate targetObject.$fontsize as $topwind.$class().$objs.[targetObject.$ident].$fontsize*heightRatio

        Switch targetObject.$objtype

    Case kHeadedListBox

      ; Whaever additional is required for headed list
        boxes

        End switch
An OO purist might have added a fourth parameter and passed either a reference to the current window instance or a reference to its class instead of using $topwind.$class() here. However, my practical side says that only the top window is likely to be resized (since any window instance being manipulated in this manner is automatically brought to the top of the window stack), so $topwind is a valid choice.
Note that we can add a Switch...Case block to deal with the special needs of specific field types.
And In Conclusion...
I hope this has been of interest to you. While I don't believe this technique at all conforms to the interface standards of any platform, there will be times when clients desire a specific feature - and the client is always right...
Omnis® and Omnis Studio® are registered trademarks, and Omnis 7™ is a trademark of Omnis Software Ltd. Other products mentioned are trademarks or registered trademarks of their corporations. All rights reserved.


 Please logon or create a free account to download this file.
