Tech News Back Issues Issue: 062703
|
Introduction to the Omnis Web Client: Part 17, Ultra-thin client: Designing a web site By Dr Caroline Wilkins In the last newsletter, we looked at planning an HTML/ultra-thin client web site. Something that you might like to consider next is the design of the site. It is easy to separate the functional/programming aspects of a website from the design and thus employ a third party design agency to undertake design seperately. In previous newsletters we have worked with fairly plain looking html pages and templates. When working with an agency, hand them those templates and let them add whatever design they want, just making sure to integrate the webclient plugins and calls to ultra-thin interface remote tasks. Many programmers will want to undertake the design of their site themselves. Programmers design human interfaces as a matter of routine in their every day work, so they are often well placed to extend those skills to the design of the web site. There are a few things to consider when designing a GUI for the web: • download times Download timesAlthough many web users now have broadband, many do not. Unless you are serving an exclusively broadband market, then you must cater for your slowest users and design a site that will work on a 56K modem dial-up connection. This means that you should keep your graphics file sizes minimal and optimized and avoid using plug-ins whose download times are not justified in terms of the functionality they deliver. Whilst it is fine to use an Omnis webclient plug-in to deliver a software application to a browser, it isn't very sensible to use webclient, or Flash, to provide a navigation bar for example. Work on the principle that a user is unlikely to wait much more than 30 seconds for your web page to load. If they wont wait that long for an elevator, why would they wait for your web page? Try and get the entire contents of your web page (i.e. the html plus all graphics) down to 100KB. Many html generator software packages (e.g. Dreamweaver) will tell you what the download size and approx. time of a page is as you develop. This subject has enormous relevance to the much debated issue of where to leverage webclient technology. As a general rule, I would advise use of ultra-thin/html interface to Omnis for sites where the usage is casual and has a very large user base. If a visitor wants simple information quickly and is not likely to visit your site regularly, then don't ask them to download the webclient plug-in. On the other hand, if you want to present a more sophisticated interactive data service, then with a download at about 450KB, the Omnis webclient is an elegant way to provide that. Tip: To optimise the size of a graphics file, try creating it in various well-supported graphics formats and see which gives you the smaller file size. You will normally find that for complex images such as photographs, jpgs will be smaller than gifs. For computer-generated images that have areas of same-colour, gifs will often be smaller. Of course, you also have to make sure that the clarity of the image is acceptable at the resolution that it will be displayed. N.B. The gif format is the patented intellectual property of Compuserve Inc. You might like to consider instead the PNG & TIFF formats, which are widely supported on browsers. There is an interesting article on the legal debate surrounding use of the gif format at: http://cloanto.com/users/mcb/19950127giflzw.html Tip: For the sake of your sanity, you should name all your html pages, graphics and resources with lower case names. If you don't, you may find that resources which display on your windows development box will not be referenced correctly on your Linux webserver for example. This occurs because the Linux webserver is case sensitive with respect to URL resources whereas windows is not. It is a very common issue and is easily avoided by making it your working practice to keep everything in lower case. Browser CompatibilityWhen designing a site, you would be well advised to test your design on as many different browsers, versions and platforms as possible. At the bare minimum, install both IE and Netscape on your development machine and check that the design works for both. If you know the distribution of browser usage within your market, then be sure to accommodate them. This is possible to assess once your site is operational by inspecting the access log files generated by the webserver. Expectations of the UserAs the Internet has developed, certain conventions and commonly used
UI techniques have evolved. Users have come to expect certain things from
a web site. Unless you have a particular reason to challenge your users
expectations, you would be advised to conform to them. NavigationI would highly recommend use of constant navigation throughout a site. By that, I mean that you should have a navigation bar that appears in the same place, and ideally in the same colours and design, on every page in your site (e.g. www.omnis.net, www.rescuepet.org.uk, www.hwarena.com). This is your web site visitor's primary tool to explore your site and find the data he came to see. Most sites these days have constant primary navigation and users have grown to expect to see and use it. The primary navigation will normally be used to enable the user to navigate between the main sections of your site. For small websites, with only 1 layer of content beneath the home page, this will be sufficient. If you have sub sections within those sections and your site goes to 2 or 3 layers of content, then you will need secondary and even tertiary navigation. This should be fixed and constant within the section it applies to. It can get difficult to manage a couple of layers of navigation within sites with a lot of pages. If you are generating these pages within Omnis, you might do this more easily by creating a text file that contains the navigation html code, or build it dynamically from the database. Otherwise, you will have to change the navigation code on a bunch of pages if you decide to add a new page/sub-section. In addition to your navigation, you may also like to provide a page which displays a site plan, which can be accessed from any page in your site. This is less critical than constant primary navigation, but is a commonly adopted convention. Similarly, you might like to consider adding a search facility that enables users to search your site. (There are various tools which will help you do this on the web.) Whilst you can place your navigation wherever you like on the web page, users will expect to find it at the top or left of the site. If you put it on the right or bottom of the page, most of your english-speaking visitors will find it harder to locate and may not instantly identify it as primary navigation if there are other things on the page to distract them. That may be acceptable for some sites, but for a business site, it isn't ideal. The thing to remember is that web users tend to be in a hurry, are often only half-interested in what you are trying to communicate to them, are easily confused or distracted, often not very intelligent and won't hang around your site if they can't find what they want. You have to make it easy for them to access the information they want. Navigation systems are your solution to this. Colours and designWhen you visit some web sites, they just seem to scream 'amateur'. Sometimes the reason for this is obvious. The designer may have made a point of including every trick and tool in their html generator and so the site is dripping with javascripts, flash plug-ins and animated gifs. The secret to creating a professional looking website is restraint! Don't use things you don't need, particularly if they involve big download times. Similarly, choose your colour scheme with restraint. When a site doesn't have too many extra bells and whistles, but still looks amateurish, it is often due to over-use of colour. As a general rule, don't use more than 3 main colours within the design of a site, including the background colour. You can use shades within those colour choices, but more than 2 main colours above and beyond your background will confuse the eye and may make a site look amateurish. Approach the use of background images with extreme caution! Tiled and textured backgrounds rarely look professional on a site. You are much safer sticking to plain colours, although a subtle background 'watermark' image can sometimes be effective. The current trend for business sites is to adopt a predominantly white background. They are referred to as 'white sites'. The trend has reinforced an expectation in web users, so it is easier to project a professional business image with a white site in the current web climate. This may change with time of course. Whilst black sites can be attractive and effective, they are a lot harder to make look professional and tend to be more commonly used for personal or "alternative" sites. If you have a white site, you can more easily get away with a 3rd colour in addition to the background colour. This is a debatable issue of course...:) ConsistencyConsistency of design is vital to a professional looking website. Choose fonts, colours, text sizes and graphic style etc. and stick to it! If your web site has a different design scheme on each page, it will look like you were just experimenting when you built it. Of course, there are times when you might intentionally divide your site by applying different designs, but this should be a carefully considered strategy rather than an accidental one. Inconsistent design makes a site look unprofessional and this will reflect on the company and on the products or services that the site is designed to promote or deliver. Pop-ups, Flash intros etc...As a general guide, just don't use pop-ups. In the current web culture, pop-up windows (i.e. additional browser windows that open up when you visit a page) are considered an irritation to the user and are therefore not to be advised without a carefully considered reason. If you think your users will forgive you or you are very determined to highlight a piece of information, then go ahead, but you should balance the user alienation risks against the probable benefits. You should also beware of pop-ups that repeat every time a user returns to the page that spawned them. You can avoid this by using a cookie. An example is given here <see popups.zip attachment!> Flash intros are more contentious. Many designers consider them pointless obstructions between a user and the content of the web site. Other designers consider an introductory page to be an important way of 'setting the scene' and introducing a company or product. I would tend to take the middle ground if the latter is your intention, by creating a home page that achieves the effect of introducing the site without obstructing the user from accessing your navigation system. If you do decide to use a flash page, be sure to put a 'Skip intro' link that enables the user to go straight to your main home page without being forced to endure the intro film. Remember that your users are hopefully regular visitors to your site and what might look cool the first time will be a source of considerable annoyance by the 3rd! AccessibilityYou should consider that some of your web site visitors may be physically challenged. Visually impaired users often use software which goes through a website and reads out loud the text content and any ALT tags. For this reason, you should make good use of ALT tags and try and use text (e.g. for navigation) rather than images of text within the pages. This aspect of web design is often neglected and may contravene disability discrimination laws in some countries (e.g. UK). All the opinions expressed in this article are that of the author. Web design is a highly subjective matter. There are many different design philosophies and a lot of information about design is available on the web. The objective of this article was to offer some ideas and guidelines for designing a professional-looking business web site, where the author considers Omnis web technologies are most likely to be deployed. In the next technical newsletter, we will discuss web promotion and search engine submissions.
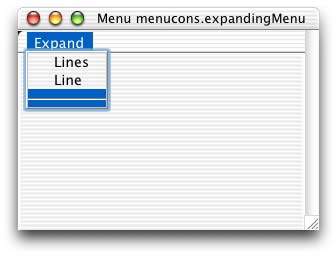
Installed Menus - Conserving Menu LinesBy David Swain In the last issue of Omnis Tech News we built a number of menu lines dynamically and then removed them from the menu instance when they were no longer needed. This scheme will work up to a point, but if it is done long enough to the same menu instance we will eventually run out of menu line ident numbers to assign to newly created lines - even if the number that can ever exist at any one time is very small. First we need to understand what limitations we face, then we need to devise a scheme of operation that avoids coming anywhere near that limit. If we are very certain of the limit, we could decide instead to work as usual until we are near the limit and then perform some sort of "reset" operation, but I prefer the more conservative approach. First, we need some raw data... Take It To The MaxLet's see if we can "max out" the menu line ident counter! (Nothing like a little destructive proof-testing to make the programming process feel more like engineering...) Be prepared for some fireworks! We simply need to create a method that adds and removes a menu item and put that into an infinite loop (or something close to it) to see how long it takes to break the application. Follow these steps to build our test menu:
Wow! That was exciting! Depending on the platform you use for running Omnis Studio, the program either summarily quit or gave an error message and then quit. The message on my machine (Mac OS X) says, "The application is short of memory. It is recommended that you do not continue. Continue?" in a No/Yes dialog. "No" is the correct response to this. Before the dialog appeared, the working message's repeat counter was registering some impressive-looking 4-digit numbers. This is the number of iterations of our loop, not the ident number of the menu line just created. Ident numbers are assigned sequentially beginning with number 1008. Since we have a total of three lines in the menu as designed, the first menu line dynamically created will have an ident number of 1011. We can fine-tune our experiment a bit by changing our Repeat loop to a For loop and introducing a local variable named count of Long integer data type:
I used a number of test values and then added a $event method for the "Line" line so I could "sneak up" on the overflow value one line at a time. Here is that method (a subset of the original):
I ultimately discovered that the magic maximum number of iterations (at least on my platform) is 7936. Since this same number was the maximum allowed number of iterations on both my desktop and laptop machines, I'm curious to know whether it is the same on all platforms. After a bit of factoring, this number reduces to "256x31" or 28x(25-1), which looks suspiciously deliberate, so my untested guess is that Windows, Linux and Mac Classic programmers should get the same result. This number also appears to be independent of the number of lines that are stored in the menu class, so I suppose that it isn't the $ident counter that we are testing after all. But whatever it is, the result is definitely repeatable - and I'd rather not have it repeat on my users in deployed applications! This means that if we feel the need to dynamically add and remove lines for a menu, we need to find a way to do this without actually adding and destroying menu line objects. A bit of menu line conservation is in order! Conservation StrategiesThere are a couple of ways we can do this. We could add new lines dynamically until we have as many as we want and then just reuse them, or we could just build as many as we will need in the first place and use only those the situation dictates. In the long run, though, we will end up with the same situation: We will have a set number of menu line objects for which we shuffle name and text property values in lieu of creating and destroying them as needed. My personal preference is to just pre-build all the empty menu lines I know I will need. This way I don't have to deal with the additional code that determines whether a new line must be created until the maximum number is reached. The additional unused lines don't show and don't take up much RAM, so the positives seem to outweigh the negative for this technique. Let's modify the example from the previous article to follow this more conservative approach. First we need to decide on our boundaries. For demonstration purposes, let's say we only want to track the topmost five window instances in our "Windows" menu. We always want the topmost window to be associated with the lowest line on the menu - the line with the highest order property value. In the simplest case, there are only three situations we must deal with: a window is opened and must be "added" to the menu (which may push an already open window off the other end), a window is closed and must be "removed" from the menu (which may require an open window that had been pushed off the end to be "re-placed" onto the menu), and a window that is already open is brought to the top and must be "re-positioned" within the menu (which may push another window off the menu if this window was not represented there). This gets a little involved, but is well worth the exercise. Problem RestatementTo review, we will still use the $name property of each menu line to hold the name of the corresponding window instance and the $text property to hold the title of the window instance. (If we were doing something more complex, we also have the $helptext property of each menu line at our disposal - as well as strategically placed comment lines in dynamically created methods if we get really desperate...) The $control method of the "Windows" menu is used to bring a window instance to the top. Last time we created public class methods in this menu for adding ($addname) and removing ($removename) menu lines called from the $construct and $destruct methods respectively of each window instance and we created a "master" window class from which all our windows are subclassed so we can more easily manage this code. These methods will need serious revamping for this new technique, but we will retain the same method names. Two new elements have been introduced: First, we now need to re-position reference to a window when it is brought to the top to the last "populated" line of our menu. We will manage this in the $event method of each window instance (through code inherited from the "master" window class) by invoking a new method in the menu named $wintotop. Second, we only allow a limited number of window instances to be represented on our menu, but we must still be able to "re-place" any window on the menu as circumstances require (that window is brought to the top or some window "above" it is removed). This may seem complicated, but this is a realistic example. The Core CodeThe windows of the application report each change in their own status to the "Windows" menu and the menu then reconfigures itself accordingly. The code on the window side is very simple. The $construct method of our "master" window class must include this method command:
The $destruct method in the "master" window class must include this method command:
The $event method in the "master" window class must include this block of code:
If any of these method is overridden in a specific subclassed window, that method must include the command:
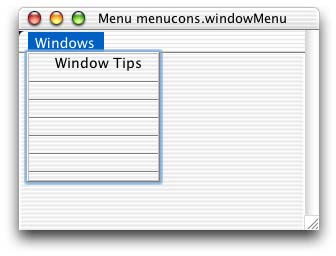
So far, this is all pretty easy. Now we have to build a little deeper. Menu ModificationsWe must make a few changes to the menu class named windowMenu we created last time. Back then we only included two menu lines in the class and added all others dynamically. Now we have decided to allow five additional menu lines and to include them in the menu class by default. It is very important to have a pristine menu class that has never had lines removed, since the code in this article relies upon the fact that the first line has a $ident property value of 1008 and all additional lines have $ident values that sequentially follow this one. Retaining the first two menu lines from last time (named windowTips and spacer1), add five more empty lines. Their names should be windowMenu_1010 through windowMenu_1014. If they are not, create a new menu named windowMenu (after renaming the existing one) and start over. Here is what the menu should look like in the Menu Class Editor:
Remember that trailing menu lines with empty text properties do not appear in the menu instance. To help manage the rotation of our menu line content, we will require a few instance variables we did not use last time. Here is a listing of the instance variables we will need:
We can set the initial values of maxLines and staticLineLimit to whatever our actual needs are. The algorithms in this exercise use these for additional flexibility. Beyond the assignment of default values in the variable definition, there is very little setup required for the "Windows" menu. We will assign an initial value to lastLineUsed in the $construct method of the menu as follows:
We set it to the same value as staticLineLimit because we have not added any dynamic lines up to this point. The $control method can also take advantage of the staticLineLimit variable. We will now make it read:
Other than the use of this variable, this method does not change from the version we created last time. This is the end of the simple changes, though. Thinking caps to the ready! Adding Window References To Existing Menu LinesThe $addname method must deal with only two possibilities: Either the menu still has an empty slot for a window reference or it does not. If there is an empty slot, we simply need to fill it with the information from the window instance whose (unique) name is passed as the parameter. As part of this process, we increment the pointer to the last used menu line, which is needed to help make this decision for the next window added or removed. If there is not an empty slot, then we must shift all the window reference information up one line (losing the information on one window in the process) and replace the information on the bottommost line with that for the current window. We also need to set a flag indicating that there are now window instances that are not represented on our menu. Here is the resulting code:
The number 1007 is used as the base reference for the $ident values of the menu lines we must address here. Omnis Studio notation only allows us to directly reference members of this group by name or ident value, not by order. We could make this more flexible by first building a list of menu line information (including ident values) using the $makelist method for the group of menu line objects and then using the fact that the resulting list lines are in $order order, but using a pristine menu where the menu lines are known to be in continuous sequential $ident order from a base number is ultimately less work. Removing Window References From Menu LinesRemoving a window from the menu has a larger matrix of possibilities. At first glance it might appear that only the window represented by the last populated menu line would be removed, since only the topmost window could have its close box clicked. But we don't want to make the assumption that this is the only means of closing a window, so we must consider all possibilities. There are two levels of possibility: First, either the window is represented on the menu or it is not. If it is not, then we don't have to remove anything from the menu itself as this window is closed (although we do have to test whether there are still unrepresented window instances by doing a quick $count() of the $iwindows group). But if the window is represented on the menu, we need to know whether or not there is an unrepresented window to take its place. This will determine how the remaining lines are reshuffled. If there are no unrepresented window instances, the information on lines after the one being removed must be rolled up, leaving an empty line at the bottom of the menu (which we rename with the default name Omnis Studio would have given it). If there is at least one unrepresented window instance remaining, the lines above the one being removed must be rolled down and the first line must be replaced with information about the next window in line. To determine whether the closing window is represented on the menu, we use the $findname method of the group of menu lines. This returns a notational reference to that line, which we catch using a local variable of Item reference type named itemToGo. From this we can determine whether the window is represented by checking that the $name property value is the same as the name parameter value used to locate the line. If this is so, we can also determine the line number that must be removed from the menu using the order property. To determine which way the information on the remaining lines must be shifted, we check the value of otherWindows. If this value is true, we need to build a quick list of the current window instances, using the $makelist method of the $iwindows group, so we can retrieve the $name and $title information for the next window instance down the stack to populate the appropriate menu line. Since the closure of the window whose name was passed has not yet been completed, it is still in this list and we must bear this in mind. The following code carries out all these options:
There is still one possibility left: What if an existing window instance is simply brought to the top? Reordering Window References On Menu LinesThere are two possibilities here too: either the window is already represented by a menu line or it is not. If it is, we roll all other lines up to fill in its position. If it is not, we roll all the menu lines up, losing the topmost one in the process. In either event, we place the information about this window on the last populated menu line. No instances were created or destroyed in this process, so none of our pointer values needs to change. See if you can follow this code with that explanation:
Admittedly, this method could have been consolidated a bit since the two conditional blocks are almost identical. We could have used a pick() function based on itemToGo.$name=name to determine the initial value for linePointer and reduced this to only one For loop, but I decided this form would read better. Next timeNext time we will begin to examine how menus installed on the embedded menu bar of a window instance differ from those installed on the main menu bar.
|
|||||||||||||||||||||||||||||||
| © 2002-2003 Copyright
of the text and images herein remains with the respective author. No part
of this newsletter may be reproduced, transmitted, stored in a retrieval
system or translated into any language in any form by any means without
the written permission of the author or Omnis Software. Omnis® and Omnis Studio® are registered trademarks, and Omnis 7™ is a trademark of Omnis Software Ltd. Other products mentioned are trademarks or registered trademarks of their corporations. All rights reserved. |
|||||||||||||||||||||||||||||||


 Please logon or create a free account to download this file.
