Tech News Back Issues Issue: 032603
|
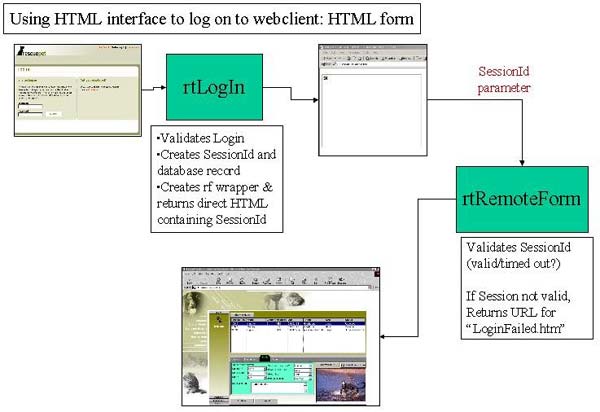
Introduction to the Omnis Web Client: Part 11, Log on to Webclient using HTML interface - Responding to user By Dr Caroline Wilkins In the previous newsletters, we have been developing an interface that enables a user to log on to a webclient application from an html form. We had got as far as receiving the username and password in a remote task called rtLogIn, had validated the username and password against a database and were ready to formulate a reply to the user in the event of a successful log on. We discussed a few possibilities for handling security and replying to the user. We are going to continue now, taking the approach that gives the best level of security: "Option 3: After validating the user, create a UserSession record with a unique and randomly generated SessionID and a timestamp. Then dynamically create a page of html, from a template, that contains a webclient application object with an additional parameter containing the Session ID. You can then place a method in the remote task that corresponds to the remote form containing your application, which validates the SessionID and either allows the remote form to construct or redirects the user to a 'DontTryAndHackMe.html' page....or the polite equivalent thereof....:) This method is easily the most secure and worth the additional effort if your data needs to be protected." You can download RPLogon2.zip which contains the code and database that we have created so far (libraries and datafiles may need to be converted in Omnis).
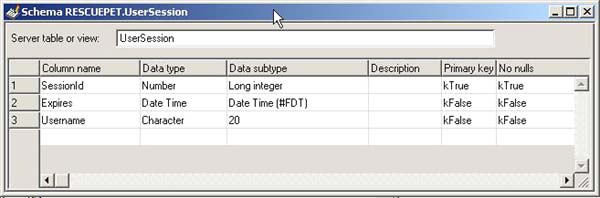
48. Create UserSession table 48.1 Add a method to rtLogIn called rfpage. The task of this method is
to handle the response to the user in the event of a successful login
in the $construct method.
48.3 Set Server table or view to 'UserSession' and set Primary key and No nulls to kTrue for the SessionId field
48.4 Now click on the UserSession schema in the library browser and drag
it over to the Table window of the SQL browser (You may have to open the
SQL browser and drill down to the Table window). The UserSession database
table should then be created. Double click on it and check that the structure
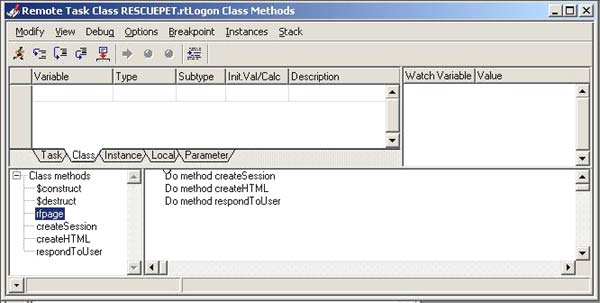
has been created. 49. Handling User In the method rfpage, we need to: create a session record with the user id in it, create a page of html containing the webclient plug-in, stream the html back to the user. In order to keep these 3 tasks neatly separated, create 3 new methods within rtLogon called createSession, createHTML and respondToUser. You can then call those three methods in turn from rfpage by putting these lines in rfpage: Do method createSession
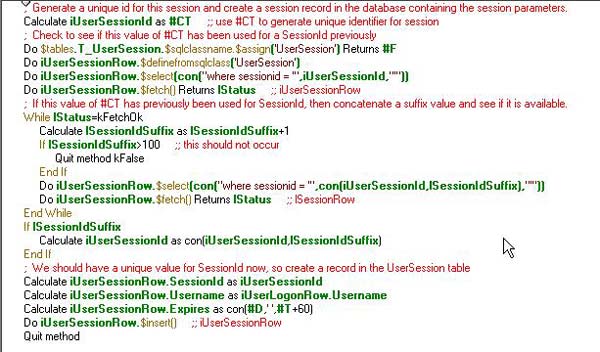
50. createSession method 50.1 We use #CT to generate a random number for our SessionId. #CT is the current tick count since the system was booted and is incremented 60 times per second. It isn't a truly random number, but it is sufficiently unpredictable for this application. It is unlikely that the same value of #CT will be assigned to more than one UserSession record, but we check for this in the method and increment the value for SessionId until it is unique in the database. Enter the following code into your createSession method: ; Generate a unique id for this session and create
a session record in the database containing the session parameters.
50.2 You should test your progress at this stage, if you haven't done so already. Open up your html log on form (You can download it from here if you need to: logon.html). Put a break point in the $construct method of rtLogon and step through the code. If you don't get as far as rtLogon, check that you have the Omnis serverport (Tools - Options) set to 5912 or whatever port you are using in the html source. Also check that the name of the library and the remote task in the html source matches your Omnis library and remote task, rtLogon. Once you are into debug mode in rtLogon and stepping through, verify that you have a record in the database to match the logon values of username and password that you are using to test with. You should then be able to step into the createSession method and follow through the process of creating a Session record for the user. In the next newsletter, we will continue with this technique, adding the code for methods createHTML and respondToUser. If all has gone to plan, you will have a library, database and logon.html page that look something like RPLogon3.zip (libraries and datafiles may need to be converted in Omnis).
style() FunctionBy David Swain In the last issue of Omnis Tech News, I briefly mentioned one of the uses of a very versatile function named "style()" for injecting an icon into a "Text" object in a report. It occurred to me that many people may not be familiar with some of the other useful features of this function, so here is a more complete explanation. As usual, let's begin with the basics... Escapes Back in the ancient days of dot matrix and Daisy-wheel printers, we needed to inject "escape sequences" into the text stream we sent to the printer in order to switch on or off certain printer features (e.g., bold or slant character sets, superscript and subscript character positions, etc.). The original "escape sequences" were intended for switching from one character set to another in a printer or for performing certain operations on character-based terminal displays, but the door was purposely (and thankfully!) left wide open for future expansion. The concept of an "escape sequence" has generally escaped the consciousness of most of the computer-using public as word processing (and other) software has evolved to hide the nuisance of the mechanics of this from us in our day-to-day work. But we programmers must still deal with them on occasion - and the deeper our "level" of programming, the more we encounter them because escapes are the basis for many of the things we call upon computers to do for us today. The engineers who created Omnis Studio included these "text escapes" for us to meet special needs. From a practical point of view, an "escape sequence" is a string of characters that is not visible in our output but that switches on or off some feature of something. (How's that for a general statement?) Each sequence begins and ends with an "announcer" that is recognized as such by the computer (software) that reads the string. In HTML, for example, the "<" and ">" characters are the announcers of an HTML tag, which is essentially an escape sequence. Between the beginning and ending "announcer" (which can be one or many characters) is the "control sequence" or "value" of the escape sequence. It tells the computer what to do in the "escape mode". All the text that follows an escape sequence is influenced or manipulated by it in some way until another escape sequence is encountered. Often the "end" of the text stream or the line resets whatever the escape sequence influenced back to its default setting. A carriage return or similar character in a long text string can have this effect within a string containing a preceding escape sequence. While we don't directly control printers and such with the style() function, we are in some sense controlling how Omnis Studio draws character strings to the screen. Bear in mind that this is a "display" feature and has nothing to do with the actual value being displayed. Omnis Studio recognizes the output of this function as a command to change some display aspect of the string of characters in which it is embedded. Let's examine how the style() function is set up and what return value it generates. Escaping With style() The style() function requires two parameters. The first is a "text escape" constant (or its numeric equivalent), the other is a value appropriate for the value given in the first position. The syntax is:
The return value of the style() function is an "escape string" that is recognized by certain GUI components in Omnis Studio. Understand that this is only valid within Omnis Studio. The escape string is neither valid nor useful for export in character strings because its meaning is proprietary to Omnis Studio. Storing it is not a good idea either since not all field types (for example, entry fields) can interpret and properly act upon the escape sequence. There are currently six valid and supported values for the first parameter - and there is a "Text Escape" constant for each one. Here is a list of them. The list includes the numeric equivalent for each constant and an indication of what should be used for the second parameter within the function when that constant is used as the first parameter.
As we can see from this table, the interpretation of the second parameter of the style() function depends on the value of the first parameter. We will examine how to use this information later in this article. The return value of the style() function is an 11-character string that is the escape sequence generated from the parameter values. Omnis Studio interprets this differently for each Text Escape Constant, but the principle is the same. For example, style(kEscColor,kWhite) yields an 11-character string equivalent to chr(27,1,56,48,48,48,48,48,50,68,35). Let's break this down and see what these characters mean. The first two characters are the "escape code". This is the actual "ESC" character (ASCII 27) combined with an ASCII character number indicating what kind of "escape" this is. This ASCII character number is the same as the numeric equivalent of the Text Escape Constant used as the first parameter value of the function. Omnis Studio then interprets the remainder of the escape sequence in this light. The following eight characters are the ASCII characters that make up a hexadecimal string that provides a "value" for the escape sequence. (This is where your "Secret Captain Omnis Decoder Ring" comes in handy!) In the example given above, these eight characters evaluate to a 4-byte hexadecimal string "80 00 00 2D". The first byte, "80" apparently means that the value was derived from a color constant of some sort. There are two groups of color constants defined in Omnis Studio: the "Colors" group and the "System Colors" group. A table with these constants and the values they yield through the style() function is given below. For all but the "transparent" color, only the rightmost byte of the remaining 3 bytes has a non-zero value. If the rgb() function had been used to specify a color as the second parameter in the style() function (like rgb(255,255,255) for "white"), the eight "value" characters again act as four hexadecimal bytes. The first byte is "00" which indicates that a hexadecimal color value (as opposed to a color constant) follows and the other three bytes are the R, G and B values we would expect. So if we had specified "white" using style(kEscColor,rgb(255,255,255)), the "value" portion of the return value would be equivalent to chr(48,48,70,70,70,70,70,70), which translates to a hex value of "00 FF FF FF". In other words, we can specify any color in 24-bit color space using the style() function as well as using the more limited (but often more appropriate) sets of color constants. Here are the values generated by the color constants:
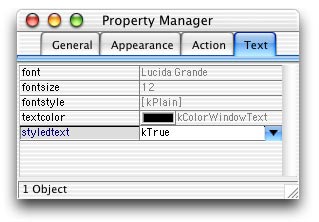
The eleventh and final character in the string generated by the style() function is chr(35) or the "#" character. This is the "announcer" that indicates the end of the escape sequence. Escape Locations We can't just use the style() function anywhere we choose within Omnis Studio. There are many places where it is not recognized or accepted, a few places where it is always accepted, and certain others where we must switch on the ability to have it be properly recognized and used. We just have to learn where the "hot spots" are that do recognize it and the appropriate ways to use it in each of those. Here are the component objects that always support style() (also known as styled text):
And here are the component objects that conditionally support style(). This means they have a property (usually named styledtext) that must be set to a value of "kTrue" in order to use styled text: Window components:
Report components:
In the examples in the rest of this article, we will assume that this property has been switched on and that styled text is in force in the demonstration fields. Notice that no component on a Remote Form, Menu or Toolbar supports styled text. Perhaps that will come later... Escape Technique To properly use the return value of the style() function, we must inject it into some string. Except in the case of simply displaying an icon, the escape sequence generated by the style() function must act upon the subsequent characters in that string to display any effect. For Text objects on a window or report, the function must be put into square brackets (so it can be evaluated). For all other components, the style() function must be included in the calculation property value, usually through use of the con() function. Combobox fields are a special problem. The list portion of the field supports styled text, but the entry portion does not. This means that if we select a line from the included list, the "escape sequence" string appears along with the value (and that value may include multiple columns as described later). We need to include code in the fields $event method to react to an evClick event and place just the proper value from the selected list line into the associated string variable. If the field represents a variable named "string" and includes a list named "list" with a column named "column1", the $event method might look something like this:
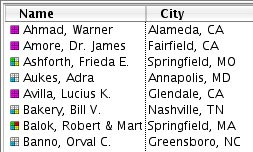
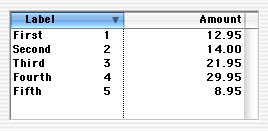
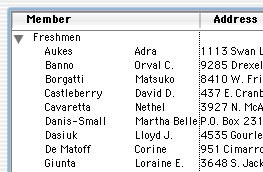
Rather than give more specific examples right here, let's examine each type of escape sequence (bitmap, color, textstyle and tab) and see how they each can be used. Bitmap Escape In the last issue of Omnis Tech News, I used the kEscBmp constant in a style() function in a Text object on a report using square bracket notation. This was used to generate an icon for display in the report. I determined that for my purposes there were more flexible ways of doing this, but that was only because the icon was to stand by itself. If I need an icon to be included within a string of text in a report, this is the only way to accomplish that. Text objects on a window have a built-in facility for injecting a "bitmap" text escape, so it is not necessary to use the style() function within square brackets in such an object for this purpose (although it still works fine). But this facility is not included in a Text object in a report for some reason... In past articles, I have also used the style() function for including an icon in various kinds of list display field. There are many reasons why we might want to do this, but there are two primary reasons: We might want to give a visual cue as to the identity or type of the record represented by that line (the basic reason for using icons for anything) or we might want to use an icon to indicate some state of that line. For the "identification icon" case, suppose we have a "membership tracking" application with five types of membership. We have created icons for each type and have a 16x16 pixel version of each one. (This is the icon size we need work well with normal font sizes in lists.) Assuming that we have included the variable (memberFile.memberType) that contains the membership type information in the definition of our list, we can use the following expression segment in the calculation property of our list field to display the appropriate icon for each line:
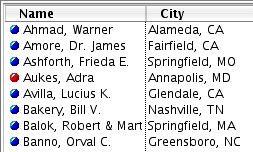
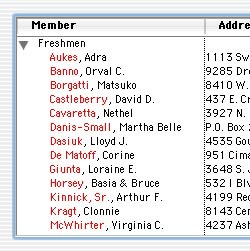
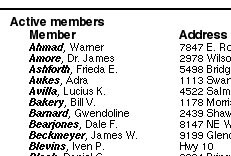
The expression is evaluated separately for each line of the list. As long as the variables used in the expression are in the definition of this list, the calculation is entirely dependent on the contents of each line. As with the report icons in the previous article, we need a conditional statement for specifying which icon to display on each line. In this case, it was easiest and most efficient to use simple arithmetic, taking advantage of the fact that our icon IDs have a linear relationship to the number used to store member type information. Unless we always craft our own icons for such purposes, we may not always have this luxury. Perhaps instead of a "member type" icon in the example above, we want a "state indicator" on each line of the list that tells us who is "active" and who is "inactive". We have chosen the "blue dot" icon (ID 1756) to indicate "active" members and the "red dot" icon (ID 1758) to indicate "inactive" members. Now perhaps we could still work out a mathematical relationship between these two and derive the icon ID needed for display on each line that way, but it's much easier in this case to use the pick() function, like this:
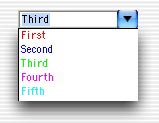
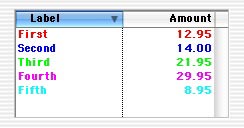
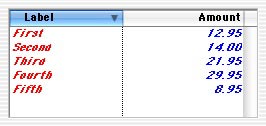
This way our inactive members stand out in the directory listing (displayed here in a Headed List Box). The style() function icon results properly use transparency, system colors and other icon features, but do not let us substitute a "background" color for the transparent color as we could with the calculated picture field we explored in the last issue. Icons retrieved by the style() function can be included in any of the field types mentioned above, but unless we use a very large font size, we should stick with using 16x16 pixel icons for most of these field types. Color Escape There can be many times when we need to assign a different color to certain parts of the text displayed by a component object on a window or report. This is especially true with the lines displayed in a list. Some list display fields (for example, data grids) have column properties that allow us to specify color on a column-by-column basis (for all lines), but List Boxes, Dropdown Lists and Headed List Boxes don't directly have this facility. Sometimes we need even more control than this - like specifying text color for an individual cell, or even just a portion of the text in a cell. Or we may not be concerned about an individual cell or a column, but would like to specify text color on a line-by-line basis. For such purposes as these, we need an escape sequence (and a field that supports styled text). Each escape sequence applies to all the text that follows it on that line, unless another escape sequence in the same line modifies the same text attributes. If we want to apply a "color escape" to a specific column, we must use the style() function before the column content part of the calculation expression and then use another one after that content (unless the color should continue to the end of that line). To color an entire line a single color (based in this example on line number), we simply place a style() function that sets up a color escape at the beginning of the expression:
Each line begins a new color. (Of course, we would make the selection of color more meaningful in a real application.) If we only want the second column so colored, we place a style() function just before the text run to which we wish to apply the color:
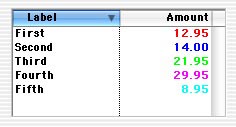
Notice that the color resets to the default color at the beginning of the line. This means that Omnis Studio treats each line as a separate text run. There and Back Again If we want to color only the first column, we must apply the color with one style() subexpression and reset the color (to kBlack in this case) in a subsequent subexpression:
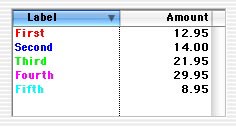
So if the non-default color we wish to switch on for a portion of the text on a line is not to extend to the end of that line, we must switch it off again before the text run to which it doesn't apply. This principle can be applied to portions of the text within a column as well as to that column as a whole. Consider a Tree List that displays people's names in "<lastname>, <firstname>" format. Suppose we want to highlight the last name part by turning it red, but leave the rest of the text in the default color (black). We would use the style() function twice when formatting our content - once to switch on the exception color and once to switch back to the default color. When applying styled text to a Tree List, we must include the escape sequences directly in the content we send to the Tree List field. There is no calculation property for a Tree List field. The code where we prepare our "transfer list" is where we must use the style() function. Here is how we might execute the example in the preceding paragraph:
The Tree List interprets the escape sequences included in the transferred content internally. While the escape sequence is not part of the data, it is part of the content we must provide to the Tree List field. Textstyle Escape As with text color in the preceding section, text style is another text characteristic that we may wish to use on a character-by-character basis. For example, in a column of a Report Data Grid column that shows people's names in "<lastname>, <firstname>" format, we may wish to highlight the last name by making it bold and italic. We just switch on the text formatting characteristics before the last name entry in the calculation property for that column and then set it back to "plain" text directly after the last name entry, like this:
When using text escapes, we can assign multiple, or composite, styles simultaneously by summing the style constants. Each style constant actually represents a bit within a "style byte". If we add them each possible combination yields a unique number that is used to set the style combination. But it's easier to understand by looking at the binary values where a "1" in a certain bit position means the style is switched "on" and a "0" means it is switched "off". This table may help:
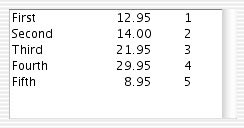
So adding kBold and kItalic yielded a value of "3" which is "00000011" in binary. Just a small warning when using styled text in a Report Data Grid: It is best to use a Fixed size column rather than an Autosized column. The Autosizing seems to make room for the length of the escape sequences as well as the text that is actually displayed. Since these can be quite long (especially when using multiple style() functions within the calculation property), an Autosized column can become very wide. Tab Escapes I saved the best until last intentionally. This seemingly innocent and entirely overlooked group of escape codes allows us to do a number of things that Omnis mythology says can't be done. I have to admit that I have been a source of some of this mythology in the past, so I have taken great delight in more recent times in disspelling some commonly-held beliefs and in spreading the word (in this case) about the new-found freedoms the "tab escapes" offer us! The primary myth we are about to eliminate from the Omnis Studio pantheon is that List Boxes and Dropdown Lists can only show properly aligned columns when using monospaced fonts. Using the style() function with "tab escapes" eliminates the need for the jst() function (at least for columnization purposes) and allows us to define a multi-column display for use with any font in these field types! Here is what the "text escapes" do for us: They allow us to specify tab positions, expressed in pixels, within the field display area. We use one of the "tab escape" constants as the first parameter of our style() function and then a number specifying the tab position as the second parameter. Consider this example: In a List Box field, we want to display three columns of values. The variable "column1" is a Character variable, "column2" is a Short number 2dp and "idno" is a Short integer (we have very few lines in this example). Traditionally, we would have used an expression like this to format the list: jst(column1,12,column2,'-8N2',idno,-6) But to get these columns to properly line up, we would have to use a monospaced font, like Courier, which may not suit our design taste. Notice how we also had to make sure that the number in the second column displays the proper number of decimal places. But now we can use the style() function like this:
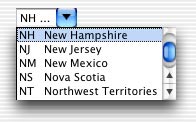
This gives us properly aligned columns using any font and still offers the commonly used column justification options (left, center and right). Since the con() function retains the proper number of decimal places for the source number in a number string (which the jst() function does not), we don't have to concern ourselves with this. While a Headed List Box offers us more features (a header that scrolls horizontally with the column, column resizing, header clicks, etc.), columns in a List Box, Dropdown List or Combobox list can still be useful. For example, in a Dropdown List for selecting a coded value like a State/Province Code, we could display both the code and the full name for each entry:
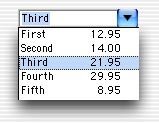
The same is true for the list part of a Combobox field. Again, we have to be careful about not allowing the entire string from the list line to be entered into the fields associated variable, but we can show other columns of information in the droplist part of the field if this might be helpful. For example, we might include a price with a product code as shown here:
I can hear you now saying, "Oh boy! Finally we can specify column justification for our Headed List fields at design time using this!" Sorry to disappoint you (I really am!), but this is not the case. A Headed List Box field still requires a "real" Tab character, not a text escape, to signal a column break - and we can still only set column-specific alignment at runtime using the $setcolumnalign() method. But what this use of the style() function offers us is the ability to have columnar formatting within a column in a Headed List Box! This also applies to Tree List fields. Suppose we want to accentuate the value I've been displaying in this Headed List Box with the corresponding ID number for that record, but still have that be part of the first column. It is more readable if I create a little "sub-column" for that number:
If I had specified a pixel position greater than the visible space available in that column, the values would simply be placed underneath the second column. The user could reveal them by dragging the column divider, thereby adjusting the size of the first column. We can perform similar feats in a Tree List field. Suppose we felt that names would be more readable in our Tree List if they were divided into columns. We can adjust the content in our transfer list to contain a tab escape to separate first name from last and have both parts of the name in their own "columns":
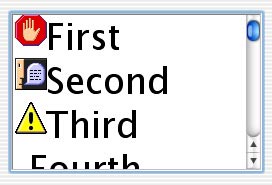
I'm certain that you can come up with further uses for this... Escape Escapees You may have noticed that there are a couple of missing Text Escape Constant numeric equivalent values in the first table of this article. I did a little experimentation with the missing escape values 6 and 7 and found some interesting results. Since no constants have been declared for these values, I'm sure they are unsupported at the very least - but we have to investigate such an inviting gap... My first guess (read: wish) was that these represented superscripting and subscripting. I have been yearning for such a facility since first working with Omnis many long years ago, since I have a need to represent chemical formulae and mathematical expressions in some of my own work. I was disappointed in this regard as these missing escapes have nothing to do with such features - but it was only a wishful guess, after all. It turns out that the results of my investigation were at least interesting. For example, escape code "6" appears to have three valid second parameter values: "0", "1" and "2". These return three standard "alert" icons on my Macintosh OSX system, when invoked as shown in the the following example:
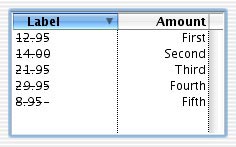
I had to bump up the font size in this list to show the entire icon, otherwise each one is truncated by the height of the list line. While of dubious practicality in a list display field, using this undocumented parameter value for the style() function in a Text object on a window is one way of generating any of these icons for custom dialog windows. A font size of 28 was sufficient to show the entire icon when this was tested in a Text object. The escape code "7" also exhibited some interesting behavior. When used to preface the content of a column in a Headed List Box, it appears to allow us to specify into which column that content is placed. It further allows us to overwrite the contents of one column with the contents of another, offering some intriguing possibilities. The second parameter appears to be interpreted as the column number, with columns being numbered from zero. In the following example, I use the same list and column definitions as in many earlier examples: "column1" is a Character column and "column2" is a Short number 2dp column. Notice what happens when the following expression is assigned as the value of the calculation property:
The values from "column1" now appear in the second column of the Headed List Box field, even though they were placed first in the calculation expression. Also notice that both the values from "column2" and the string of hyphens appear in the first column, one overlaying the other. Just so you know, the $construct method of this field contains a method line that sets the alignment of the second column to right justified. This was neither created by nor disturbed by the use of style(7,x). The contents are aligned according to the alignment of the columns into which they are placed by the function. I did not have time to explore the use of "0" or numbers greater than "8" for the first parameter of the style() function, but I doubt that much value would come from such an attempt. Combining Escapes Of course, there will be times when we need to apply more than one escape sequence to a run of text. This is the "tough luck" part of this article. While it might occasionally be nice to be able to combine our text escapes within a single function (like formatting options in the jst() function), this can't be done. This is not to say that we can't combine text escapes - we just have to use a separate style() function for each one. Each use of the style() function takes two - and only two - parameters. It does not accept pairs of parameters like the jst() function does. But there is no limit to the number of times we can use this function in the same expression. There is certainly some overhead for each use of the style() function. The function itself is tokenized to just three bytes (chr(125,0,159)), however many of the constants we use have much more complex tokens. The "textstyle" constants have been in the Omnis family for a long time and have only 2-byte tokens. For example, kBold tokenizes to chr(251,161). But many of the "modern" constants, including the "text escape" constants themselves, require seven bytes. For example, kEscColor tokenizes to chr(127,0,0,0,123,1,189). We can reduce this load for the "text escape" constants by using their numeric equivalent values instead (at the cost of reduced "readability" of the code, of course), which require only one byte in their tokenized form. But the numeric equivalents of the color constants are even longer than their tokens because those 10-digit negative numbers are kept intact when tokenized within this function (eleven bytes total with the negation element)! Ah well, that's what we learn sometimes when we poke around too deeply... So to switch on a red text color and bold style, we must use:
These escape sequences do not "nest" inside one another. So in the example just given, we can switch the color to kBlue and not affect the text style in force.
The possibilities are endless... Conclusion I hope you find at least some of the informatin in this article to be useful. (Then again, I guess you've read it this far...) I apologize that I did not have time or resources to test all this on other platforms, but I'm sure that most of it will behave at least similarly on all platforms Omnis Studio supports.
|
||||||||||||||||||||||||||||||||||||||||||||||||||||||||||||||||||||||||||||||||||||||||||||||||||||||||||||||||||||||||||||||||||||||||||||||||||||||||||||||||||||||
| © 2002-2003 Copyright
of the text and images herein remains with the respective author. No part
of this newsletter may be reproduced, transmitted, stored in a retrieval
system or translated into any language in any form by any means without
the written permission of the author or Omnis Software. Omnis® and Omnis Studio® are registered trademarks, and Omnis 7™ is a trademark of Omnis Software Ltd. Other products mentioned are trademarks or registered trademarks of their corporations. All rights reserved. |
||||||||||||||||||||||||||||||||||||||||||||||||||||||||||||||||||||||||||||||||||||||||||||||||||||||||||||||||||||||||||||||||||||||||||||||||||||||||||||||||||||||


 Please logon or create a free account to download this file.
