Tech News Back Issues Issue: 091003
|
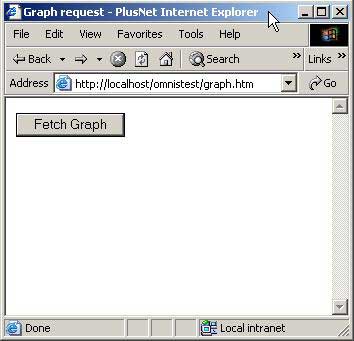
Introduction to the Omnis Web Client: Part 19, Graphs and the HTML interface By Dr Caroline Wilkins During my session at the recent OzOmnis conference, someone asked me whether it was possible to incorporate Omnis graphs into an HTML/ultra-thin interface. It occured to me that this question may be of interest to others and therefor an ideal topic for the technical newletter. In short, yes it is possible. Just as you can take snapshots of a graph object to include in a webclient application, you can save those snapshots to image files and either return just a JPG of the graph or reference the image files in the html page you return to a user. Let's take a look at an example of creating a graph from some sample data, creating a graph using the Omnis graph component and then returning a JPEG snapshot of that graph to the user as a web resource... You can download this demo library, demo database and the graph.htm page required for this tutorial from here: htmlgraphs.zip (libraries may need to be converted in Omnis). 1. Create a new library and a basic html interface <HTML> <form method="GET" action="http://localhost/scripts/Omnisapi.dll"> </BODY> If you have chosen the path suggested above, you should be able to test this file by opening your browser and selecting http://localhost/omnistest/graph.htm This should give you a start page with just a button to click that will call the remote task rtGraph. No additional data is conveyed to the remote task at this stage of development, but it could easily be done so by adding additional hidden parameters or form input elements. This would enable you to build a graph with more user interaction. We may return to that idea in a later tutorial. 2. Testing the graph request interface So thus far, we have given the user a way of opening a dialogue with our Omnis application. We are now ready to create a graph to send back to the user. We start by adding a database from which to assemble graph data... 3. Database Set current session {HTMLgraphs} Obviously, you will have to change the path to the df1 file above if you have placed it somewhere else. 3.3. Close and reopen the library to ensure that the library opens a
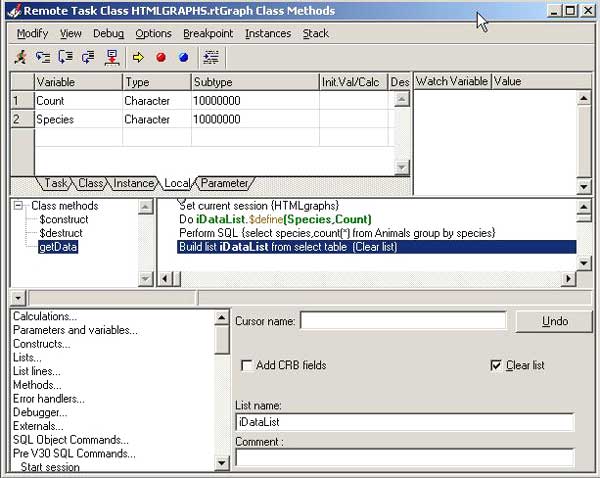
session to the database correctly. If you run a SQL query in the Interactive Sql Browser, you will see I have entered a few animals into that table, along with data about their species (very loosely typed!) and the month of their registration and adoption. That gives us some data to play with for the purposes of graphing. 4. Get data method Set current session {HTMLgraphs}
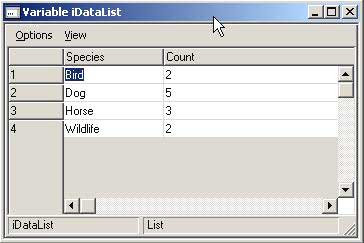
4.5. Add a line to the $construct method of rtGraph to call this method: Do method getData Returns iDataList You can now test this by clicking the button on the graph.htm page, stepping through rtGraph and into the getData method. You should find that, when you have stepped past the "Build list" line, iDataList contains a 4 line List (right click on iDataList and select "Variable iDataList" to view contents).
Now that we have a List of data to graph, we can move into the actual graphing part. 5. Build Graph method
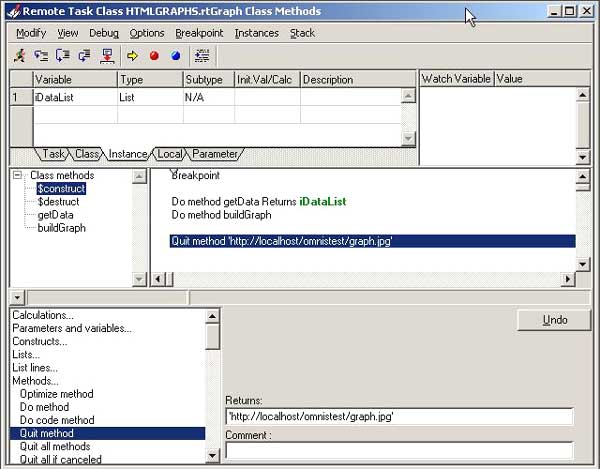
5.3. Add the following code to the buildGraph method: Calculate graphObj.$columnheadings as Calculate graphObj.$depthmode as kGRdepth3D Calculate mBackground as graphObj.$getobject("$background",0,0) Calculate mGraph as graphObj.$snapshot(480,300) Do pictconvto("CS24",mGraph,"JPEG")
Returns mJPG Again, you may wish to use a directory other than C:\Inetpub\wwwroot\omnistest\graph.jpg to save the graph image that is created. Nevertheless, you should choose a localhost location if you want to simulate a website environment. You will also have to make sure that the path you return to the user for the URL of the graph that is created matches the location you have chosen to write to. Note the last 4 lines in the buildGraph method. The graph object snapshot produced in the previous line creates an image of Omnis Picture format in the variable mGraph. This needs to be converted to a graphical format for use on a web page, so we use the "pictconvto" function to change the image to JPEG format. This is written to disk within the localhost directory structure where it can be served as a web resource. 6. Finishing off the $construct methods Breakpoint Do method getData Returns iDataList Quit method 'http://localhost/omnistest/graph.jpg'
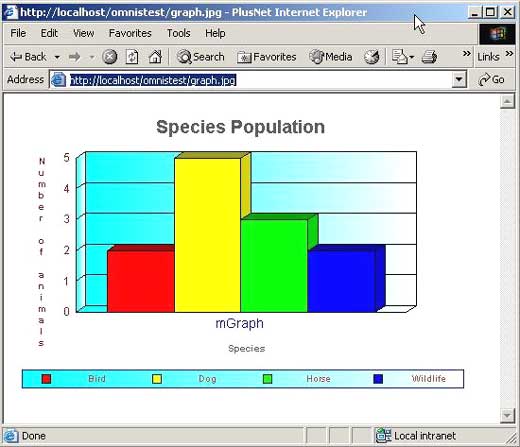
You should now be able to test the whole interface and find that clicking the button on http://localhost/omnistest/graph.htm causes a graph to be drawn, using data from the sample database, and is returned to your web browser (http://localhost/omnistest/graph.jpg). It should look something like this:
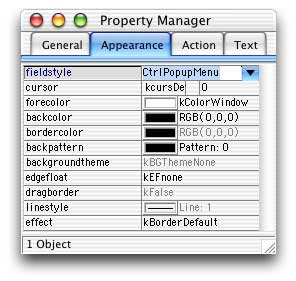
Popup Menu FieldsBy David Swain In previous issues of Omnis Tech News, we have explored two ways to instantiate a menu class. There are still a few others. In this issue we will examine the consequences of deploying a menu using a Popup menu field on a window.
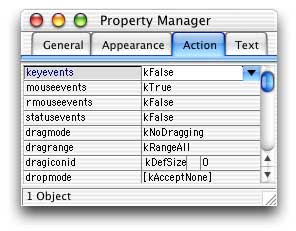
Popup Menu Field Basics The Popup menu field is one of two window field types that are designed to contain an instance of a class — in this case, a menu instance. The other is the Subwindow field, which will be detailed in some future article. (We could also stretch this concept and include the Screen Report Field window object as well, but it is much more than just a container...) The important thing to understand with either of these field types is that the field itself has properties and methods completely separate from the properties, variables and methods of the instance that it contains. A common mistake I see Omnis developers make is confusing the Popup menu field with the menu instance it represents (similar to the concern I have for people who confuse an entry field with its associated variable or a list display field with its associated list variable), so I want to stress this here. The field and its associated menu instance are not the same. The field has its own properties (like Appearance and Text properties) and methods (up to 501 of them, including a $event method!) and the instance has its own properties (name, title, class type, etc.) and methods (up to 501 at the class level and the same potential number for each line). The primary purpose for using a Popup menu field on a window is to give the user access to the command lines of the menu instance - to expose a menu with a mouse click on a field. But there will be times when the properties or methods of the field itself also come into play.
There are also some runtime properties we will examine and use later. A Popup menu field has a built-in $redraw method. As with any other field, this can be overridden if necessary. A Popup menu field can also have a $event method like any other field. This is completely separate from the $event methods of the menu lines in the menu instance contained by the field and it can respond to a wider range of event types. Since the field is used to expose the menu within it, events involving the field are trapped before those of any menu lines of that menu. In its simplest uses, the Popup menu field type is no bother at all and much of this concern for detail doesn't matter. But when using a Popup menu field in more creative ways, there are some additional things we must understand to get it to work as we would like. The Menu Class We don't really do anything different in preparing a menu class for the simplest of uses with a Popup menu field than we do in preparing one for use as an embedded menu. I am assuming here that the point of putting a menu in a field of a window is that it performs actions for that window, among which might be invoking public methods of that window instance. If this is the case, then the $event methods of the menu lines will generally be quite short and will point to the public methods of the window instance that houses the Popup menu field by using "$cwind" or possibly "$topwind" (since the window must be the topmost to receive a click on the field in the first place!). In any case, a reference to an item belonging to the window on which the Popup menu field resides from within the menu instance should be addressed through $cwind because $cinst refers to the menu instance and not to the window in that environment.
Menus placed in Popup menu fields on a window act almost like menus embedded in that window instance's menu bar. One difference is in how the shortcut keys of the placed menu are activated... Shortcut Key Priority Shortcut keys for the lines of a menu deployed in a Popup menu field take precedence over those of either embedded menus or installed menus - but only if the Popup menu field has been "popped up" (or "dropped" as the case may be). At least on the platforms I've tested (and with the library's canfocusbuttons property value set to kFocus for good measure), this requires clicking the Popup menu field with the mouse - so there isn't much point in using a shortcut key here. (I have not tested this on Windows platforms or in version 3.3.x.) If the menu instance in a Popup menu field is not exposed, shortcut keystrokes seem only to apply to embedded and installed menus. Trouble In Paradise This scheme works just fine for simple placements of a Popup menu field on a window instance. But what if the Popup menu is intended as a component of a subwindow that carries its own encapsulated functionality to the master windows on which it is placed? If the methods the lines of our menu must invoke reside within the subwindow, then we have a bit of a problem! If we use "$cinst" to point to an item, the menu instance itself is specified. If we use "$cwind", the main window (the one that contains the subwindow) is specified. There is no simple notational solution to this problem in the current version of Omnis Studio (I'm using version 3.2.1 here).But a little planning is all that is needed - planning that underscores the need to understand the difference between the field and the instance it contains. Our job is to get all these elements (fields and the instances embedded within them) talking amongst themselves in a meaningful and productive way - so the first thing we must do is to introduce them to each other. In order for our menu to be able to point to the window instance within which its Popup menu field directly resides, we have to "teach" it the "name" of that window instance. This requires a cooperative effort between the Popup menu field and the menu instance inside it. Also, the menu class must be specifically written for this use (as you will see). The Instance in the Field Most of us are born into a pre-existing world. There are resources available to us as soon as we emerge. The menu instance that exists in a Popup menu field is born first and then its world is built around it. When a window is instantiated, it is "built from the inside out". The window class is used as a guide in this construction so that everything is done in the proper order, but the instance itself is created one field at a time in order order within each container, with the innermost level of contained fields leading the way. In the case of fields that contain instances (Subwindow and Popup menu fields), the instance to be contained by the field is created first. So as far as the "creation history" of a Popup menu field is concerned, the menu instance is created, then the Popup menu field is constructed "around" it, and finally the window instance is constructed and drawn to the screen (after any additional containers within the window are constructed). This process also indicates the order in which the $construct methods of these elements execute. The reason this is important to know is that our menu instance can't know about its surroundings on construction because the surroundings don't yet exist. On the other hand, it might be too much to ask the main window instance to manage all of the items inside it in its own $construct method. Perhaps we can build our menu class and the Popup menu field that goes with it in such a way that they can explore their environment together as the need arises. Messages can be sent to the menu instance from elsewhere within the window because the Popup menu field has a runtime property named $menuinst that points to the menu instance. Resolving this reference (following it with parentheses) gives us direct access to the menu instance. The menu instance itself doesn't know where it is. But we can give it an instance variable of Item reference type where a reference to the window that directly contains the associated Popup menu field can be kept. If we can manage to somehow populate this variable with a valid notational reference, the menu instance can then invoke public methods of that window instance even if it is used as a subwindow. To do this, we need the help of the Popup menu field. (We can also do a similar thing to inform the menu instance of the Popup menu field itself, in case that menu instance needs to execute some method of the field.) The Field Containing the Instance Every field has a runtime property named $container that points to the object that contains it. A Popup menu field is no exception. This property contains just the value we need to populate the instance variable in our menu mentioned in the previous section. The only problems we have to solve are when and how to pass that information to the menu instance. Let's first consider the "When?" issue. We already know that we can't pass this value during the field's $construct method because the container instance doesn't exist yet. On the other hand, we don't need it from the very beginning. We only need to have the value by the time the menu instance needs to execute one of its lines. We could perform a "just in time" update of that value by trapping the On evMousedown event of the Popup menu field, which is the precursor of a menu line selection for its associated menu instance. This is done in the $event method of the Popup menu field. It also requires that mouseevents be switched on for the Popup menu field if the property is not already switched on for the entire library. Now we just need a "How?". The usual way to pass a value to an instance variable from outside that instance is through a parameter of an "accessor" method. Let's build a little experiment to demonstrate all of this. Subwindow Experiment Just to recap, we are going to create a window containing a subwindow which in turn contains a Popup menu field. We want the menu instance inside the Popup menu field to be able to invoke public methods of either the main window or the subwindow. What we have to do is to tell the menu instance when the mouse is first held down onto the Popup menu field what the Popup menu field's container is. This notational path will then reside in an instance variable in the menu instance that other methods can use to access items within that (sub)window instance. Here we go:
Now open a test instance of the main window and test the use of the menu instance in the Popup menu field. Notice that the menu instance now iknows how to specify methods in either the main window or the subwindow within which the Popup menu field resides. Who's Your Daddy? We had to "teach" the menu instance what its "parent" container is so it can properly communicate with it. The trick is to populate containerRef with the proper Item reference value. To do this, we passed the proper reference (known to the Popup menu field, but not the menu instance inside it) to the public $getcontainer method of the menu instance through a Field reference parameter named pContainerRef. Since we did this on the mousedown event, the value is available to any method the user might select from the menu by the time that method executes. Ideally it would have been nice to send this reference to the $construct method of the menu instance, but the order of construction makes that impractical. So we're stuck having to send this reference each time the user mouses down on the Popup menu field. Not To Be Confused With... Just so you are aware, there are other uses of the phrase "Popup menu" in Omnis Studio. There is a method command named Popup menu as well as a related command named Popup menu from list. These operate in an entirely different way from the Popup menu field described in this article and we will deal with them next time.
|
|||||||||
| © 2002-2003 Copyright
of the text and images herein remains with the respective author. No part
of this newsletter may be reproduced, transmitted, stored in a retrieval
system or translated into any language in any form by any means without
the written permission of the author or Omnis Software. Omnis® and Omnis Studio® are registered trademarks, and Omnis 7™ is a trademark of Omnis Software Ltd. Other products mentioned are trademarks or registered trademarks of their corporations. All rights reserved. |
|||||||||


 Please logon or create a free account to download this file.
