Omnis Technical Note TNSQ0008
Connecting to "Sybase Adaptive Server Anywhere 9"
For Omnis Studio
by Gary Ashford
Due to its publication date, this technote contains information which may no longer be accurate or applicable on one or more of the platforms it refers to. Please refer to the index page which may contain updated information.
To connect to a Sybase ASA Server from Omnis, the procedure is similar to that used to connect to an Adaptive Server Enterprise (ASE) server. The example below assumes that a connection is to be made to the SQL Anywhere Studio Developer Edition which- at time of publishing is available for download from Sybase's website.
After installing ASA developer edition, run the Network Server Sample which- following initialisation, will accept TCP/IP connections on port 2638 by default. The two most common ways of connecting to Sybase are:
1. Using the Sybase DAM.
To connect using the Sybase DAM, you need to have Sybase clientware installed
on the client machine. Edit your interfaces file (either using a text
editor or the dsEdit utility if available) and add the following entry:
asademo
master tcp ether xxx.xxx.xxx.xxx 2638
query tcp ether xxx.xxx.xxx.xxx 2638
where xxx.xxx.xxx.xxx represents the IP address of the ASA server. If
the server is running locally, you can use the word localhost
in place of the IP address.
It is important to note that the name chosen for the connection matches
the name of a database running on the ASA server, otherwise you will receive
an error -83:"Specified database not found" when attempting to connect.
If using dsEdit, you can also "ping" the server to test that the connection
details are correct.
From the Omnis SQL Browser, you should then be able to connect to the
server. The default username and password for the ASA sample are "dba"
and "sql" respectively. Specify "asademo"
as the hostname and leave the database field blank.
2. Using the ODBC DAM.
Windows Client - using ASA Win32
ODBC Driver
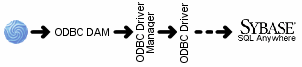
We recommend use of the Adaptive Server Anywhere 9.0 Win32
ODBC driver where possible as this is supplied with the server.
When creating a User or System DSN using this driver, the Server name
and Database name fields (Under the Database tab) should match
those at the server. For the ASA Sample, these are "asademo9"
and "asademo" respectively. Under the Network
tab, specify TCP/IP as the network protocol and enter
the connection string as follows:
HOST=xxx.xxx.xxx.xxx;PORT=2638
where xxx.xxx.xxx.xxx is the IP address where the ASA server is running.
All other settings can be left at their default values.
Mac OS X Client - using Openlink Multi-tier Driver
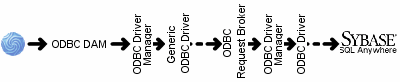
In this scenario, you are attempting to connect to an ASA server running
on a remote machine. The Openlink mult-tier driver acts as a bridge to
a Windows machine where the Win32 Sybase ASA driver is used to complete
the conenction.
If connecting from a Mac using the Openlink multi-tier driver, set the
driver up to use the DSN named at the request broker, remembering to specify
"Odbc" as the Domain type.
The Openlink ODBC Administrator allows you to test the DSN and you should
be able to connect using the default username and password of "dba"
and "sql" respectively.
Once this is successful, you should then be able to log on from Omnis
via the ODBC DAM; specifying the newly created DSN as the hostname. The
default username and password are as above.
Mac OS X Client - local connection using "dbodbc9_r.bundle"
In this scenario, your database and client application are both running
locally. You can use the ODBC driver supplied with the ASA installation
located in the lib32 folder named "dbodbc9_r.bundle".
If using the "dbodbc9_r.bundle" ODBC driver supplied with SQLAnywhere
9, you should use the ODBC Administrator supplied with OS X, add the ODBC
driver, then add your User or System DSN as follows:
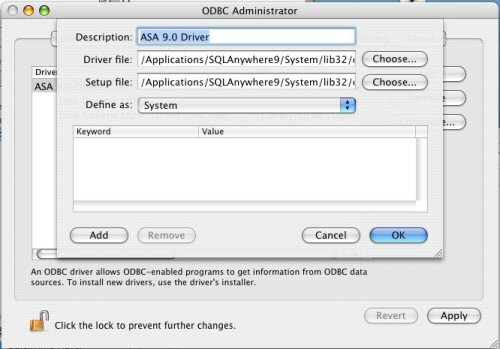
1. Add the Sybase ASA ODBC Driver
From the ODBC Administrator, select the Drivers tab, then select Add.
In the dialogue which appears, enter a description for the driver. For
the Driver file and Setup file, you should Choose the dbodbc9_r.bundle
file located in /Applications/SQLAnywhere9/System/lib32 by default.
Press OK followed by Apply to complete
setup of the driver.
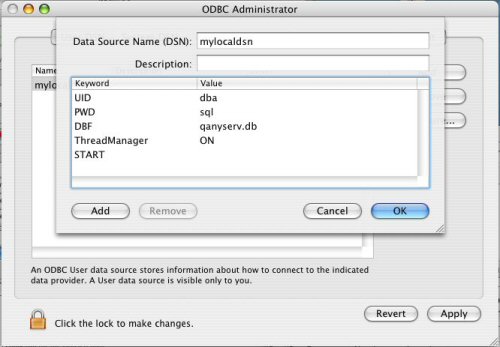
2. Add a User DSN
From the "User DSN" tab, select Add. Choose a name for
the DSN and enter an optional description.
Manually add the keyword value pairs as shown and press OK
followed by Apply to complete the setup of the DSN. From
Omnis, you can then logon via the ODBC DAM, specifying the DSN name as
the hostname. Username and Password will be optional if entered below.
Special Note: If using the ODBC Administrator supplied with Mac OS X, you may need to download a replacement xodbc.bundle . This is necessary if using Omnis Studio 4.x because the default xodbc.bundle looks for the Openlink iODBC framework when loading. The replacement bundle was built directly against the Mac OS X native ODBC Administrator library (libiodbc.2.dylib).


 Please logon or create a free account to download this file.
