Tech News Back Issues Issue: 012203
|
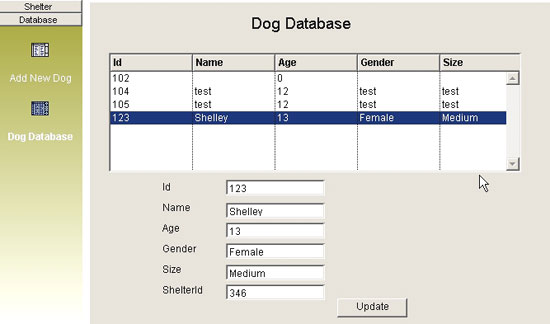
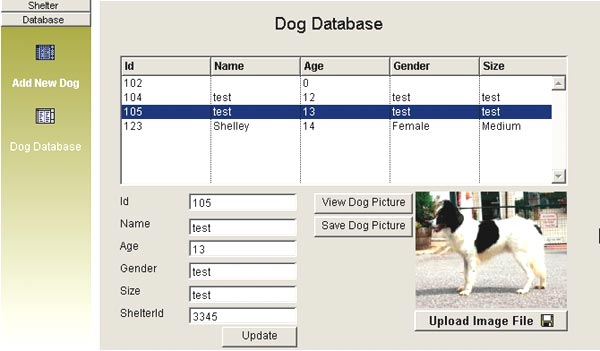
Introduction to the Omnis Web Client: Part 8, Updating table data and changing images By Dr Caroline Wilkins In the previous newsletters, we created an Omnis library, an Omnis database, programmed a startup task that will open a session to that database and created a schema in the library to represent a table in the database. We built a web client application that consists of a Sidebar controlling the pagenumber of a PagedPane component that enables a user to enter records into a table from a remote form. We added a facility to upload JPEG images to the web server using the remote form. We then rationalized the number of instance variables by using the iRow.Field technique and cut out some unnecessary code. Last time, we added a feature on the remote form application which displays data from a table in a Heading List and responds to user clicks of the Heading List by displaying row data in single line edit boxes. In this newsletter, we will develop this further to perform updates of table data, and the viewing and changing of associated image files. If you want to skip the stages in the previous newsletters, you can download the zip file RPView.zip containing RescuePet.lbs and RescuePet.df1 (libraries & datafiles may need to be converted in Omnis). The numbering in the this issue follows on directly from the last issue. Make sure that you either put your library and datafile in c:\RescuePet\ directory or change the path to the datafile in the Startup_Task $construct method: Set hostname {C:\RescuePet\RescuePet.df1} 34. Update button 34.1 Add a new button to page 3 of your paged pane. On evClick This will make Omnis locate the table record with data contained in iViewDogRowOld and replace that row with the data contained in iViewDogRow. Recall that you previously added code behind the headed list that assigned the selected row of the List into the iViewDogRow and iViewDogRowOld row variables. (The iViewDogRowOld variable was put there as a point of reference for the update method we are adding now.) The user will have been able to edit the contents of iViewDogRow since we have assigned datanames of the form iViewDogRow.Field to the fields on the form.
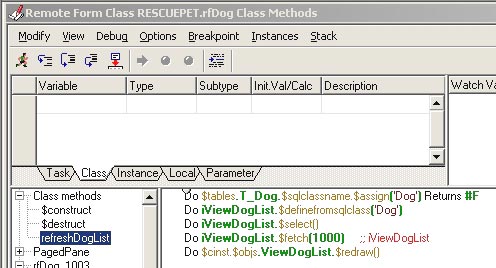
It is in this update method that we see one of the major benefits of using the iRow.Field approach to dataname allocation. If we had stuck to the idea of using separate instance variables for each field on the form, we would have to issue a series of Calculate commands in order to push the user data into the row we are trying to update. This is much more efficient. 35. Refresh table data 35.1 If you test the application at this stage, you will find that the database is actually updated with any changes you make to a particular record, but it doesn't show on the remote form until you click on the 'Dog Database' icon on the Sidebar. This is obviously not very satisfactory. Looking at the code behind the Sidebar, you will see that the following code is executed when user selects icon 3: Do $tables.T_Dog.$sqlclassname.$assign('Dog')
Returns #F We are going to need to call on this routine in order to perform a refresh of the headed list data. It would not be very good design to just copy and paste (although it would work). Instead, we should create a new Class method called refreshDogList. 35.2 Right click on Class methods in your method editor
and select 'Insert New Method'. Name it 'refreshDogList'
35.4 Edit the code behind the update button you added in the previous section of this tutorial so that you have the following behind the Update button: On evClick 35.5 Save changes to remote form by closing it in design mode. Then open and test! The headed list should be refreshed with the updates you have made to data. 36. Tidying up 36.1 Return to the code behind the Sidebar and replace the block you have just copied into refreshDogList with the line: Do method refreshDogList This means that both the Sidebar and the Update button are calling on the same method to refresh the headed list. If you need to make any changes later on, it will just have to be done in one place. This sort of approach to organizing the code that you need in multiple places will streamline your application considerably and make it much easier to navigate, debug and enhance. Its value will become more obvious as your application grows in complexity.
36.2 Now that you have pushed the code that requires
database interaction into its own method, you should now be able to set
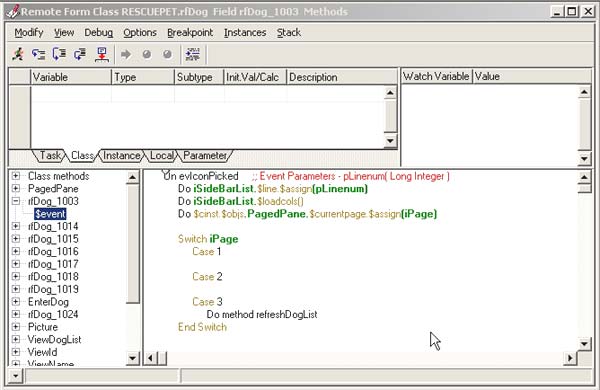
the method behind the Sidebar to client side execution. Right click on
it and select "Execute on Web Client". The $event method should then turn
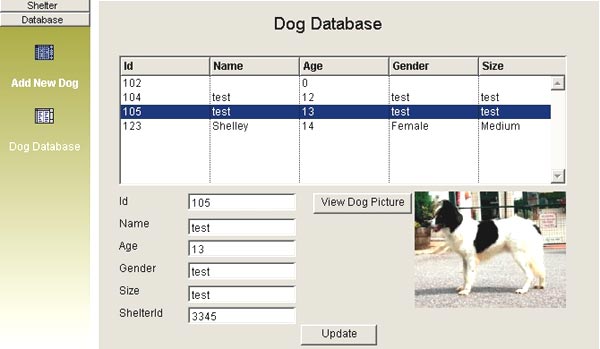
pink. 37. View Image for row 37.1 Add a Picture component to page 3, the Dog Database,
page of the paged pane. On evClick 37.8 Save your remote form by closing it. Reopen and test the form. You should now find that if you click the 'View Dog Picture' button after selecting a row from the list, the corresponding JPG image is displayed. If this is not happening, first check that you do have images uploaded to the 'C:\InetPub\wwwroot\rescuepet\images' directory. If you need images to test with, please feel free to visit http://www.rescuepet.org.uk and download some! If necessary, place a breakpoint behind the 'View Dog Picture' button and step through the method. Establish whether the method is locating a valid image file and loading it into the iViewImage variable.
38. Change Image for row 38.1 Go to page 2 of your paged pane. Select the formfile
component that you are using there to upload image files. Ctrl-C to copy
it. Go to page 3 and paste it in. You may of course, put a fresh new formfile
component on page 3, but this will be faster. On evFileRead ;; a file has been
read on the server 38.5 If you test now, you should find you are able to
switch the image over for one from your hard disk. We need to be able
to actually save this though, so.... On evClick You should now be able to change the image associated
with a particular dog record in the database.
If all has gone to plan, you should have a library that looks something like RPUpdate.zip (libraries & datafiles may need to be converted in Omnis) and a new feature on the remote form application which performs updates of table data and the viewing and changing of associated image files.
Item Reference and Field Reference ParametersBy David Swain A few weeks ago we received a request from a reader for an explanation of when we should use a Field reference parameter as opposed to an Item reference parameter in a method. Actually, these two are usually quite different, but it's easy to see how this might be confusing. First, a little background: Parameter Metaphysics A successful parameter pass is a partnership arrangement between the calling (sending) and called (receiving) parameters. The receiving parameter is a variable and it determines how the parameter pass is to take place based on its data type. So it is "in the driver's seat", so to speak, in determining how the parameter offered by the calling method is to be used in the called method. But the calling method has an equal responsibility to present the parameter being passed in the proper form expected by the receiving parameter. There are two ways we can pass a parameter to a method: by value and by reference. In fact, this is how the parameter is received, so the calling method has no control over this aspect of the pass. We might better say that parameters are either "received by value" or "received by reference". The use of the word "reference" is a likely source of some of the problem in understanding here because we have a type of value in Omnis Studio that is called Item "reference". The sending parameter still has some responsibility in the process, though. In setting up the sending parameter, we must understand how the receiving parameter intends to receive what the sending parameter intends to send and then we must "package" the sending parameter appropriately. Perhaps we should think in terms of a parameter being sent as expressed in the calling method and received as defined in the receiving method. We would then focus on how we define the parameter variable in the receiving method and how we express the parameter in the sending method. "Normal" Data Types Including Item Reference Parameter variables have the same data type options as other variables plus one special "data type" reserved for parameters alone. A parameter defined using a "normal" data type (one available to any other variable) will receive the parameter passed to it by value. That is, the act of passing the parameter works in essentially the same way as the Calculate command acts on its target variable (for most data types). The expression in the sending parameter is evaluated and the result is put into the receiving parameter variable. Omnis Studio is very flexible in what it allows to be passed in this way. It does not have strict data typing and so can set a value of any data type based on a value of any other data type without generating an error — although the resulting value might be "empty" in some cases and this may cause errors further down the trail. To avoid unintentional and potentially hazardous "empty" values being received, we must take care in the way we express our sending parameters. An Item reference parameter variable is just like any other "normal" parameter. The value it receives must be a valid notational reference to an item or it will be "empty" (or at least unuseable). While the passing of a non-valid notational reference will not generate an error, any attempt to use that parameter variable in the called method as the target of a Calculate command will result in an "Attempt to assign to an unset item reference" error. More on why the concern about the Calculate command a bit later... Field Reference "Data Type" If the parameter variable in the called method is given the special Field reference data type, the parameter in the calling location must be a variable. In the broadest sense of the term, this can include a notational path to a property of some object, but only value-holding notational items can be used in this manner. So notation strings that point to objects or object groups will not trigger an error, but cannot be operated upon through the Field reference parameter variable. Only a variable can be passed to a Field reference parameter variable. If we try to use an expression as the sending parameter, an "Attempt to assign a calculation to a field reference parameter" error will be generated when the receiving parameter variable is instantiated. This includes attempts to send the name of a variable as a string (using the nam() function or enclosing the variable name in quotes). When a variable is passed by reference, the parameter variable in the called method acts as an alias or an avatar for the variable passed from the calling method. That is, any action performed on the parameter variable is actually performed on the original variable from the calling method. Why would we do this? Tradition has it that when passing a parameter by reference, no significant RAM allocation is required by the parameter variable — even if it represents a variable with a very large value (like a long list). The parameter variable is simply a conduit to the real variable containing the value. I have not delved deeply enough into this to prove to myself conclusively that this is so, but switching to passing large lists to reports by reference rather than by value has cleared up more than one "out of memory" error in the past, so I suspect that this is true. Another effect of passing parameters by reference is that it allows us to bypass the rules of "scope" and directly affect the value of an "out-of-scope" variable. For this reason, Object Orientation true believers sometimes find passing variables by reference to be distasteful because it "violates" certain OO rules regarding access to items in another object (but most of them do it anyway for practical reasons). Passing by reference pre-dates object oriented thinking, but is no less viable because it is "old". The feature is a part of Omnis Studio and it offers us the ability to affect the values of as many variables as we need in a calling method from a called method. On to the comparison... References to Variables Now to confuse what I just explained above by being very precise in describing a special case! We can achieve what appears to be the same effect as "passing by reference" by passing a reference to a variable to an Item reference parameter variable. (Yes, I checked that sentence for syntactical correctness a few times...) Let me demonstrate this: Suppose we have a Character variable named "variable" (scope does not matter here, except that this variable must be "in scope" for the calling method) and we have a parameter variable of Field reference type named "pVariable" in a method named "$subroutine". The method "$subroutine" contains this one line:
If we execute the following command line from a calling method, variable will be populated with the string 'Howdy':
If we now change the data type of "pVariable" to Item reference, we only have to change our calling command line to the following to achieve the same result:
Rather than acting like the Calculate command, passing a parameter value to an Item reference parameter variable acts more like the Set reference command. We must make sure that the value being passed is a valid notational reference. We can then use the parameter variable in "$subroutine" in exactly the same way as when it was a Field reference parameter. The Calculate command does not affect the value of an Item reference variable, but affects the item to which that value resolves (which must be a "value-carrying" item like a variable or a property). So what is the advantage of one technique over another? Not much. In either case the parameter variable "pVariable" in "$subroutine" is just standing in for the actual variable and scope is being bypassed. The biggest difference is in how Omnis Studio handles the parameter value on the calling side. The direct use of "variable" as the sent parameter requires only a 2 byte token (trust me on this for now...) while "variable.$ref" requires 10 bytes and a little more interpretation time. Curious about how I can speak with certainty about the number of bytes in a token? Make sure you read the next article to see how we can explore this aspect of Omnis Studio!
|
|
| © 2002-2003 Copyright
of the text and images herein remains with the respective author. No part
of this newsletter may be reproduced, transmitted, stored in a retrieval
system or translated into any language in any form by any means without
the written permission of the author or Omnis Software. Omnis® and Omnis Studio® are registered trademarks, and Omnis 7™ is a trademark of Omnis Software Ltd. Other products mentioned are trademarks or registered trademarks of their corporations. All rights reserved. |


 Please logon or create a free account to download this file.
