Tech News Back Issues Issue: 012508
Content Tips For Entry FieldsBy David Swain Newness is in the air! It's a new year and we recently received a new major dot release of Omnis Studio, so it seems only fitting that we begin examining the new features that arrived with this release. Of course, we also received the official "What's New in Studio 4.3" document, but there is often a lot more to discuss beyond the basic descriptions and quick examples we find there. And not all new features find their way into those pages... One new item that escaped the official "What's New" documentation is the $contenttip property for an Entry field on a Window class. This is a very useful feature to have in an application. In fact, I have demonstrated techniques for emulating what this feature provides in my Omnis classes going way back to the early days of Omnis 3 Plus (not Studio). So I was delighted to come across it as I examined my new copy of Omnis Studio 4.3! What Is The "Need Case" For This Feature?Basically, this property is used to provide a string that will be displayed by default in the field when there is no value held in the fields associated variable. That is, if there is no content to display in the field, the value of $contenttip is displayed instead as a kind of "embedded prompt". As soon as the first character is typed into the field during data entry, it fully replaces the content tip text. If the field is emptied of content by any means (removing that content with the backspace key during data entry, deleting the value of the associated variable and redrawing the field or just displaying an empty value from a new row), the value from $contenttip comes back into view. The content tip is displayed in greyed text - which is always the same color of grey even if the field is assigned a non-black text color. There is no programming involved on our part to achieve this beyond providing a value for the $contenttip property. So how is this useful? It's a matter of style, really - but it helps us to provide a cleaner interface for the user by internally labeling entry fields with no content so that we don't have to clutter a window with labels for each and every field. As an example, consider the basic address block we might place in many applications... (My apologies to non-US readers that I am using the US address format for examples in this article. I am certainly aware that addresses, and the component parts of them, vary from one country to another. In fact, I created a rather extensive module - code-named PenPal - that dynamically repositions the fields of an address block - as well as providing postal code and telephone number formats and currency symbols - based on the country chosen for the address on window, remote form and report classes. Currently 235 country formats are supported, although the Unicode version of Omnis Studio is required for using many of the currency symbols.) In the ancient days of "green screen" applications, we needed to label each entry field so that the user would know what content is expected where on the screen. There were no fonts or sizes or data entry control objects we could use to distinguish these labels from the data displayed on the screen - just a monitor with 80 character positions across and 21 lines of text display:
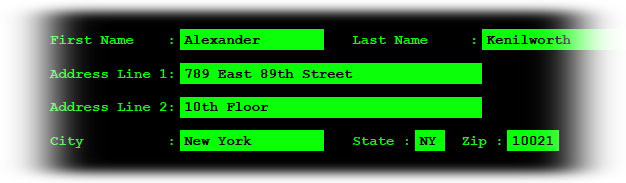
Various features were used to try to differentiate the labels from the text as these features became available in the evolution of monitors and the software that allows our computers to control them. For text-only raster font displays, bold text or inverse color (black characters on a green field) were used for this purpose. Later, when "color monitors" were introduced, different colors were used to distinguish field labels from data. These techniques were sometimes a bit hard on the eyes, though:
Variations of these practices often carried over into early GUI applications. Inversed text blocks led to boxes drawn to delimit data entry fields - and those boxes later gained options for making them appear to have a depth dimension. Today we often see address blocks that look like this:
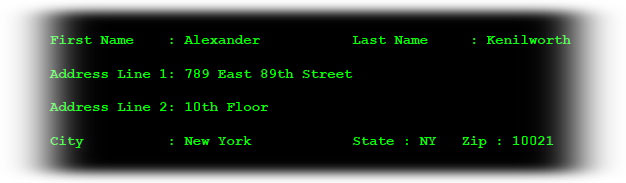
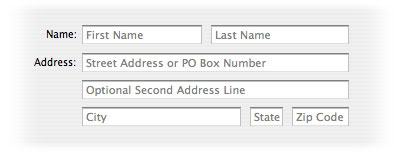
The practice of labeling every field was fine for data entry purposes because it helped the user understand what content should be typed into each field when all the entry fields are empty, but when a completed record is simply displayed on such a window, interspersed labels can make the information a bit difficult to read (even with the visual devices I've mentioned) because all those labels can still get in the way:
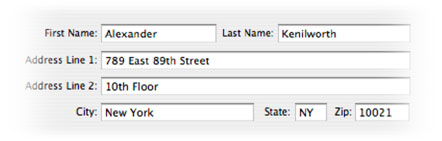
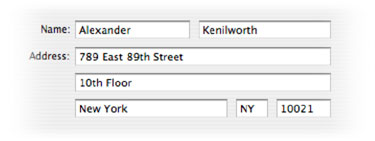
Especially for data like an address block that have a commonly recognized layout, we can easily determine the meaning of each fields content in context even if¬Ãwe eliminate most of the labels:
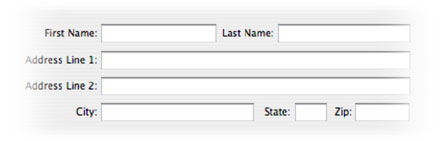
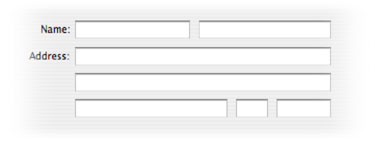
But when the data is cleared from these fields in preparation for data entry of a new record, it is a bit more difficult to determine what values should be entered into which fields:
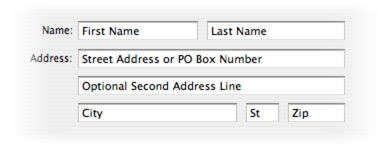
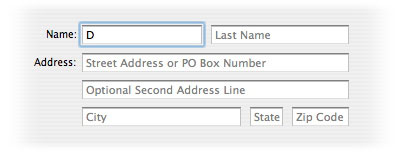
We can fulfill our desire for a cleaner window design by eliminating many of those field labels and replacing them with "internal labels" that appear during data entry to specify what should be entered into various fields. Some basic labels are still useful, but the bulk of the label clutter can be removed to both save space on the window and enhance its readability:
The early techniques for doing this required a little work, but took advantage of the fact that if the user tabs into a field that already contains text, that text will be automatically selected and the first data entry keystroke into that field will replace all that selected text. Briefly, we would supply default values for the variables represented by the Entry fields at the beginning of the data entry cycle and then empty those variables that still contained their default values after the user indicated that data entry was finished (by clicking OK or Cancel) before storing the completed record to disk. Simple enough, but there were still some issues to overcome if the user did not act as expected. And there is another issue with this technique: The value we provide for display in a given field must conform to the data type of the associated variable for that field. This immediately disallows us from putting descriptive text into fields used to display the value of a numeric or a date-time variable. It also disallows us from providing a description longer than the maximum length of a character variable. For example, we could not display the word "State" in the field used for entering the State code, which is limited to 2 characters (again, a US-centric example). Still, the technique has worked well for most character Entry fields. Further enhancements to the event handling features of more recent versions of Omnis allow us to solve most of these problems, but there remains a cost in executing the event handling code. Some developers chose to use tooltips to provide some on-demand help that somewhat parallels internal labeling, but that requires the user to grab the mouse and move it over a field to see that fields tooltip. The introduction of the $contenttip property for an Entry field in Omnis Studio 4.3, separate from the $tooltip property, greatly simplifies the process of internally labeling Entry fields! (For the nostalgia buffs who have been using Omnis for decades - and who still own the references cited here - I first wrote about this in my earliest Omnis book, Unlocking Omnis 3 Plus, published back in 1986. In the original wire spiral-bound volume, the description can be found at the top of page 126. In the plastic comb bound Version 3.3 expanded revision published a couple of years later, the principle is both explained and illustrated on page 130.) Basic OperationThe use of the $contenttip property is really too simple. (Seriously - we could use a few options, but I'll discuss those in a bit...) All we have to do is supply the text we would like to appear in a field when its associated variable is empty and that text is exactly what we will see in that situation. Furthermore, that text is greyed to distinguish it from an actual variable value (as long as we don't use a grey text color for the field itself...). And the content tip text doesn't even have to be selected to be replaced. So an empty address block would look like this with the proper content tips installed:
As soon as a character is typed into a field, the typed character replaces the content tip in that field:
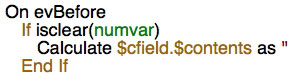
If the user removes the entered value from a field using the backspace key (or by some other means), the content tip automatically returns even though the focus has not left the field. This would require some pretty fancy programming using Omnis Studio method code! Another useful thing is that we can display these descriptive strings no matter what the data type of the associated variable! So fields used to represent Number and Date-Time variables can now also be internally labeled as easily as those used to represent Character variables. But there are a few limitations that we must keep in mind... Limitations On Using $contenttipFirst, $contenttip is only a property of an Entry field. Neither Masked Entry nor Multiline Entry contain this property. Obviously, a content tip would interfere with any input mask we might use in a Masked Entry field, so this is not surprising. But even those masked fields where we only want to use the display mask feature (such as fields representing Number and/or Date-Time variables) cannot display content tips. Ah well, we can't have everything! Still it might be nice to have a content tip for a multi-line entry field occasionally. And there is a "trick" to using $contenttip with numeric variables: The $zeroempty property for the field should be set to kTrue. Otherwise the 0 character that is displayed by default (for both 0 and NULL) is enough to displace the content tip. But even if $zeroempty is set to kFalse, the content tip will appear if all digits in the field are removed (using the Backspace key or some equivalent action). So we could remove a zero on entering the field using Notation if we really want to do so:
(Note the use of the new isclear() function that tests, in this case, whether the variable is zero or NULL. Another very handy improvement!) The zero re-establishes itself automatically when the focus leaves the field if the user has not supplied any digits in such cases. Content tip strings do not support square bracket notation. They simply report exactly the string value we put into the $contenttip property (square brackets included). But the most troublesome aspect of this property (to me, at least) is that the field continues to display the content tip all the time, as long as its associated variable remains empty. While it is useful during data entry, a content tip is somewhat in the way when we are just viewing a record. (Less so because it is displayed in greyed text, but still...) If a field is truly empty, let's see it that way when we are just viewing the record! We have not been given any other field, window, library or global Omnis Studio properties to control this behavior (like $nocontenttipifdisabled or something similar), so we must still do a bit of coding to give ourselves a cleaner interface. Again, this is only a matter of personal preference - but I have that preference, so let's look at how we can make this property work more flexibly... Making Content Tips Work Like We WantWhat if we don't want these content tip strings displayed in empty Entry fields all the time? The simplest thing is to swap the property values out for empty strings. Of course, the trick is then to get the proper $contenttip values put back into our Entry fields when we need them! Let's examine a couple of scenarios: First, let's suppose we only want to display the content tips while in a data entry mode. This can either be during the operation of the Enter data command or on a "modeless" window where we switch on and off the $enabled property of our entry fields for insert and update operations. We would want to do this whenever the window is "at rest" (not enterable), so we might want to perform this action in the $construct method of the window. For a modal window (one that requires the execution of the Enter data command to allow data entry in otherwise enterable fields), we just need to remove the content tip. This can be performed using a simple $sendall() as follows:
If we prefer to build our window with its $modelessdata property set to kTrue (the default), then we might also want to disable the Entry fields at the same time:
When the user indicates they want to perform an operation that requires data entry, we would then need to retrieve the original $contenttip values for all of our Entry fields. To do this, we must go back to the Window class objects that contain these in their definitions:
Note the use of $sendallref to retrieve the $ident value for each field so that we can retrieve the $contenttip value for each field from the corresponding field in the window class. For more information on using $sendall(), see the following article in Omnis Tech News published 8 September, 2006 and available here. Another scenario that we might encounter is as follows: Suppose we only want to display the content tip for a field if that field is enabled (and its associated variable is empty or NULL, of course). We could set its $statusevents property value to kTrue (or switch it on for the entire library) and then put the following code segment into its $event method:
Finally, suppose that we want to localize our content tips depending upon the language selection that a user makes as they open our application (or even as they switch languages during use of the application). We could extend the techniques given here to provide multiple language support. There are a number of variations as to how we might do this and where the language-specific strings might be stored, but the easiest of these would be to use the string table facilities of Omnis Studio. We could then store the string ID value for a given field in its $contenttip property at the class level (or the $userinfo property or in a comment line in a separate method of the field, etc.) and use that value to retrieve the appropriate string for the currently selected language as the field in a window instance is enabled. Because of all the variations involved (and all of the additional things that I would need to explain or demonstrate), I will leave that exercise to your own ingenuity - or for some future article... In The Next Issue...There are so many new features - and even more coming soon in version 4.3.1 for the Mac OS X platform - that it is difficult to choose. So I have decided to stay with Window class objects for a bit and discuss the new Radio Button Group object (and perhaps others) in the next article. But I will soon revisit the new and improved Graph2 component since many enhancement requests have been answered on that one since I wrote about it last! Stay tuned!
|
|
| © 2008
Copyright of the text and images herein remains with the respective
author. No part of this newsletter may be reproduced, transmitted,
stored in a retrieval system or translated into any language in any
form by any means without the written permission of the author or
Omnis Software. Omnis® and Omnis Studio® are registered trademarks, and Omnis 7™ is a trademark of Omnis Software UK Ltd. Other products mentioned are trademarks or registered trademarks of their corporations. All rights reserved. |


 Please logon or create a free account to download this file.
