Omnis Technical Note TNJC0015Nov 2021
Adding Signature Capture to Omnis using a JSON Component
for Omnis Studio 10.x or above
By Omnis Engineering
As well as having all the tools you need to build Web and Mobile apps straight ‘out of the box’, another major strength of Omnis Studio is its ability to integrate many other technologies, tools and third-party components to extend the power and flexibility of your applications. For example, you can add third-party JavaScript controls to your web and mobile apps by wrapping those JS controls in a JSON component which can then be added to a Remote form in Omnis. This Tech note describes how you can take a Signature Capture JS control and add it to a remote form – the original third-party JS component was ‘signature pad’ by Szymon Nowak available from: https://github.com/szimek/signature_pad
In addition to capturing a signature, the same component could be used to capture any hand drawn image, such as a sketch – the base JavaScript code used in the Omnis JS Signature control uses variable width Bézier curve interpolation giving an authentic hand drawn style.
This Tech note shows how you can use a ready-made JSON component, that we already created in Omnis, but you make your own using the JSON Component Editor – to do this you can refer to another Tech note: 'Adding Ready-made JavaScript components to Omnis': TNJC0009
Source Files
You can download the necessary files in the following archive, including a demo Omnis library: omnis-signature.zip, then follow the steps below to setup the JS Signature control.
Alternatively, you can download the files from our GitHub repo: https://github.com/OmnisStudio/Omnis-Signature where you may find other components that interest you. (If you are using GitHub, use the ‘Dowload ZIP’ option on the green 'Code' button and follow the instructions on that page, including the steps to import the Omnis library from the JSON source.)
Set up the Signature Component
To setup the Signature component, ensure Omnis Studio is closed.
Place the folder net.omnis.signature into the \html\controls (not \htmlcontrols) of your Omnis Studio tree, first creating the folder if it does not already exist.
Copy ctrl_net_omnis_signature.js and signature_pad.js into \html\scripts of your Omnis Studio tree.
Add the following lines to your \html\jsctempl.htm file under the Omnis Studio JavaScript client scripts comment (this ensures the JavaScript code is referenced when Omnis creates the test HTML page):
<script type="text/javascript" src="scripts/signature_pad.js"></script> |
Place the jssignature.lbs library in your Omnis tree, start Omnis Studio and open the library.
Locate the jsSignature remote form, open it in design mode and examine the components on the form, including the Signature control (yellow rectangle); note that the Signature component has been added to the Component Store under the JSON Components tab (if it is not there, check the steps above).
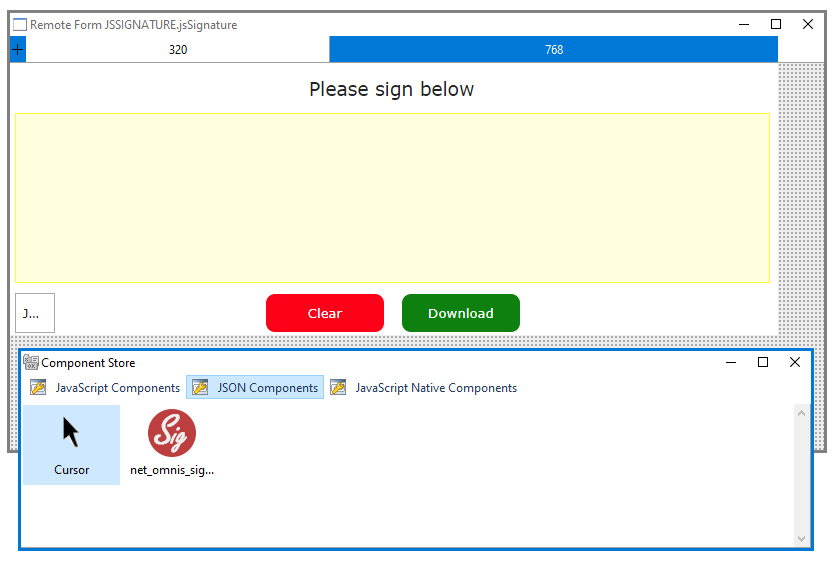
Click on the Signature control in the Remote form and examine its properties under the Signature tab in the Property Manager. Look at the code behind the Download and Clear buttons (double-click to open the method editor), including the downloadImage class method, which takes the data from the Signature control and saves the image into a file, ready to download using the jsFile control (which is located in the lower left corner of the form).
Do iJSFileRow.$define(iJSFileName, iJSMediaType, iJSVariableName) |
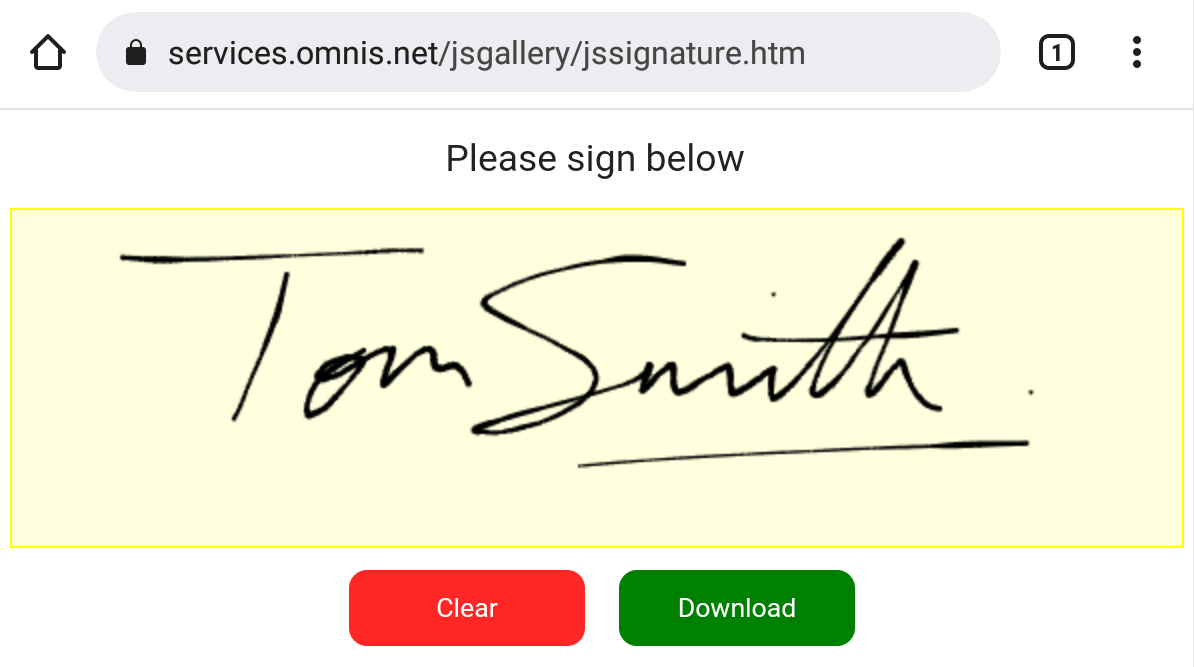
You can test the form using the Ctrl/Cmnd-T option, or use the live demo (see below). The remote form will open in your default web browser, and you can write your signature into the signature field. The Download button will download the image as a JPG to your desktop/Download folder, which could be adapted to add the image to a database, such as a customer record.
Live Demo
You can try out the Signature component in a live demo hosted on an Omnis service at: https://services.omnis.net/jsgallery/jssignature.htm
Try signing your name and download your signature in jpg format.

 Facebook
 Github
 Instagram
 Linkedin
 Twitter
 Youtube
 Please logon or create a free account to download this file.
